Wednesday, September 30, 2009

Faux Fried Chicken and Hoecakes

Matt pointed out Art Smith's recipe for Barbecue Chicken Hoecakes in this month's Bon Appetit to me while I was planning this week's menu. He said he was mostly interested in the hoecakes. I thought they would be good with a little maple syrup in them with some fried chicken, I don't know why but it made me think of chicken & waffles.
Faux Fried Chicken & hoecakes
For the chicken, I cooked up two breasts using this Faux Fried Chicken method. I kept the seasoning simple by just adding salt, pepper & fresh thyme to the breading. This is really just the best baked chicken.

We ended up having to make the hoecakes twice. The first time the batter was just too runny & never set while cooking. The second time we added more flour & that seemed to do the trick. They were really tasty with the chicken. Matt said it was like a quick version of cornbread & he liked them with butter. I though they were good just eaten with a piece of chicken, though a little more maple syrup would be good too.

Maple Hoecakes
(adapted from an Art Smith Recipe in Bon Appetit Sept. '09)

1/4 c yellow cornmeal
1/4 c all-purpose flour
2 t sugar
1/2 t baking powder
1/4 t salt
1/4 c water
1 t maple syrup
1/2 T unsalted butter, melted

Mix the cornmeal, flour, sugar, baking powder and salt together. Whisk in the water, maple syrup and melted butter.

Heat a griddle over medium-high heat. Coat it with a little butter. Spoon the cornmeal batter on into four pancakes, spreading the dough out. Allow to cook until brown & then flip & cook until the other side is brown, about 5 minutes total.

Makes 4 cakes.

Matt made the Creamed Chard side dish & it was wonderful. He sautéed chopped chard leaves with some crushed garlic until wilted. Then he mixed in some half & half & Parmesan cheese. Let it reduce a bit & its ready.

If you are not reading this post in a feed reader or at http://agoodappetite.blogspot.com OR at http://agoodappetite.com then the site you are reading is illegally publishing copyrighted material. Contact me at katbaro AT yahoo DOT COM. All recipes, text and photographs in this post are the original creations & property of the author unless otherwise noted.
© 2007-2009 Kathy Lewinski

Monday, September 28, 2009

Weekly Menu 9/27 - 10/3

Fall is finally in the air here in Minneapolis.
Fall
The leaves are starting to fall & the asters are in bloom.
Chomp chomp chomp
The squirrels are busily stripping our neighbor's tree of black walnuts & leaving piles of shells everywhere (plus filling the air with the sounds of their chomping).

Really what it means for us is the return of cold weather food favorites as seen in this week's Menu Planning Monday...

Stuffed Maple Burger with Spicy Apple Bacon Compote

Roast Chicken & Vegetables

Homemade Chicken Noodle Soup - Using the leftover chicken, of course

Swedish Meatballs or Tamales (I'm home alone so whichever item in the freezer appeals to me the most.)

Grown-up Mac & Cheese - The cherry tomatoes are done for the year I think so I'll just add some chopped romas

Two Bean Beef Chili

If you are not reading this post in a feed reader or at http://agoodappetite.blogspot.com OR at http://agoodappetite.com then the site you are reading is illegally publishing copyrighted material. Contact me at katbaro AT yahoo DOT COM. All recipes, text and photographs in this post are the original creations & property of the author unless otherwise noted.
© 2007-2009 Kathy Lewinski

Sunday, September 27, 2009

Daring Bakers - Vols-au-Vent

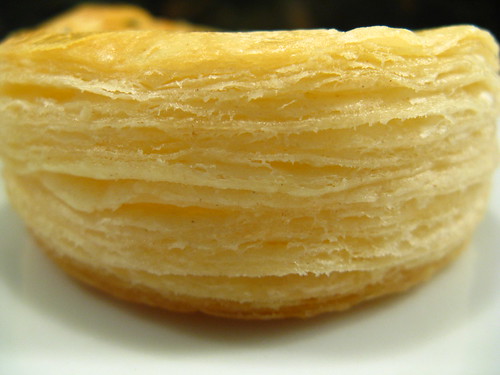
The September 2009 Daring Bakers' challenge was hosted by Steph of A Whisk and a Spoon. She chose the French treat, Vols-au-Vent based on the Puff Pastry recipe by Michel Richard from the cookbook Baking With Julia by Dorie Greenspan. When I first saw it I groaned at the thought of making puff pastry from scratch. Then Matt reminded me I'd basically already made puff pastry for the Danish Braid challenge. Ok, I figured if I'd done it once I can do it again and here's the flaky layers to prove it.
IMG_6126
I decided if I was going to take the time to make puff pastry I was going to use the best butter possible which to us means the locally produced Hope Butter. (Seriously, this is the best butter ever!) It was worth it, Matt took one bite of the finished pastry & declared it the best puff pastry he'd ever had.
Vols-au-Vent
I did a pretty basic filling for it. Cooked chicken with mixed vegetables in a white wine & cream sauce with just a tough of whole grain mustard in it. Simple, comforting & satisfying.

Vols-au-Vent
I did 1/4th of this recipe which gave me 4 vols-au-vent & lots of scraps. My notes are in italics throughout the recipe.

Prep Times:
-about 4-5 hours to prepare the puff pastry dough (much of this time is inactive, while you wait for the dough to chill between turns…it can be stretched out over an even longer period of time if that better suits your schedule)
-about 1.5 hours to shape, chill and bake the vols-au-vent after your puff pastry dough is complete

Michel Richard’s Puff Pastry Dough
From: Baking with Julia by Dorie Greenspan

Yield: 2-1/2 pounds dough


2-1/2 cups (12.2 oz/ 354 g) unbleached all-purpose flour I used 1/2 c plus 2 T

1-1/4 cups (5.0 oz/ 142 g) cake flour
 I used 1/4 c plus 1 T
1 tbsp. salt (you can cut this by half for a less salty dough or for sweet preparations)
 I used 1/2 t
1-1/4 cups (10 fl oz/ 300 ml) ice water
 I used 1/4 c plus 1 T
1 pound (16 oz/ 454 g) very cold unsalted butter I used 1/4 lb
plus extra flour for dusting work surface

Mixing the Dough:
Put the all-purpose flour, cake flour, and salt in the work bowl of a food processor fitted with a metal blade and pulse a couple of times just to mix. Add the water all at once, pulsing until the dough forms a ball on the blade. The dough will be very moist and pliable and will hold together when squeezed between your fingers. (Actually, it will feel like Play-Doh.)
Remove the dough from the machine, form it into a ball, with a small sharp knife, slash the top in a tic-tac-toe pattern. Wrap the dough in a damp towel and refrigerate for about 5 minutes.

Meanwhile, place the butter between 2 sheets of plastic wrap and beat it with a rolling pin until it flattens into a square that's about 1" thick. Take care that the butter remains cool and firm: if it has softened or become oily, chill it before continuing. Make sure your butter isn't too cold either. Mine was a little hard & broke through the dough right away. I had to start over with fresh dough & just made sure the butter wasn't still frozen

Incorporating the Butter:
Unwrap the dough and place it on a work surface dusted with all-purpose flour (A cool piece of marble is the ideal surface for puff pastry) with your rolling pin (preferably a French rolling pin without handles), press on the dough to flatten it and then roll it into a 10" square. For 1/4 of the recipe I only made a 2.5 inch square. Keep the top and bottom of the dough well floured to prevent sticking and lift the dough and move it around frequently. Starting from the center of the square, roll out over each corner to create a thick center pad with "ears," or flaps.

Place the cold butter in the middle of the dough and fold the ears over the butter, stretching them as needed so that they overlap slightly and encase the butter completely. (If you have to stretch the dough, stretch it from all over; don't just pull the ends) you should now have a package that is 8" square. I ended up with a 2" square.

To make great puff pastry, it is important to keep the dough cold at all times. There are specified times for chilling the dough, but if your room is warm, or you work slowly, or you find that for no particular reason the butter starts to ooze out of the pastry, cover the dough with plastic wrap and refrigerate it . You can stop at any point in the process and continue at your convenience or when the dough is properly chilled.

Making the Turns:
Gently but firmly press the rolling pin against the top and bottom edges of the square (this will help keep it square). Then, keeping the work surface and the top of the dough well floured to prevent sticking, roll the dough into a rectangle that is three times as long as the square you started with, about 24" (don't worry about the width of the rectangle: if you get the 24", everything else will work itself out.) For 1/4 of the dough I made sure the longest side was 6" long. With this first roll, it is particularly important that the butter be rolled evenly along the length and width of the rectangle; check when you start rolling that the butter is moving along well, and roll a bit harder or more evenly, if necessary, to get a smooth, even dough-butter sandwich (use your arm-strength!). I found I had to pound the dough & butter to get it all spread without ripping the dough.

With a pastry brush, brush off the excess flour from the top of the dough, and fold the rectangle up from the bottom and down from the top in thirds, like a business letter, brushing off the excess flour. You have completed one turn. I found it better to chill the dough for 30 minutes at this point & then do the second turn.

Rotate the dough so that the closed fold is to your left, like the spine of a book. Repeat the rolling and folding process, rolling the dough to a length of 24", or 6" in my case, and then folding it in thirds. This is the second turn.

Chilling the Dough:
If the dough is still cool and no butter is oozing out, you can give the dough another two turns now. Once again I only did one turn & chilled it for 30 minutes between turned. The dough got easier to work with each time. If the condition of the dough is iffy, wrap it in plastic wrap and refrigerate it for at least 30 minutes. Each time you refrigerate the dough, mark the number of turns you've completed by indenting the dough with your fingertips. It is best to refrigerate the dough for 30 to 60 minutes between each set of two turns.

The total number of turns needed is six. If you prefer, you can give the dough just four turns now, chill it overnight, and do the last two turns the next day. Puff pastry is extremely flexible in this regard. However, no matter how you arrange your schedule, you should plan to chill the dough for at least an hour before cutting or shaping it.

Forming and Baking the Vols-au-Vent:
Yield: 1/3 of the puff pastry recipe below will yield about 8-10 1.5” vols-au-vent or 4 4” vols-au-vent
In addition to the equipment listed above, you will need:
-well-chilled puff pastry dough (recipe below)
-egg wash (1 egg or yolk beaten with a small amount of water)
-your filling of choice

Line a baking sheet with parchment and set aside.

Using a knife or metal bench scraper, divided your chilled puff pastry dough into three equal pieces. Work with one piece of the dough, and leave the rest wrapped and chilled. (If you are looking to make more vols-au-vent than the yield stated above, you can roll and cut the remaining two pieces of dough as well…if not, then leave refrigerated for the time being or prepare it for longer-term freezer storage.

On a lightly floured surface, roll the piece of dough into a rectangle about 1/8 to 1/4-inch (3-6 mm) thick. Transfer it to the baking sheet and refrigerate for about 10 minutes before proceeding with the cutting.

(This assumes you will be using round cutters, but if you do not have them, it is possible to cut square vols-au-vents using a sharp chef’s knife.) For smaller, hors d'oeuvre sized vols-au-vent, use a 1.5” round cutter to cut out 8-10 circles. For larger sized vols-au-vent, fit for a main course or dessert, use a 4” cutter to cut out about 4 circles. Make clean, sharp cuts and try not to twist your cutters back and forth or drag your knife through the dough. Half of these rounds will be for the bases, and the other half will be for the sides. (Save any scrap by stacking—not wadding up—the pieces…they can be re-rolled and used if you need extra dough. If you do need to re-roll scrap to get enough disks, be sure to use any rounds cut from it for the bases, not the ring-shaped sides.)

Using a ¾-inch cutter for small vols-au-vent, or a 2- to 2.5-inch round cutter for large, cut centers from half of the rounds to make rings. These rings will become the sides of the vols-au-vent, while the solid disks will be the bottoms. You can either save the center cut-outs to bake off as little “caps” for you vols-au-vent, or put them in the scrap pile.

Dock the solid bottom rounds with a fork (prick them lightly, making sure not to go all the way through the pastry) and lightly brush them with egg wash. Place the rings directly on top of the bottom rounds and very lightly press them to adhere. Brush the top rings lightly with egg wash, trying not to drip any down the sides (which may inhibit rise). I used my finger tip to egg wash the rings, this gave me better control than a brush & prevented drips. If you are using the little “caps,” dock and egg wash them as well.

Refrigerate the assembled vols-au-vent on the lined baking sheet while you pre-heat the oven to 400ºF (200ºC). (You could also cover and refrigerate them for a few hours at this point.)

Once the oven is heated, remove the sheet from the refrigerator and place a silicon baking mat (preferred because of its weight) or another sheet of parchment over top of the shells. I used a silicon baking pad to do this & it actually stuck to the top layer of my vols-au-vent making it really hard to remove. I also don't think it helped give me an even rise. This will help them rise evenly. Bake the shells until they have risen and begin to brown, about 10-15 minutes depending on their size. Reduce the oven temperature to 350ºF (180ºC), and remove the silicon mat or parchment sheet from the top of the vols-au-vent. If the centers have risen up inside the vols-au-vent, you can gently press them down. Continue baking (with no sheet on top) until the layers are golden, about 15-20 minutes more. (If you are baking the center “caps” they will likely be finished well ahead of the shells, so keep an eye on them and remove them from the oven when browned.) My caps cooked the exact same amount of time as my shells.

Remove to a rack to cool. Cool to room temperature for cold fillings or to warm for hot fillings. Fill and serve.

*Shaped, unbaked vols-au-vent can be wrapped and frozen for up to a month (bake from frozen, egg-washing them first).

If you are not reading this post in a feed reader or at http://agoodappetite.blogspot.com OR at http://agoodappetite.com then the site you are reading is illegally publishing copyrighted material. Contact me at katbaro AT yahoo DOT COM. All recipes, text and photographs in this post are the original creations & property of the author unless otherwise noted.
© 2007-2009 Kathy Lewinski

Saturday, September 26, 2009

A little shameless self-promotion

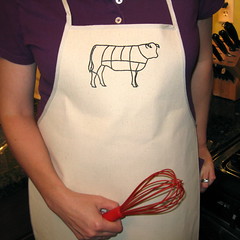
Some of you may know I have an Etsy store where I sell mainly hand embroidered throw pillows & other decorative goods. Well, recently I've added hand embroidered aprons to the mix & I thought all you foodies might get a kick out of them.
PIg Parts ApronPig Parts Apron
This one I call the Other White Meat Apron and is currently available in red & black.
It's What's For Dinner Apron - NaturalIt's What's For Dinner Apron - Natural
I call this one the It's What's For Dinner Apron. It's only in natural right now though black will be available soon too.
They are 100% cotton & cost $15 each plus shipping.
I also do custom embroidered aprons such as these...
Susi's Apron close upRob's Apron close upapron
So, if you have an idea for yourself or as gift let me know.

If you are not reading this post in a feed reader or at http://agoodappetite.blogspot.com OR at http://agoodappetite.com then the site you are reading is illegally publishing copyrighted material. Contact me at katbaro AT yahoo DOT COM. All recipes, text and photographs in this post are the original creations & property of the author unless otherwise noted.
© 2007-2009 Kathy Lewinski

Friday, September 25, 2009

What we did with CSA box #10 and what's in box #11


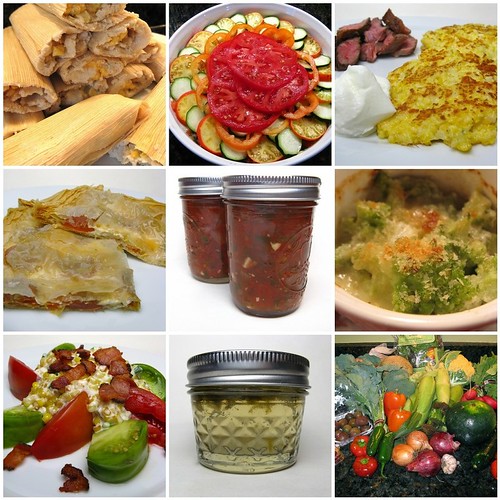
What we did with CSA box 10
1. sweet corn tamales 2. using up the veggies ratatouille 3. Cheesy Cauliflower Pancakes 4. Cherry Tomato & Goat Cheese Pie 5. smoked tomato salsa 6. baked cheesy broccoli romanesco 7. tomato, corn & bacon salad 8. hot pepper jelly 9. The box

And CSA box #11
CSA box #11
Tomatoes - I have a bunch more ripe in the garden too so I'll probably can them.
Jalapenos - Salsa!
Ukraine Peppers - I might use these in the tomato sauce
Garlic
Parsley Root - I really thought these were parsnips but I guess this is a new vegetable to our CSA boxes. Apparently it is best used in soups & stews so I'll make some soup this week & freeze the rest.
Raspberries - These will get frozen with the last boxes batch to use in raspberry apple sauce.
Lettuce - for sandwiches & a salad nicoise salad
Spinach - I'll use this in soup
Celeriac - Our newsletter suggests fritters & that sounds too good not to try
Broccoli - Matt is addicted to broccoli, bacon & raisin salad for lunch so that will use the bulk of this.

Find more ideas on using your CSA box at Cooking Away My CSA

If you are not reading this post in a feed reader or at http://agoodappetite.blogspot.com OR at http://agoodappetite.com then the site you are reading is illegally publishing copyrighted material. Contact me at katbaro AT yahoo DOT COM. All recipes, text and photographs in this post are the original creations & property of the author unless otherwise noted.
© 2007-2009 Kathy Lewinski

Wednesday, September 23, 2009

Cheesy Cauliflower Pancakes

A couple weeks ago Giz over at Equal Opportunity Kitchen posted a recipe for Cauliflower Pancakes. They sounded & looked wonderful to me so the head of yellow cauliflower in our fridge was quickly marked for pancakes. When I mentioned them in my weekly menu Dawn at Vanilla Sugar said she hoped there would be cheese in them. Well that was like a light bulb going on over my head. Of course there would be cheese in them! Cheese & cayenne!
Cheesy Cauliflower Pancakes
These were such a simple side dish & a great use for cauliflower (it seems we always end up roasting it). The cheese added a really nice depth of flavor & the cayenne just gave that bit of heat at the back of the throat.
Cheesy Cauliflower Pancakes
I liked them with a little sour cream to dip them in while Matt preferred them with a little more cheese grated over the top.

Cheesy Cauliflower Pancakes

1 head cauliflower
2 large eggs
1/2 c cheddar cheese, grated
1/2 c panko
1/2 t cayenne pepper (more of less to taste)
salt
olive oil

Cut cauliflower into florets & cook in boiling water until tender about 10 minutes. Drain. Mash the cauliflower while still warm. Stir cheese, eggs, panko, cayenne & salt to taste.

Coat the bottom of a griddle or skillet with olive oil over medium-high heat. Form the cauliflower mixture into patties about 3 inches across. Cook until golden brown & set, about 3 minutes per side. Keep each batch warm in the oven while you cook the rest.

Makes 8 pancakes

If you are not reading this post in a feed reader or at http://agoodappetite.blogspot.com OR at http://agoodappetite.com then the site you are reading is illegally publishing copyrighted material. Contact me at katbaro AT yahoo DOT COM. All recipes, text and photographs in this post are the original creations & property of the author unless otherwise noted.
© 2007-2009 Kathy Lewinski

Tuesday, September 22, 2009

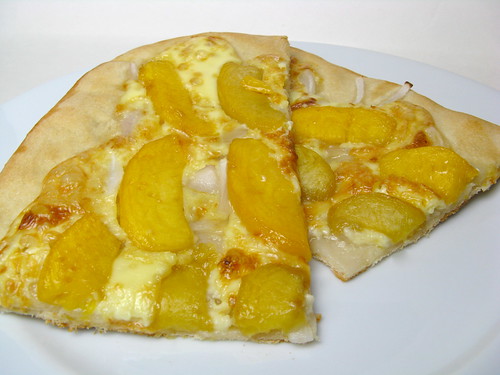
Bourbon-Poached Peaches and Brie Pizza

This pizza was inspired by a hamburger. Ok, I know that sounds really strange but we were watching the Diners, Drive-ins & Dive one night & saw this burger topped with a bourbon poached peach. We both thought the peach sounded great & would be perfect on a pizza with a good stinky brie.
Bourbon-Poached Peaches & Brie Pizza
This seems like it would be a dessert pizza but it was really quite savory. The sweetness of the peach is tempered by the bourbon & the brie. Onion adds a nice bit of sharpness. I would have also put some arugula on this if we had had any in the house.
Bourbon-Poached Peaches & Brie Pizza
Save any peach slices you don't use & the bourbon to pour over ice cream.

Bourbon-Poached Peaches & Brie Pizza

2 peaches, peeled & sliced
1/2 c bourbon
2 T sugar
1/2 batch of our favorite pizza dough
1/4 c thinly sliced red onion
6 oz brie

Preheat oven to 450F.

Put bourbon & sugar in a small saucepan & bring to a simmer over medium heat. Stir to dissolve sugar. Add the peaches & simmer for about 10 - 15 minutes until soft, stirring from time to time.

Spread pizza dough out on a greased baking sheet. Top with onions, brie & peaches. Bake for 15 minutes until top & crust are golden brown.

Serves 2

If you are not reading this post in a feed reader or at http://agoodappetite.blogspot.com OR at http://agoodappetite.com then the site you are reading is illegally publishing copyrighted material. Contact me at katbaro AT yahoo DOT COM. All recipes, text and photographs in this post are the original creations & property of the author unless otherwise noted.
© 2007-2009 Kathy Lewinski

Monday, September 21, 2009

Weekly Menu 9/21 - 9/25 and Tamales

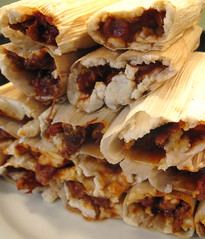
Matt & I spent this Saturday morning filling our freezer with some homemade tamales. Matt thought the leftover smoked pork would make for the start of a great filling. We also had some sweet corn in the fridge to make the corn & cheese version.
Smoked Pork TamalesSweet Corn Tamales
We first made tamales last year when it was a Recipes to Rival challenge. We were really pleased with the results & how easy they actually were to make. The pork filling Matt made this time was so amazing I thought I'd share the recipe. It would also be good as a filling for tacos. Visit our original tamale post to get the recipe for the corn & cheese filling. The recipe for the masa dough & how to assemble & cook tamales is here. We freeze the tamales in freezer bags of two & them microwave them on high for 3 minutes when we want to eat them.
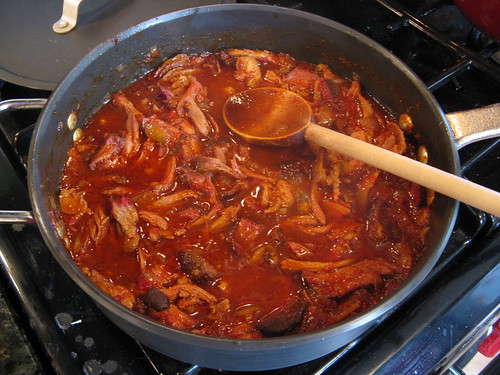
Smoked Pork Filling

Red Chile Pork Filling

2 dried ancho chiles, seeded & roughly chopped
2 dried guajillo chiles, seeded & roughly chopped
2 c boiling water
3 T vegetable oil
2 medium tomatoes, peeled
1 small onion, finely diced
1/2 t ground cumin
1/4 t black pepper
1/4 t dried oregano
4 cloves garlic, peeled
2 - 3 c pulled pork*
salt to taste

Put the chiles in a bowl & cover with the boiling water. Let sit for 15 minutes.

Meanwhile, heat the oil in a large, straight sided skillet over medium-high heat. Add the tomatoes, onion, cumin, pepper and oregano. Let cook for 10 minutes stirring from occasionally & crushing the tomatoes with your spoon.

Put the soaked chiles, the soaking water & garlic into a food processor or blender. Process until smooth. Add to the onion & tomato mixture. Stir in the pork & salt to taste. Bring to a boil. Reduce heat & simmer for about 30 minutes until reduced.

Makes enough filling for about 15 tamales.

(*If you don't have cooked pulled pork, sear a pork shoulder then braise until cooked about 1 1/2 hours. Shred & stir into the sauce.)

On to Menu Planning Monday...

Recipes to Rival Challenge (so I can't tell)

Dinner & a movie out

BLTs - Trying to enjoy the tomatoes while they last

Oven Fried Chicken & Hoecakes

Chicken Pot Pie

If you are not reading this post in a feed reader or at http://agoodappetite.blogspot.com OR at http://agoodappetite.com then the site you are reading is illegally publishing copyrighted material. Contact me at katbaro AT yahoo DOT COM. All recipes, text and photographs in this post are the original creations & property of the author unless otherwise noted.
© 2007-2009 Kathy Lewinski

Sunday, September 20, 2009

Using Up The Veggies Ratatouille

Our CSA boxes right now are just overflowing with amazing produce, almost too much for the two of us to eat before it goes bad. Usually my solution for that is to make a stir-fry but then I saw Sarah at What Smells So Good's Vive Le Jardin Ratatouille & knew I had to try it.
Ratatouille Cooked
We had everything in house to make it; zucchini, eggplants, tomato, peppers & onion. The colors were amazing especially since we used a Ukrainian Orange Pepper & Turkish Orange Eggplants.
Ratatouille ready for the oven
(It looked so amazing before cooking I had to photograph it)

I followed the recipe pretty exactly except I didn't have dried Herbes de Provence but I did have basil, savory & thyme in the garden so I used those fresh herbs instead. This version of ratatouille require you to do a lot less pre-cooking of the vegetables than others I've seen which is a great time saver. The flavors were amazing, especially that beautiful heirloom tomato. Everything got soft & blended together on the plate. We served ours over a bed of rice for a really filling meal. So, if you've got a crisper full of vegetables that need to be used I highly recommend you visit Sarah's site & try this recipe.

If you are not reading this post in a feed reader or at http://agoodappetite.blogspot.com OR at http://agoodappetite.com then the site you are reading is illegally publishing copyrighted material. Contact me at katbaro AT yahoo DOT COM. All recipes, text and photographs in this post are the original creations & property of the author unless otherwise noted.
© 2007-2009 Kathy Lewinski
Friday, September 18, 2009

Smoked Tomato Salsa

Last week one of my Flickr friends posted some roasted tomato salsa he had canned. He said it was his favorite with just the right amount of spice so I asked him to share the recipe since Matt loves salsa so much. Then I started thinking why not smoked the tomatoes instead of just roasting them. I figured that added smoky flavor would be great in salsa.
Smoked Tomato Salsa
I also decided to use all fresh peppers instead of dried because we had them in the garden. This is a really tasty salsa. There is just a hint of smokiness & a nice bite from the peppers. It does take a few steps but its worth it.

Smoked Tomato Salsa

6 lbs plum tomatoes, halved & seeded (you can peel them now if you want)
9 hot chiles, seeded
15 cloves of garlic, unpeeled
3 c red onion, chopped
6 jalapenos, seeded & diced
1 1/2 T reserved tomato juice
1 bunch cilantro, chopped (between 1 and 1 1/2 c)
1 T kosher salt
3/4 t crushed red pepper flakes
3/4 c red wine vinegar

Place the tomatoes in a disposable pan or make on from tin foil. Let smoke for 2 1/2 - 3 hours until vert soft. Run through a food mill or slide the skins off with your hands & mash the tomatoes a bit.

Put the hot chiles & 1 T water in a food processor & blend until smooth. Set aside.

Heat a small skillet over medium-high heat. Add the unpeeled garlic gloves & sauté for 10 - 15 minutes until the skins are brown & the cloves soft. Peel & mince the cooked garlic. Set aside.

Prepare seven 1/2 pint jars & lids by boiling the jars for 20 minutes & the lids for 5 minutes.

Heat a large enamel or stainless steel saucepan over medium-high heat. Add the garlic, onions, jalapenos & reserved tomato juice. Sauté for 10 - 15 minutes until soft. Add the hot chiles, cilantro, salt, red pepper flakes and vinegar. Cook for another 10 minutes or until thickened. Add the tomatoes & bring to a boil. Cook to desired consistency.

Ladle the salsa into the hot jars. Wipe the jar rims. Put the lids on top & hand tighten the neckbands. Process in boiling water for 15 minutes. Turn off heat & let sit 5 more minutes. Remove the jars to a rack to cool for 12 - 24 hours. Lids of the jars should pop & pull downwards. Any jars that do not pop should either be reprocessed or put in the fridge to use.

Makes 7 cups

I'm submitting to the "Homemade Food Event" Ben hosts over at What's Cooking. This month's them is Salsa so join the fun.

Since we had our new "El Cheapo" Smoker going it only made since to smoke a piece of meat on the other rack. We put in a pork butt to smoke for 8+ hours after letting it sit all night with a chili rub on it.
Smoked Pork ButtSmoked Pork Butt
It came out tender & juicy & just look at those pink smoky bits!

If you are not reading this post in a feed reader or at http://agoodappetite.blogspot.com OR at http://agoodappetite.com then the site you are reading is illegally publishing copyrighted material. Contact me at katbaro AT yahoo DOT COM. All recipes, text and photographs in this post are the original creations & property of the author unless otherwise noted.
© 2007-2009 Kathy Lewinski

Thursday, September 17, 2009

Cherry Tomato and Goat Cheese Pie

The hot weather continues in Minneapolis so light meals are in order. With all the beautiful tomatoes in season right now, I decided a tomato tart with a salad would hit the spot. Well, I originally planned for this to be an open-faced tart but as I was making it thought why not top it with more crispy phyllo and make it a pie. Really can you have enough flakey, crispy phyllo?
Cherry Tomato & Goat Cheese Pie
(I wished this looked as good as it tasted!)

Use the most flavorful tomatoes you can get for this dish, they will make all the difference. I used black cherry tomatoes but you can really use whatever you have.

Cherry Tomato and Goat Cheese Pie

9 sheets of phyllo dough
oil olive
1/2 t dried basil
2 oz goat cheese
8 - 10 cherry tomatoes, sliced
salt & pepper

Preheat oven to 350 F.

Lay one sheet of phyllo dough on a silcon pad or greased baking pan. Brush with olive oil. Place another sheet on top & brush with olive oil. Repeat with another sheet. Sprinkle with basil. Top with another sheet of phyllo & brush with olive oil. Repeat with two more sheet of phyllo brushing with olive oil between each sheet. Crumble goat cheese on top leaving a 1-inch border on all sides. Top the goat cheese with the tomato slices. Season with salt & pepper. Top with a sheet of phyllo dough. Brush with olive oil. Repeat with two more sheets of phyllo brushing with olive oil between each sheet. Fold the edges over 1/2-inch sealing the edges.

Bake for 25 - 30 minutes until crispy & brown.

2 servings.

If you are not reading this post in a feed reader or at http://agoodappetite.blogspot.com OR at http://agoodappetite.com then the site you are reading is illegally publishing copyrighted material. Contact me at katbaro AT yahoo DOT COM. All recipes, text and photographs in this post are the original creations & property of the author unless otherwise noted.
© 2007-2009 Kathy Lewinski

Wednesday, September 16, 2009

Hot Pepper Jelly

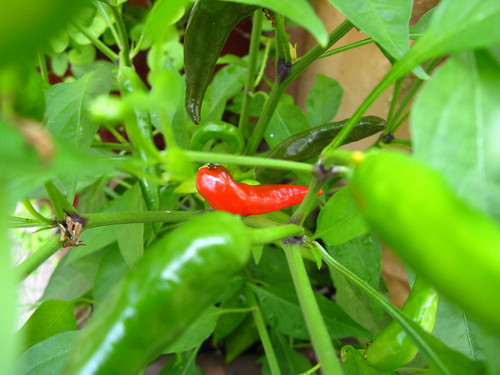
Our pepper plants are really doing very well this year. We almost have too many! (Don' worry I'll make sure they all get used or preserved before the season is up.)
#217 - Red hot
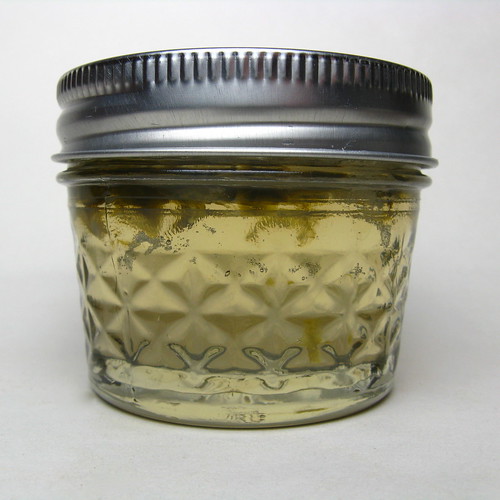
I haven't had hot pepper jelly in years but I remember my mom serving it over cream cheese as an appetizer & it being so good. I decided it was time to add it to our canning repertoire especially when I saw how easy it is to make.
Hot Pepper Jelly
Ok, you can't really see the peppers in this jelly as they are all at the top (Does anyone know how to prevent this?) but believe me they are in there & the flavor is really through the whole jelly. I tasted a little of it from what was leftover in the pan & the flavor is as good as I remembered, slightly hot but sweet at the same time. Actually I think it was even better than I remember. I chose to can this jelly in 4oz jars as it seemed the perfect amount for one appetizer serving to me.

Hot Pepper Jelly
(from The Complete Book of Small-Batch Preserving)

2 large jalapenos, seeded & chopped (about 1/2 c)
3/4 c white wine vinegar
3 c sugar
1 pouch liquid pectin

Prepare seven 4 oz jars & lids by boiling the jars for 20 minutes & the lids for 5.

Place the jalapenos, sugar & vinegar in an enamel or stainless steel saucepan. Bring to a boil over medium high heat while stirring. Let boil for 1 minute, stirring the whole time. Stir in the pectin & bring back to a hard boil. Boil while stirring for 1 more minute.

Skim off foam. Ladle hot jelly into the hot jars leaving 1/4-inch headspace. Wipe the tops of the jars clean. Top with lids & hand tighten on neckbands. Process in boiling water for 10 minutes. Turn off the heat let sit for 5 minutes. Remove jars to a rack & allow to cool untouched for 12 - 24 hours. The lid of the jar should pop & pull downward. Any jar that doesn't pop should either be reprocessed or stored in the fridge.

Makes 3 1/2 cups.

If you are not reading this post in a feed reader or at http://agoodappetite.blogspot.com OR at http://agoodappetite.com then the site you are reading is illegally publishing copyrighted material. Contact me at katbaro AT yahoo DOT COM. All recipes, text and photographs in this post are the original creations & property of the author unless otherwise noted.
© 2007-2009 Kathy Lewinski

Tuesday, September 15, 2009

Tomato, Corn and Bacon Salad

It is still unusually hot & summer-like here in Minneapolis. Typical temperatures this time of year are high 60's & we have been in the mid 80's. It's a good thing for the crops as the cold spring gave everything a late start & many things are ripening late. Tomatoes & sweet corn are two things that came in late this year but are now at their peak & star together in this wonderful main dish salad.
Tomato, Corn & Bacon Salad
Sweet corn is best right now when its had plenty of time to build up the sugars & really live up to its name. Oh & the tomatoes! The two heirlooms from our CSA box couldn't have been more perfectly flavored & textured. The bacon adds a good saltiness to the salad while the fresh jalapeno gives a pleasant heat. The dressing is fantastic, we especially liked the tang of the goat cheese against the sweet corn. Matt was tempted to replace the goat cheese with gorgonzola, which would have been good as well, but we liked the way the goat cheese didn't overpower the other flavors.

The original recipe had to hollow out the tomatoes & serve the corn salad inside which I'm sure would be a pretty presentation. Our heirlooms weren't super pretty for that type of serving so we just sliced them up & placed them on the plate. Plus I think its easier to eat this way.

Tomato, Corn & Bacon Salad
(adapted from a recipe by Tara Mataraza Desmond via Serious Eats)

2 slices bacon, cut into small pieces
kernels from 2 ears of sweet corn
1 jalapeno, seeded & diced
1 clove garlic, chopped
2 scallions, chopped
1/4 c buttermilk
2 oz goat cheese
salt & pepper
2 large heirloom tomatoes, sliced

Cook the bacon until crisp in a skillet over medium heat. Remove to a paper towel to drain leaving about 1 tablespoon of bacon fat in the pan. Add the corn, jalapenos & garlic to the pan & saute for 5 - 7 minutes. (Matt turned the heat up the last minute to brown the corn a little.)

While the corn mixture is cooking, mix the buttermilk & goat cheese together until smooth (a small food processor works well for this). Stir the cooked corn mixture into the dressing. Stir in the scallions & season with salt & pepper.

Divide the tomato slices between two plates. Spoon the corn & dressing over the top. Sprinkle with bacon.

Serves 2

This salad made a very filling meal served with a side of rosemary flatbread.
Flat Bread
Matt made this flatbread by topping our favorite pizza dough with olive oil, salt, fresh rosemary & freshly grated parmesan, yum!

If you are not reading this post in a feed reader or at http://agoodappetite.blogspot.com OR at http://agoodappetite.com then the site you are reading is illegally publishing copyrighted material. Contact me at katbaro AT yahoo DOT COM. All recipes, text and photographs in this post are the original creations & property of the author unless otherwise noted.
© 2007-2009 Kathy Lewinski

Monday, September 14, 2009

Weekly Menu 9/14 - 9/19

The canning continues in full force around Chez Good Appetite. This past Friday my cousin & I headed down to the Minneapolis Farmers Market & picked up 75 pounds of tomatoes (for only $23!). We canned 50 pounds of them as crushed tomatoes to be used in chilis, soups, stews & sauces. She'll can the remaining 25 pounds as a roasted tomato sauce.
IMG_5831
The tomatoes continue to ripen in our garden as well & I'm making a smoked tomato salsa. This is a bit of an experiment but I thought the smokey flavor would be good in salsa.
Smoked Tomato Salsa
The jalapenos are also really doing well this year plus we can buy big amounts of them at the farmer's market for $1. I made a batch of hot pepper jelly this weekend & Matt plans on making his own jalapeno hot sauce.
Hot Pepper Jelly
The next thing on the list (I say that like we actually have a list of what to can) is apple sauce. We'll start with a batch of apple-raspberry and them probably just follow up with some plain.

On to Menu Planning Monday...

Tomato, Corn & Bacon Salad with Flatbread

Smoked Pulled Pork with Cheesy Broccoli Romanesco Bake - moved over from last week since we went out to eat instead

Grilled Steak with Cauliflower Pancakes

Black Cherry Tomato & Goat Cheese Pie

Tamales - We plan on making sweet corn & smoked pork versions

Bourbon-poached Peach and Brie Pizza

Use up all the veggies stir-fry

If you are not reading this post in a feed reader or at http://agoodappetite.blogspot.com OR at http://agoodappetite.com then the site you are reading is illegally publishing copyrighted material. Contact me at katbaro AT yahoo DOT COM. All recipes, text and photographs in this post are the original creations & property of the author unless otherwise noted.
© 2007-2009 Kathy Lewinski

Saturday, September 12, 2009

What we did with CSA box #9 and what's in #10


What we did with CSA9-09
1. Carrot cake 2. Carrot Raisin Salad 3. Sausage & Peppers 4. BST (Bacon, Spinach & Tomato) & roasted potatoes 5. Raspberry Swirl Gelato 6. Tomato Sauce 7. Honey Soy Stir-fry 8. Pasta with Fresh Cherry Tomato Sauce
We still have quite a bit left from this box as we usually have two weeks between boxes.

Box #10 is a doozy....
What's in CSA box 10
Carrots - A have a fridge & freezer full at this point. Need to find more creative recipes for them
Salad Mix
Cauliflower - We like it best roasted
Radishes - Great in stir-fry
Sweet Corn - We'll eat two this week with butter & I'll freeze the rest
Broccoli - Best just steamed
Melon & Watermelon - We've been enjoying the melons in our box as a nice light dessert
Spigarello - Matt wants to see if we like it better cooked in a soup than we did in stir-fry
Edimame - Steamed & salted for a snack. Also been good shelled into stir-fry
Black Cherry Tomatoes - Thinking of using these on a pizza
Raspberries - Matt would like me to make some raspberry applesauce
Pimentos - We used these in the sausage & peppers
Jalapenos - I plan on using these in some roasted tomato salsa
Orange Ukraine Peppers - Think I might do a roasted pepper sauce with these
Onions
Garlic
Zucchini - We'll grill this with the one still left from the last box
Tomatoes - I want more BLTs
Turkish Orange Eggplant - Think we'll try these unusual little eggplants in a stir-fry

Find more ideas on using your CSA box at Cooking Away My CSA

If you are not reading this post in a feed reader or at http://agoodappetite.blogspot.com OR at http://agoodappetite.com then the site you are reading is illegally publishing copyrighted material. Contact me at katbaro AT yahoo DOT COM. All recipes, text and photographs in this post are the original creations & property of the author unless otherwise noted.
© 2007-2009 Kathy Lewinski
Friday, September 11, 2009

MN State Fair 2009

Call us crazy but two days back from India & we were off to the State Fair (I figure after India the heat & crowds at the fair would be nothing). We didn't go on the full-on-eating binge we did last year but we did try a few new treats (some were just new to us not the fair).
Maple SodaSpam CurdsTexas Tornado
Peach Glazed Pig CheeksBacon Lickers
1. Maple Soda - I'm not a fan of maple syrup so this wasn't a favorite of mine. Just not sure maple flavor was meant to be carbonated.
2. Spam Curds - Quite good actually especially dipped in some mustard. The kids with us hated them.
3. Texas Tornado - We went basic & only got this deep fried potato treat seasoned with season salt. Oh, this was good. We could have eaten a couple more.
4. Peach-Glazed Pig Cheeks - Bigger than we expected. Really tender & well cooked with a nice glaze.
5. Pig Lickers - Finally! We couldn't get these frozen pieces of chocolate covered bacon last year because they kept selling out. I knew this would be good from my own chocolate covered bacon experiments. Even the kids loved it.
How are those Bacon Lickers?Who likes Bacon Lickers?
Other than that we just went for some classics like Pronto Pups & Deep Fried Pickles.
Pronto Pups
That should keep out deep-fried-on-a-stick quota filled until State Fair 2010.
Ferris Wheel#247 - Sky Flyer
We'll be back with more recipes soon, I promise. Just having a hard time getting back into the swing of things after the trip.

If you are not reading this post in a feed reader or at http://agoodappetite.blogspot.com OR at http://agoodappetite.com then the site you are reading is illegally publishing copyrighted material. Contact me at katbaro AT yahoo DOT COM. All recipes, text and photographs in this post are the original creations & property of the author unless otherwise noted.
© 2007-2009 Kathy Lewinski

Wednesday, September 9, 2009

Postcard from India

What can I tell you about India? We saw many beautiful things there.
Taj Mahal at sunriseSun coming throughAmber FortHawa Mahal
We also saw many slums and pile upon pile of trash everywhere.
Boy at Construction Site - Delhi#236 - Morning Washing
We were overwhelmed by the crowds, traffic and incredible heat & humidity (that's what we get for going during summer & monsoon season!).
Village StreetOn the back of a bicycle rickshaw
We saw cows, goats, sheep, pigs and monkeys all roaming freely plus oxen, camel & elephants working.
#235 - Street CowsMonkeys on the highwayCamel cartCatching an elephant ride
We were lucky to be in Nagpur during festival season & got to visit many of the neighborhood Ganesh displays as well as see how the idols are made.
Ganesha Display#239 - Ganesha in Progress
Now, I know you all expected to hear a lot about the food. Surprisingly, I didn't photograph any of it, curry just doesn't photograph well. We really enjoy Indian food and had some wonderful food though I found much of it to be too spicy for whimpy me, Matt loved it. The Indians also seem to love Chinese food though its changed for their tastes, egg rolls with hot peppers in them anyone? I will admit after almost two weeks of Indian food for every meal I was really looking forward to something different.
Vegetable ShoppingLike flowers in the fieldsBarber ShopRangoli
To see more of my pictures visit my India 2009 Flickr set.

If you are not reading this post in a feed reader or at http://agoodappetite.blogspot.com OR at http://agoodappetite.com then the site you are reading is illegally publishing copyrighted material. Contact me at katbaro AT yahoo DOT COM. All recipes, text and photographs in this post are the original creations & property of the author unless otherwise noted.
© 2007-2009 Kathy Lewinski