Friday, October 30, 2009

Roasted Pepper Soup

Matt & I are lucky enough to both work at home. (I know many couples say they would kill each other but we've learned to respect each other's space & enjoy the time together.) One of the perks is we get to have a homemade lunch together. We'd gotten into a real sandwich & chips rut over the summer so we decided to make an effort this fall & winter to make homemade soups & stews ahead of time to have instead. This week I made celeriac, potato & apple soup & this roasted pepper soup.
Roasted Pepper Soup & Sweet Potato Bread
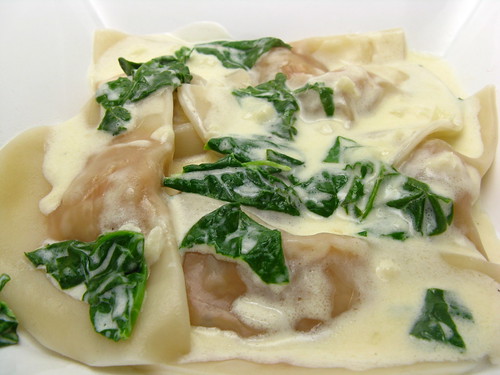
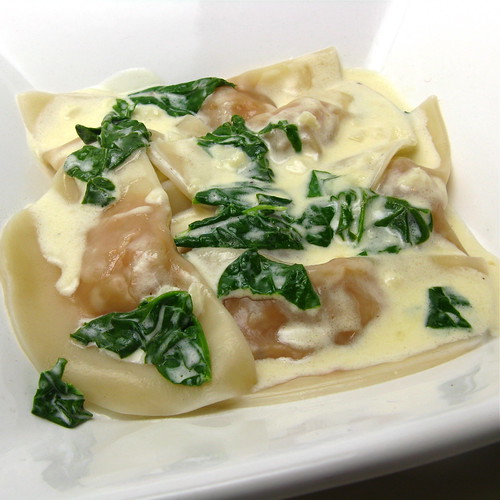
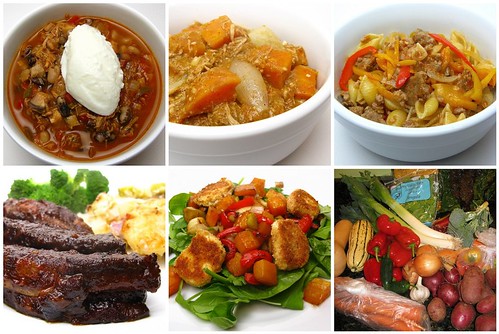
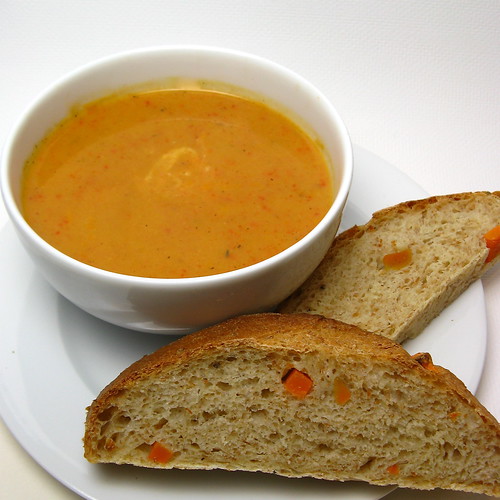
Seriously, who wouldn't prefer this beautiful plate for lunch instead of a cold sandwich? The original recipe called for just red peppers but I used a mixture of red & yellow. I also decided to add a jalapeno to the mix to give it a little bit of a kick. I have to say I was surprised at just how good this soup was, it's rich, creamy & just a little spicy.
Olive Oil, Pepper & Sweet Potato Bread
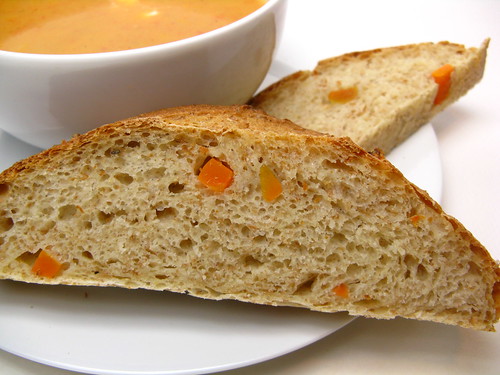
Are you wondering about this bread? It's the Peppery Olive Oil Bread with Sweet Potato from the new Healthy Bread in Five Minutes a Day: 100 New Recipes Featuring Whole Grains, Fruits, Vegetables, and Gluten-Free Ingredients. We're excited to try a bunch more recipes from this book to go with our daily soups & stews. We need to head to the grocery store now to stock up on various whole grains & interesting flours.

Roasted Pepper Soup
adapted from The Big Book of Soups and Stews: 262 Recipes for Serious Comfort Food

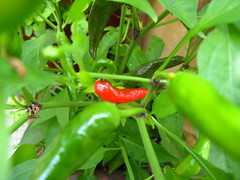
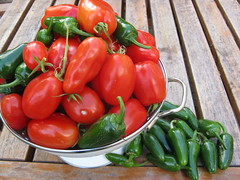
3 large bell peppers (we used a mix of red & yellow)
1 large jalapeno
1 T olive oil
1 large yellow onion, chopped
2 cloves garlic, chopped
1 small potato, peeled & cut into 1/2-inch pieces
1/2 t salt
1/4 t dried thyme
1/8 t crushed red pepper flakes
2 1/2 c chicken or vegetable stock
1 c milk or buttermilk

Preheat broiler. Line a baking sheet with tin foil. Seed & cut the peppers & jalapeno in half. Cut a few slits in them to make the pepper halves lay flat. Place in the tin foil. Put in broiler & let roast until charred, 10 - 15 minutes. Remove from broiler & wrap the peppers in the tin foil to steam. Once cooled a bit, remove the peppers from the tin foil pouch & take off the charred skins (I find this easier to do under running water). Chop roughly.

In a large soup pot, heat the olive oil over medium heat. Add the onion & sauté until tender, about 5 minutes. Add the garlic & let cook for a minute or two. Add the potato, salt, thyme, red pepper flakes and broth. Bring to a boil. Reduce heat & cover then let simmer for about 15 minutes until the potato is tender. Add the chopped peppers & let cook another 5 - 10 minutes. Pureé in a blender or with an immersion blender. Add milk or buttermilk gently heat to serving temperature.

4 servings

The recipe recommends topping with some yogurt or sour cream. We did add some yogurt but it really didn't need it.

If you are not reading this post in a feed reader or at http://agoodappetite.blogspot.com OR at http://agoodappetite.com then the site you are reading is illegally publishing copyrighted material. Contact me at katbaro AT yahoo DOT COM. All recipes, text and photographs in this post are the original creations & property of the author unless otherwise noted.
© 2007-2009 Kathy Lewinski

Thursday, October 29, 2009

Chili and Cornbread Pot Pie

Last week I was chatting with Hollywood Homemaker on Twitter & she was wondering if it was possible to make a pot pie with chili as the filling & cornbread as the crust. I told her that my mom used to make a dish like that called Man Cooked Meal when I was a kid. We both decided we would try our own takes on it & compare notes on how it went.
Chili & Cornbread Pot Pie
My mom's version had ground beef mixed with Tomato Rice Soup & some seasoning then topped with Jiffy Cornbread Mix. I started with homemade chili leaving out the rice & adding black & kidney beans instead. I also made the cornbread from scratch using honey to give it add bit of sweetness against the spice of the chili. The finished result came out pretty darn good and a fun way to serve a pretty basic meal. I liked the fact you get a bite of cornbread with every bite of chili.
Chili & Cornbread Pot Pie
You really could use any favorite chili or cornbread recipe to make this dish. It would also be a great way to use leftover chili if you wanted to change it up a little for a second serving.

Chili and Cornbread Pot Pie

Chili

1 c dried beans (we used a mix of black & kidney beans) or two cups canned beans
1 T olive oil
1 c red onion, chopped
1 large garlic clove, minced
1 jalapeno, seeded & chopped
1 lb lean ground beef
14.5 can whole tomatoes
1 T tomato paste
1 c chicken broth
2 t chili powder
1/4 t ground cayenne
1/2 t dried oregano
1 t cumin
salt & pepper

If using dried beans place them in a large pot with 3 cups of water. Boil for 2 minutes. Turn off heat cover & let seep 1 hours. Bring back to a boil, turn down heat & simmer for 1 1/2 hours or until tender. Drain.

In a large soup pot heat the olive oil over medium heat. Add the onions, garlic & jalapeno. Sauté until the onions are tender & translucent. Add the ground meat & cook until browned. Stir in the tomatoes, tomato paste, broth, chili powder, cayenne, oregano and cumin. Season to taste with salt & pepper. Let simmer for 20 - 30 minutes, stirring occasionally. You want it to be more like stew than soup.

Cornbread
(adapted from Small-Batch Baking)

1/2 c buttermilk
4 t honey
1 large egg
1 c corn meal
2 T sugar
1/2 t cream of tarter
1/4 t baking soda
1/2 t salt

Whisk the buttermilk, honey & egg together in a small bowl. In another bowl mix together the corn meal, sugar, cream of tarter, baking soda & salt. Stir in the wet ingredients until just blended.

Preheat oven to 425 F.

Pack the chili into a 8" x 8" baking pan or 4 individual 2 cup ramekins. Spoon the cornbread batter over the top of the chili, spreading to cover all the chili. Bake for 15 minutes, until the cornbread is firm & starting to brown. Let sit a few minutes before serving.

Serves 4

If you are not reading this post in a feed reader or at http://agoodappetite.blogspot.com OR at http://agoodappetite.com then the site you are reading is illegally publishing copyrighted material. Contact me at katbaro AT yahoo DOT COM. All recipes, text and photographs in this post are the original creations & property of the author unless otherwise noted.
© 2007-2009 Kathy Lewinski

Wednesday, October 28, 2009

Sweet Potato Ravioli and Spinach in Cream Sauce

I had originally planned to take another stab at sweet potato gnocchi with the sweet potatoes from our latest CSA box but, as I was writing this week's menu the idea of ravioli stuffed with sweet potato was a little more appealing.
Sweet Potato Ravioli with Spinach in Cream Sauce
I totally did the cheaters method of making ravioli & used pot sticker wrappers. Thing was, I had a lot of things I wanted to get done that day & making pasta from scratch was really going to cut into my time. The pot sticker wrappers really worked perfectly & we had gorgeous ravioli wrapped in thin pasta in a snap.

The final dish was so tasty. The sweetness of the potatoes stood nicely out in the mild cream sauce. The spinach adds a bit of color & some extra vitamins (next time I'd actually add more spinach).
Sweet Potato Ravioli with Spinach in Cream Sauce
This is a dish you can really assemble in parts. The sweet potato filling can be made ahead of time & kept refrigerated. The finished ravioli can be frozen to use another time (we have half of our batch in the freezer). Once the ravioli are assemble, cooking time is just 5 minutes for both the ravioli & sauce so if you plan ahead you can have a homemade dinner really quicky.

Sweet Potato Ravioli and Spinach in Cream Sauce

Sweet Potato Ravioli

1 large orange sweet potato, peeled & cut into large chunks
1 T brown sugar
1/8 t ground nutmeg
salt & pepper
1 package pot sticker wrappers (you could use wonton wrappers instead & do a triangle shape)

Put the sweet potato into a pot of water & bring to a boil. Boil for 20 - 25 minutes until soft. Drain & return to pot. Mash the sweet potatoes until relatively smooth, don't worry if there are a few lumps. Mix in the brown sugar and nutmeg. Season to taste with salt & pepper. (I ended up with between 1 & 1 1/2 cups of mashed sweet potato)

Place 1 teaspoon of the sweet potato mixture in the center of a pot sticker wrapper. Brush a little water around the edge of the wrapper. (We just used our finger to do this.) Fold in half over the filling, pressing the edges together to seal. Try to get as much air out as possible while sealing. Place on a piece of wax paper or silicone pad to keep from sticking. Continue until all the filling is used. (Freeze whatever ravioli you don't plan on using right away. We froze them individually on a baking sheet before placing them in a freezer bag.)
Sweet Potato Ravioli
Bring a large pot of water to a boil. Add 6 - 8 ravioli per person. Boil for 5 minutes. Spoon out with a slotted spoon to shallow bowls.

Makes about 32 ravioli

Cream Sauce with Spinach

2 T unsalted butter
1/2 c heavy cream
1 clove garlic, minced
1/2 c grated Parmesan
handful spinach, roughly torn

Meanwhile, melt the butter over medium heat in a skillet or saucepan. Add the garlic & sauté for about 2 minutes. Stir in the cream and Parmesan. Add the spinach & cook until wilted. Serve over ravioli.

Makes enough sauce for 2 servings.

If you are not reading this post in a feed reader or at http://agoodappetite.blogspot.com OR at http://agoodappetite.com then the site you are reading is illegally publishing copyrighted material. Contact me at katbaro AT yahoo DOT COM. All recipes, text and photographs in this post are the original creations & property of the author unless otherwise noted.
© 2007-2009 Kathy Lewinski

Tuesday, October 27, 2009

Daring Bakers - Macarons

The 2009 October Daring Bakers’ challenge was brought to us by Ami S. She chose macarons from Claudia Fleming’s The Last Course: The Desserts of Gramercy Tavern as the challenge recipe.
IMG_6529
Of all the Daring Bakers' challenges I would have to say this is the first one that didn't come out as good as I hoped. Most of my macarons cracked during baking which meant the didn't have that crispy outside. They were pretty close though so I'm sure if I played with the recipe a bit I could get it right but I realized I'm just really not that big a fan of macarons.
IMG_6523
Since the recipe claimed to make 10 dozen I sized it way down & got about 10 sandwiches total (this might be part of the reason the weren't perfect.) I decided to make my own nut flour for the recipe & went with hazelnuts instead of almonds because that's what I had on hand. They were roasted so moisture wasn't a problem. I felt like they gave a nice flavor to the cookies. I also added a little ground cinnamon to the dough.

For the filling I did a very simple buttercream (butter & powdered sugar) flavored with jelly, but the jelly I chose to use was Port Wine Jelly. The flavor just wasn't as good as I had hoped. I really should have gone with my first instinct & used the Green Tomato Jam instead.

Macarons
from Claudia Fleming’s The Last Course: The Desserts of Gramercy Tavern

Actual baking time: 12 minutes total, plus a few minutes to get your oven from 200°F to 375°F.

Confectioners’ (Icing) sugar: 2 ¼ cups (225 g, 8 oz.)

Almond flour: 2 cups (190 g, 6.7 oz.)

Granulated sugar: 2 tablespoons (25 g , .88 oz.)

Egg whites: 5 (Have at room temperature)

1. Preheat the oven to 200°F (93°C). Combine the confectioners’ sugar and almond flour in a medium bowl. If grinding your own nuts, combine nuts and a cup of confectioners’ sugar in the bowl of a food processor and grind until nuts are very fine and powdery.

2. Beat the egg whites in the clean dry bowl of a stand mixer until they hold soft peaks. Slowly add the granulated sugar and beat until the mixture holds stiff peaks.

3. Sift a third of the almond flour mixture into the meringue and fold gently to combine. If you are planning on adding zest or other flavorings to the batter, now is the time. Sift in the remaining almond flour in two batches. Be gentle! Don’t overfold, but fully incorporate your ingredients.

4. Spoon the mixture into a pastry bag fitted with a plain half-inch tip (Ateco #806). You can also use a Ziploc bag with a corner cut off. It’s easiest to fill your bag if you stand it up in a tall glass and fold the top down before spooning in the batter.
5. Pipe one-inch-sized (2.5 cm) mounds of batter onto baking sheets lined with nonstick liners (or parchment paper).

6. Bake the macaroon for 5 minutes. Remove the pan from the oven and raise the temperature to 375°F (190°C). Once the oven is up to temperature, put the pans back in the oven and bake for an additional 7 to 8 minutes, or lightly colored.

7. Cool on a rack before filling.

Yield: 10 dozen. Ami's note: My yield was much smaller than this. I produced about two dozen filled macaroons.

If you are not reading this post in a feed reader or at http://agoodappetite.blogspot.com OR at http://agoodappetite.com then the site you are reading is illegally publishing copyrighted material. Contact me at katbaro AT yahoo DOT COM. All recipes, text and photographs in this post are the original creations & property of the author unless otherwise noted.
© 2007-2009 Kathy Lewinski

Monday, October 26, 2009

Cherry Mustard Sauce and Weekly Menu 10/25 - 10/31

Matt's parents came to visit us this weekend which gave us a great excuse to go to the Minnesota Landscape Arboretum. We'd never gone before but it was such a beautiful place we ended up buying a membership & look forward to seeing it during all four seasons (plus they offer cooking from the garden dinners!). We were lucky & our grey skies cleared for our walk around the gardens & forests.
SunnyIMG_6606IMG_6599
Having house guests also meant for lots of yummy dinners coming out of the kitchen. Friday night, Matt roasted a couple of pork loins. He used the dried Michigan sour cherries that his parents had brought us to create an amazing sauce to top the pork.
Pork Loin with Cherry Mustard Sauce
The sauce really made the pork into something special. It would be perfect with other cuts of pork like chops & I think fabulous with duck as well.

Cherry Mustard Sauce

1 c medium bodied red wine (we used a Cotes du rhone)
1/2 c dry sour cherries, chopped
1 1/2 T whole grain Dijon mustard
1 T butter

Put the wine, cherries & mustard in a small skillet over medium heat. Simmer for about 15 minutes to reduce slightly & rehydrate the cherries. Whisk in butter.

Makes about 1 cup

On to Menu Planning Monday...

Roast Chicken with Parsnips, Carrots, Potatoes & Fennel

Sweet Potato Ravioli & Spinach in Cream Sauce

Greek Lamb Patties with Fennel Tzatziki - This lamb was going to be Moroccan patties last week but we had leftover chili instead. Since we got fennel in our CSA box we decided to go Greek instead.

Chili Cornbread Pot Pie

Thursday we are going to see The Importance of Being Earnest at the Guthrie so we'll be eating dinner out.

Recipes to Rival Challenge - So I can't tell

Roast Kabocha Squash with Cheese & Sausage - If you missed this dish last year check it out because it is such a fall winner.

I'll also be making a couple soups for lunches using some butternut squash & some celeriac.

If you are not reading this post in a feed reader or at http://agoodappetite.blogspot.com OR at http://agoodappetite.com then the site you are reading is illegally publishing copyrighted material. Contact me at katbaro AT yahoo DOT COM. All recipes, text and photographs in this post are the original creations & property of the author unless otherwise noted.
© 2007-2009 Kathy Lewinski

Saturday, October 24, 2009

What we did with CSA box #12 and what's in box #13


What we did with CSA box #12
1. Turkey Chili (recipe to come) 2. Roasted Butternut Squash Curry 3. Sausage & Peppers Pasta 4. Crock Pot Rib w/ Potato & Leek Gratin 5. Roasted Vegetable Salad with Fried Goat Cheese 6. The box

And what's in box #13 - A lot of staples in this box
IMG_6571
Fennel - I'm thinking something with fish will be a good use for this fennel but I'm not sure yet.
Bok Choy - Stir-fry
Lettuce
Red Kale - Think we'll sauté this up as a side dish with pork
Carrots - These small carrots will be a perfect lunch time side for use as we try to stop eating chips.
Delicata Squash - Perfect just baked with a little butter.
Butternut Squash - This will probably become a soup as well
Parsnips - We'll roast these with Sunday's chicken
Potatoes - Some will get roasted with the chicken & some used in soup
Red & Yellow Onions
Garlic
Sweet Potatoes - I'd love to try a sweet potato gnocchi
Leeks - We are trying to have soup at lunch every day so I think I'll make a potato leek soup

Find more ideas on using your CSA box at Cooking Away My CSA

If you are not reading this post in a feed reader or at http://agoodappetite.blogspot.com OR at http://agoodappetite.com then the site you are reading is illegally publishing copyrighted material. Contact me at katbaro AT yahoo DOT COM. All recipes, text and photographs in this post are the original creations & property of the author unless otherwise noted.
© 2007-2009 Kathy Lewinski

Friday, October 23, 2009

A Good Appetite Garden 2009

We've had our first hard frost & snow in Minneapolis so it looks like the growing season is over. Seems like a good time to look back at our first vegetable garden...
#272 - New Raised BedsMorning 83 - A dusting#96 - Look how my garden grows
In the fall of 2008 Matt build us two 8' x 4' raised beds in unused space next to our driveway. Since there is a fence behind the beds its hard to get to the back so next year we will rebuild these beds to be 4' x 4'. We also planted garlic in the fall so it had a chance to spout before winter. Come spring, Matt build an adjustable light greenhouse set up in our basement to start seeds. Here's instructions on how to make one.
#104 - Planting the cool weather cropsIMG_3198Tomato Seedlings
Cool weather crops like peas, spinach, lettuce & kohlrabi were started from seed right in the garden. We used twine to mark out 12" squares. A soaker hose was placed through the garden for easy watering. Indoor seedlings were moved to bigger pots as needed.
Morning 132 - Spinach, Lettuce & KohlrabiPeas!Pea Trellis
Cool weather crops start popping up. Matt built a trellis for the peas from bamboo & twine.
#150 - Seedlings ready for the gardenGarden May 31Garlic Scape
Time to move the seedlings outdoors. We had way more than we needed & ended up giving a bunch away. The peas grew like crazy. The garlic scapes formed & we harvested them in the hopes of getting bigger garlic bulbs.
#151 - BoltedIMG_4209IMG_4210
Our spinach bolted before we got to eat any. We won't do spinach next year & just stick to leaf lettuce which was great. As things warmed up the the square foot gardens started to look very full but needed very little weeding.
#182 - Garlic from our GardenThe jungle#189 - Beginning of Broccoli
We harvested our garlic. The bulbs were pretty small but tasty. Next year we'll fertilize them to see if we get bigger bulbs. Beans, cucumbers, zucchini & tomatoes really fill one bed. Broccoli heads are starting to form.
Beans!#195 - Matt & the Giant Kohlrabi#200 - Harvest
We had really good luck with bush beans this year & they don't require trellising. Look at the huge kohlrabi! Time to start harvesting.
#205 - Matt's Giant ZucchiniMorning 209 - Laden DownHarvest
The zucchini got huge overnight. Our tomato plants, all San Marzano, are covered with green tomatoes, cool weather makes us wonder if they'll ever ripen. Harvest really hit full swing, especially the cucumbers, time to make pickles!
#217 - Red hotMorning 221 - FinallyHomemade Ristras
We grew some super chiles in a pot which did really well as did our jalapenos. Finally the tomatoes start to ripen. We had enough super chiles from on plant to make two ristras.
Last harvest?Drying Room
We start harvesting 6 - 12 pounds of tomatoes a weeks as well as a ton of jalapenos. The frost comes before many tomatoes can ripen though & we make green tomato jam. The last of the herbs are harvested & dried.

Next year we'll do less cucumbers & zucchini so we are so overrun with them. Also I'd like to do a good sandwich tomato as San Marzanos are really best for paste & sauce. We'll do peppers again & would like to find seeds to grow some pablanos.

If you are not reading this post in a feed reader or at http://agoodappetite.blogspot.com OR at http://agoodappetite.com then the site you are reading is illegally publishing copyrighted material. Contact me at katbaro AT yahoo DOT COM. All recipes, text and photographs in this post are the original creations & property of the author unless otherwise noted.
© 2007-2009 Kathy Lewinski

Thursday, October 22, 2009

Roasted Butternut Squash Curry

When we cam back from India last month I was pretty sure I never wanted to look at another curry again. Don't get me wrong, the curries we had were wonderful but we had a lot of them. (I have to tell you, we ate so much curry that the last night in India we were thrilled to have a Pizza Hut outside our hotel & went there for dinner. It's almost embarrassing but that pizza tasted so good.) Well, it didn't take me long to get over that & here we are making curries at home again. We just can't resist, they taste too good & are so perfect for cooler weather.
Roasted Butternut Squash Curry
Since we had half a butternut squash leftover from last week's Roast Vegetable Salad we decided to try a creamy squash curry. I thought butternut squash would have enough flavor to stand up in a curry unlike a milder variety like Delicata. It may seem like a lot of spices in this dish but they really blend together wonderfully. This is a very mild curry, with the slightest bit of heat, add more cayenne or a little Sriracha if you are like Matt & want it hotter. The squash & onions are roasted with a mixture of spices & turned out so good you could just do that part of the recipe to serve as a sidedish.

This dish was originally meant to be vegetarian but I had some leftover cooked chicken I wanted to use up so I threw it in. You can easily make it vegetarian though by leaving the chicken out & using vegetable stock instead of chicken.

Roasted Butternut Squash Curry

1 1/2 lb butternut squash, peeled, seeded & cut into 1-inch cubes
1 medium yellow onion, peeled & quartered
1 1/2 T olive oil
1 clove garlic, peeled & crushed
1/4 t ground cloves
1/4 t ground cinnamon
1/2 t ground cardamon
1/2 t black pepper
1/2 t ground ginger
1 c chicken stock
1 1/2 t garam marsala
1 t chili powder
1 1/2 t ground coriander
1/4 t cayenne pepper
1/2 t cumin
1/2 c yogurt
1/4 c ground almonds
2 T salted butter
2 T heavy cream
1/4 - 1/2 c cooked, shredded chicken (optional)

Preheat oven to 400 F.

Place the squash, onion & garlic in a small roasting pan. Pour in the olive oil & stir to coat. Add the cloves, cinnamon, cardamon, pepper & ginger. Stir until all the vegetables are coated well. Bake for 30-35 minutes until the squash is tender but not smooshy. (You can do this step ahead of time & refrigerate until ready to use.)

Put the chicken stock into a large saucepan over medium heat. Add the garam marsala, chili powder, coriander, cayenne & cumin. Whisk in the yogurt. Add the almonds, butter & heavy cream. Once the butter has melted add the squash, onions & chicken if using. Bring to a simmer & let cook uncovered for about 15 minutes.

Serve over rice

2 - 3 servings.

If you are not reading this post in a feed reader or at http://agoodappetite.blogspot.com OR at http://agoodappetite.com then the site you are reading is illegally publishing copyrighted material. Contact me at katbaro AT yahoo DOT COM. All recipes, text and photographs in this post are the original creations & property of the author unless otherwise noted.
© 2007-2009 Kathy Lewinski
Related Posts with Thumbnails

Get Email Updates!

Enter your email address:

Delivered by FeedBurner

Measurement Abbreviations

T = Tablespoon
t = teaspoon
c = cup
lb = pound
oz - ounce

Labels

Blog Archive

Contributors

Blog Directory for Minneapolis, Minnesota