Friday, June 5, 2009

Cardamom Rhubarb Sorbet and Creamsicles

I read this post on Rhubarb Sorbet from Two Peas & Their Pod a couple weeks ago & decided that's what I wanted to try with some of the rhubarb I had from the farm.
#153 - cardamom rhubarb sorbet
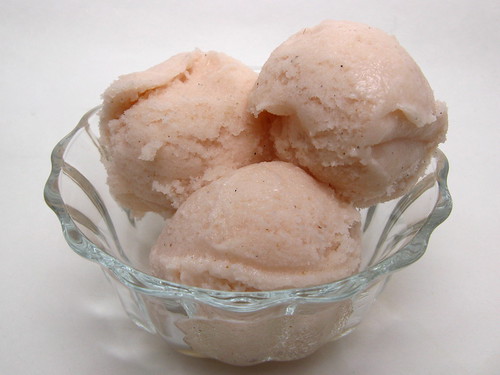
The base came together easily enough but the flavor was a little too subtle for me, I thought it needed something else to really make it sing. I wasn't sure which way to go (nutmeg? cinnamon? ginger?) so, I put the question out there on Twitter, @lonebaker gave some suggestions for pairings with rhubarb from The Flavor Bible. The suggestion of cardamom & vanilla struck me as the most interesting & I really like cardamom. I love the extra punch they gave this sorbet. The sorbet mixed up to this beautiful creamy texture & tasted like an amazing Scandinavian baked good.

Cardamom Rhubarb Sorbet
(adapted from Garrett McCord of Vanilla Garlic)

3 1/2 c fresh rhubarb, chopped
2 1/2 c water
1 2/3 c sugar
1/4 t salt
2 t dried lemon zest
1/2 t cardamom (I really like cardamom if you aren't sure start with 1/4 t & taste it before adding more)
1 t vanilla extract
2 t corn syrup

Place the rhubarb, water, sugar, salt & lemon zest in a large saucepan. Bring to a boil. Reduce heat, cover & let simmer for 5 minutes. The rhubarb should get very soft. Let cool.

Using a blender or immersion blender, process the rhubarb mixture until smooth. Press through a fine strainer to remove the pulp. (Ours was pretty fine so a lot went through the strainer & I think had no effect on the finished sorbet.) Stir in the cardamom, vanilla & corn syrup. Cover & chill until very cold.

Process in your ice cream maker until creamy. Place in a container & freeze.

Makes about 1 quart.

I also wanted to make popsicles since I'd just found these great popsicle molds at IKEA that remind me so much of being a kid.
Morning 153 - Sorbet & Popsicles
But I wanted them to be more like creamsicles. So, I left about 1/4 of the rhubarb sorbet in the ice cream maker & stirred in about 1/2 c of heavy cream. Then I filled my popsicle molds & put them in the freezer overnight.
IMG_3883
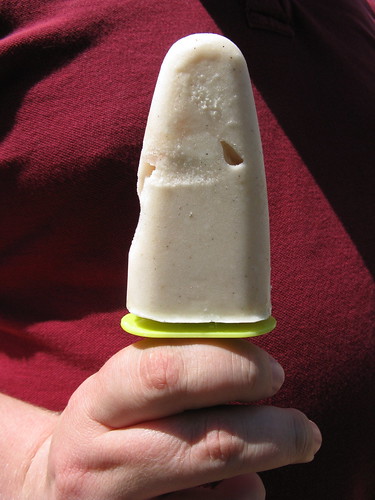
The result was sooo good. I love the added smoothness to the texture & taste that the little bit of cream gave to the sorbet. (Matt actually preferred the regular sorbet as he thought the cream took away some of the tang.) I had my 10 year old cousin over today who said he hated rhubarb & yet he ate two of these popsicles. The only issue was getting them out of the molds, the sticks kept pulling out because these were softer than your regular popsicle.

If you are not reading this post in a feed reader or at http://agoodappetite.blogspot.com OR at http://agoodappetite.com then the site you are reading is illegally publishing copyrighted material. Contact me at katbaro AT yahoo DOT COM. All recipes, text and photographs in this post are the original creations & property of the author unless otherwise noted.
© 2007-2009 Kathy Lewinski


Thursday, June 4, 2009

Herbed Balsamic Chicken with Blue Cheese

This was a super simple dish with lots of layered flavors (or as Matt said, "There's a lot going on here.").
IMG_3861
The balsamic marinade adds a ton of flavor but only has four ingredients. The chicken is then seasoned with herbes de Provence which I didn't have on hand. I looked up what was in it & realized I had everything (except the savory) so I just made up my own. Apparently, lavender is optional is herbes de Provence but to me it really adds that special taste to this dish & pairs well with the blue cheese

Herbes de Provence
(adapted from About.com)

Mix together

4 t dried oregano
4 t dried thyme
1 T dried savory (we skipped this)
1 T dried lavender, crushed
1/2 t dried basil
1/2 t dried sage
1/2 t dried rosemary, crushed

Makes about 6 Tablespoons

It might seem like the blue cheese would overpower this dish but it really blended well with everything. When buying a blue cheese we choose Maytag from Iowa because its a little milder than the Danish blues we've tried & a lot milder than the St. Pete's from Fairbault, MN.

Herbed Balsamic Chicken with Blue Cheese
(adapted for serving size from Bon Appetit June '09)

2 skinless, boneless chicken breasts
1/4 c balsamic vinegar
1 1/2 T olive oil
3/4 t kosher salt
1/2 t black pepper
1 t herbes de Provence
2 half ounce slices of blue cheese

Mix the vinegar, oil, salt & vinegar together in a resealable bag. Add the chicken & seal the bag removing as much air as possible. Refrigerate for at least 2 hours (we did almost 4 which gave it the dark color), turning from time to time.
Heat the barbecue to medium-high. Remove the chicken from the marinade. Sprinkle it with the herbes do Provence & a little more salt & pepper. Oil the grill grates & cook the chicken for about 6 minutes per side or until done.
Serve each chicken breast with a slice of blue cheese on top.

Serves 2
IMG_3856
We served the chicken with some grilled asparagus & some red lentils. I cooked the red lentils. Then I sautéed a couple spring onions & a garlic clove. Added about 1 teaspoon or so of the herbes de Provence. Then mixed that into the lentils. Finally I seasoned it with salt & pepper. A great pairing with the chicken.

If you are not reading this post in a feed reader or at http://agoodappetite.blogspot.com OR at http://agoodappetite.com then the site you are reading is illegally publishing copyrighted material. Contact me at katbaro AT yahoo DOT COM. All recipes, text and photographs in this post are the original creations & property of the author unless otherwise noted.
© 2007-2009 Kathy Lewinski


Wednesday, June 3, 2009

Green Goddess Dressing

Matt bookmarked this recipe from Bon Appetit May '09 & I thought it was Alice Water's recipe but when I went to make it I noticed it was actually Molly Wizenberg's version of Alice Water's. I was a little unsure about whether or not I'd like it but it was really light & fresh & perfect on the first harvest from our garden.
First harvest
I was a little confused about how much avocado to use in the recipe. It said "1/2 ripe medium avocado, about 7 oz." So, does that mean you want 7 oz of avocado or half of a 7 oz avocado? I don't believe I've ever seen a 14 oz avocado. My avocado was only 5 oz once the pit was removed soI decided to just wing it & throw in the whole thing figuring I was coming in somewhere in the middle. I think the consistency came out just fine & the avocado flavor isn't too little or too much.
Green Goddess
We really enjoyed the herbal flavor of this dressing. Ours was pretty heavy with the licoice flavor of the tarragon because I was a little short on cilantro & parsley but changing the amounts of the different herbs is a great way to give this dressing different flavors each time. I'm betting after sitting overnight it's going to be even better on a salad at lunch today.

Green Goddess Dressing
(adapted from Bon Appetit May '09)

5 oz ripe avocado
3 T champagne vinegar
1 clove garlic, minced
1 t lemon juice
1/2 t lime juice
1/4 t sugar
3/4 c extra virgin olive oil
1/4 c heavy whipping cream
3 T fresh Italian parsley, chopped
2 T fresh tarragon, chopped
2 T fresh cilantro, chopped
1 T fresh basil, chopped
1 T shallot, chopped
salt & pepper

Blend the first six ingredients in a food processor into a purée. While processing slowly add the olive oil. Blend well. Pour into a bowl or storage container. Whisk in the cream & then add the herbs & shallots. Season with salt & pepper. Chill for a couple of hours before serving. Whisk right before serving.

Makes 2 cups

Oh yeah, the original recipe called for one anchovy which we left out as well (mainly because I wasn't buying a can for one) so this version did require a good bit of salt to make up for it.

If you are not reading this post in a feed reader or at http://agoodappetite.blogspot.com OR at http://agoodappetite.com then the site you are reading is illegally publishing copyrighted material. Contact me at katbaro AT yahoo DOT COM. All recipes, text and photographs in this post are the original creations & property of the author unless otherwise noted.
© 2007-2009 Kathy Lewinski

Tuesday, June 2, 2009

Turkey Yakitori Burgers

Our local grocery store gives away a free magazine called Real Food. We picked it up a couple weeks ago & were surprised at how much we wanted to make from it, especially some unusual grilling recipes. This week we tried the Ground Turkey Yakitori.
Turkey Yakitori Burger
The recipe had versions for serving this over rice or as a burger. We did the burger version. This was an incredibly tasty burger. There is plenty of binder to hold the turkey together (often an issue with turkey burgers). The Sweet Soy Glaze has a wonderful sweet/salty flavor, it was good on the burgers, onions & mixed into mayonnaise. Matt liked the mayo version as a dip for his roasted potatoes. This is not a flavor combination you'd usually expect for a grilled burger but it really works.
Turkey Yakitori Burger

Turkey Yakitori Burgers
(adapted slightly from Real Foods)

1/2 - 3/4 lb ground turkey
1/2 t garlic, minced
1 t fresh ginger, minced
1 T chopped spring onion (or scallion), white part only (we chopped the greens & put them in with roasting potatoes
1/2 t honey
1/2 T soy sauce
2 T well-beaten egg
1 t corn starch
1/2 t salt
1/4 t black pepper

Sweet Soy Glaze

1/4 c Mirin wine or sweet sherry (I used regular sherry & a teaspoon of sugar)
1/4 c soy sauce
1 T maple syrup
1 T brown sugar
2 t fresh ginger, minced
2 T lemon juice
1 t cornstarch
1 T cold water

6 spring onions, trimmed & cut to about 8-inches long
1/4 c mayonnaise

In a small saucepan bring the Mirin, soy sauce, maple syrup, brown sugar, ginger & lemon juice to a boil. Mix the cornstarch & water together to dissolve the cornstarch. Stir into the boiling mixture. Let boil for about 15 minutes until thickened. Set aside to cool. Once cooled mix 1 T of the glaze into the mayonnaise & set aside to top the burgers.

Mix all the burger ingredients together with your hands & form into two patties. Grill over medium-high heat for 3 minutes per side. Brush with glaze & flip. Grill 2 more minutes. Brush with glaze & flip again cooking 2 more minutes.

When the burgers have about 5 minutes left put the onions on the grill & brush them with the glaze. Grill until they are soft.

Brush both the burgers & onions with glaze once more before serving.

Serve the burgers on rolls (sesame would be good) topped with the mayonnaise & lettuce. The onions can be eaten on the side or on the burgers.

Serves 2

If you are not reading this post in a feed reader or at http://agoodappetite.blogspot.com OR at http://agoodappetite.com then the site you are reading is illegally publishing copyrighted material. Contact me at katbaro AT yahoo DOT COM. All recipes, text and photographs in this post are the original creations & property of the author unless otherwise noted.
© 2007-2009 Kathy Lewinski

Monday, June 1, 2009

Recipes to Rival - Falafel and Whole Wheat Pita

For this month's Recipes to Rival challenge (brought to us by Lori from Lori's Lipsmaking Goodness)  we had our choice to two chickpea recipes, Chickpea Fries or Falafel. I chose to do falafel mainly because I couldn't find chickpea flour. I also took on the additional challenge & made the pita from scratch to serve the falafel in.
IMG_3502
I also couldn't find dried chickpeas so I used canned instead & just skipped the overnight soak. I also made the falafel into 2-inch patties rather than walnut-sized balls because I thought they would fit in the pits better.
IMG_3501
Not that it made a difference as these didn't hold together at all. The recipe was pretty vague in its cooking instructions. I think that the trick is to have really hot oil & fry them so they get a good crispy crust on the outside to hold them together. (After doing some research the issue may have been the canned chickpeas after all.) In the long run it didn't matter though because they tasted fantastic! We topped them with cucumber, tomatoes, spinach & red onion. I dipped mine in some plain yogurt while Matt added some Sirracha.

Falafel: Chickpea Patties
(adapted from Madelian Farah, Lebanese Cuisine, Four Walls Eight Windows)

1 14/5 oz can chickpeas
1/4 c red onion, chopped
1 clove garlic
1/2 T all-purpose flour
1/2 t ground coriander
1/2 t baking soda
1/4 t ground cumin
pinch red paper flakes
salt & pepper
vegetable oil

Drain & rinse the chickpeas. Add to a food processor with the onion & process. Add all remaining ingredients except the oil. Process until you get a slightly chunky paste. Give it a pinch & see if it holds together easily. Form into 8 2-inch patties.

Heat about 1/4 inch oil in a non-stick skillet over high heat until very hot. Add 4 of the patties. Cook until the bottom us very brown & then flip & cook the second side. Remove to a plate covered with a paper towel & cook second set of patties.

Makes 8 patties

IMG_3495
The pitas were really simple to make & really turned out great. This recipe had you cook them right on the oven rack which was a little odd since it kind of hung over the rungs & I think kept it from puffing up completely. Next time I think I'll try cooking them on a baking stone like many of the other recipes I saw called for.

Whole Wheat Pita Bread
(Gourmet May '03)

1 1/4 t active dry yeast
1/2 teaspoon honey
1/2 cup + 2 T warm water (105–115°F)
1 cups bread flour or high-gluten flour, plus additional for kneading
1/2 cup whole-wheat flour
2 T extra-virgin olive oil
1/2 teaspoon salt
Cornmeal for sprinkling baking sheets

Stir together yeast, honey, and 1/2 cup warm water in a large bowl, then let stand until foamy, about 5 minutes. (If mixture doesn't foam, discard and start over with new yeast.)

While yeast mixture stands, stir together flours in another bowl. Whisk 1/2 cup flour mixture into yeast mixture until smooth, then cover with plastic wrap and let stand in a draft-free place at warm room temperature until doubled in bulk and bubbly, about 45 minutes. Stir in oil, salt, remaining 3/4 cup warm water, and remaining 2 1/2 cups flour mixture until a dough forms.

Turn out dough onto a floured surface and knead, working in just enough additional flour to keep dough from sticking, until dough is smooth and elastic, 8 to 10 minutes. Form dough into a ball and put in an oiled large bowl, turning to coat. Cover bowl with plastic wrap and let dough rise in draft-free place at warm room temperature until doubled in bulk, about 1 hour.

Punch down dough and cut into 4 pieces. Form each piece into a ball. Flatten 1 ball, then roll out into a 6 1/2- to 7-inch round on floured surface with a floured rolling pin.
IMG_3490
Transfer round to a baking sheet lightly sprinkled with cornmeal. Make 3 more rounds in same manner, arranging them on baking sheets.
IMG_3491
Loosely cover pitas with clean kitchen towels (not terry cloth) and let stand at room temperature 30 minutes.

Set oven rack in lower third of oven and remove other racks. Preheat oven to 500°F.

Transfer 4 pitas, 1 at a time, directly onto oven rack. Bake until just puffed and pale golden, about 2 minutes. Turn over with tongs and bake 1 minute more. Cool pitas on a cooling rack.

Makes 4 6-inch pitas

Note:
Pitas can be baked 1 week ahead and cooled completely, then frozen, wrapped well in foil in a sealed plastic bag. Thaw before reheating, wrapped in foil, 10 to 12 minutes in a 350°F oven.

If you are not reading this post in a feed reader or at http://agoodappetite.blogspot.com OR at http://agoodappetite.com then the site you are reading is illegally publishing copyrighted material. Contact me at katbaro AT yahoo DOT COM. All recipes, text and photographs in this post are the original creations & property of the author unless otherwise noted.
© 2007-2009 Kathy Lewinski

Related Posts with Thumbnails

Get Email Updates!

Enter your email address:

Delivered by FeedBurner

Measurement Abbreviations

T = Tablespoon
t = teaspoon
c = cup
lb = pound
oz - ounce

Labels

Blog Archive

Contributors

Blog Directory for Minneapolis, Minnesota