Thursday, December 11, 2008

It's about the food...

We are flying back to Minnesota from California today (to a bit of snow I hear). We've really enjoyed our visit, getting to see friends, enjoying the warm weather (ok, they think its cold here) but most of all enjoying the food.
A San Francisco Burrito
We always have to get a Mission burrito when we are here. We've learned to like Chipotle but we miss these burritos so much. Really it's about the Spanish rice & the melted cheese.
Sushi!
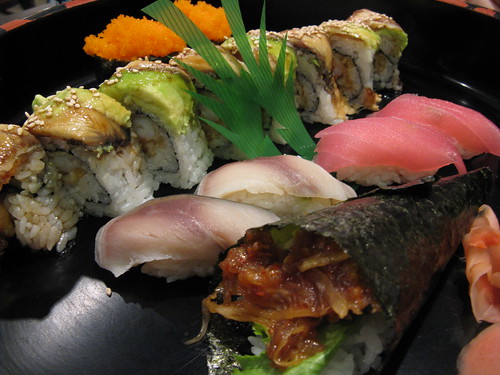
Sushi is another must have while we are in the Bay Area. I hear there is some good sushi in Minneapolis but I can't get past the idea of eating raw fish in a place with no coast.
Pomegranate Yogurt with Pomegranates
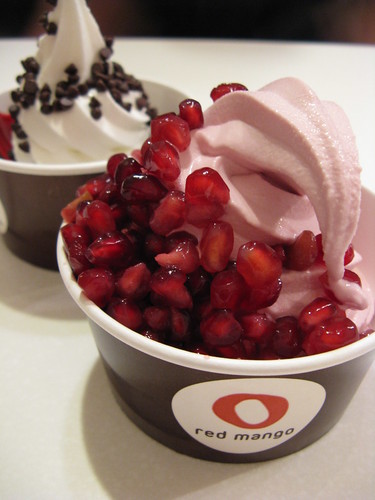
After sushi last night we tried Red Mango, a frozen yogurt shop on University Ave in Palo Alto. Their yogurt is all natural & really has a strong yogurt flavor. Right now they have a pomegranate yogurt which I had topped with fresh pomegranate seeds, so good!
Hobie's Blueberry Coffee Cake
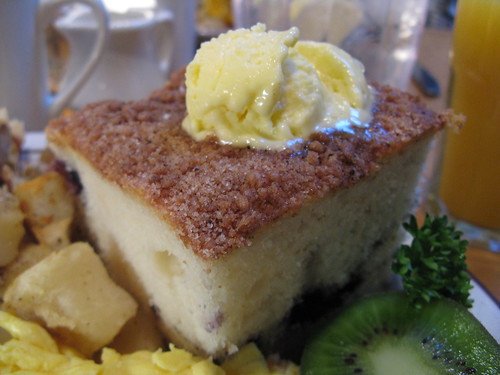
This morning we headed over to Hobie's for breakfast. To me Hobie's means one thing, coffee cake. They make this amazing light blueberry coffee cake. They serve you a huge piece that's warm & topped with tons of melting butter. Matt got their seasonal cranberry coffee cake & thought the tartness of the cranberries was perfect with the sweet topping.
Sprinkles' Red Velvet Cupcake
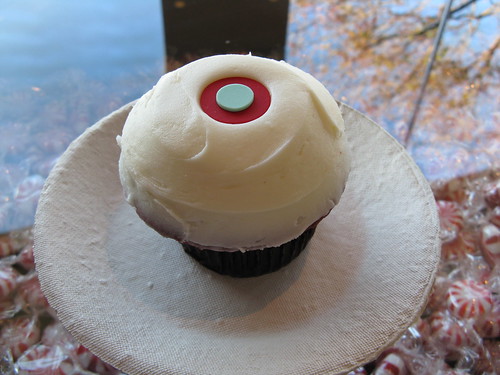
I heard that Sprinkles, the famous cupcake store in LA, had opened a store in the Stanford Center. Since we were staying within walking distance I had to go try it out. I have to admit I wasn't blown away. I found the cupcake to be a little dry & the cream cheese frosting was way too sweet. I'm glad I got to try them out but next time I'll head to Kara's Cupcakes since they have opened a location in the Town & Country Center.

Wednesday, December 10, 2008

Bugs Bunny only wished he had our problem...

We have too many carrots. For the last 4 or 5 CSA shipments we've received a bag of carrots & the crisper drawers in our fridge are full of them. Matt's Mom told me over Thanksgiving that if I grate & blanch them they will freeze well for baking later on. Matt did a little research & discovered that they will freeze well in slices to use in stew & soup later on as well.
Freezing Carrots
I froze 3 bags of slices for soup & stew, one of diagonal slices for stir-fry & 1/2 c bags of grated carrot for muffins & bread.

It's a pretty simple process especially if you don't bother peeling your carrots.
1. Cut or grate your carrots to the desired size.
2. Blanch the carrots in boiling water, 2 minutes for slices, 1 minute for grated.
3. Cool the blanched carrots with cold water & drain.
4. Put in airtight containers & freeze
5. Use within 10 - 12 months

I still have 2 1/2 bags of carrots in the fridge so I'll do more for the freezer. We only have CSA deliveries through the end of January so we'll be happy to have these local vegetables stored away for the rest of the winter.

Tuesday, December 9, 2008

Ziploc Vacuum Bags

With all cookies I've been making for Christmas & vegetables I have to much of from our CSA, I've been freezing a lot lately. It seems though that I've been getting freezer burn really quickly on my meats & vegetables. We'll I don't have that problem anymore since we got the Ziploc Vacuum Bags. Target had the starter kit with the pump & two sizes of bags on sale so we picked one up to try.
Ziploc Vacuum Bag vs Regular
Look at the difference in these two pieces of flank steak that had been frozen for only a week! We like to buy meat when its on sale & freeze it & now I feel like it will be kept at its best.

This system works so easily, you just put the pump over the special vent on the bags, pump a few times until the air is gone & your done. Plus its so much cheaper than a electric vacuum sealer. I even wash the bags & use them again which makes it even a better value.

Monday, December 8, 2008

Dark Chocolate & Lavender Cocoa

While we were in Michigan over Thanksgiving we ate lunch at a restaurant called Food Dance. The restaurant also had a shop & we killed some time looking around it while waiting for our table. One thing that caught my interest was the Vosge's drinking chocolate. I was especially intrigued by the white chocolate with lavender. When I saw they cost $4.50 & only made one 4 oz serving I decided I could easily make my own flavored cocoas at home.
Dark Chocolate & Lavender Cocoa
I'm not a huge fan of white chocolate so I decided to start this cocoa using my favorite cocoa powder in this, Hershey's Special Dark, it almost makes this cocoa black. I infused culinary lavender in hot milk before adding the milk to the chocolate. It gave off such an amazing aroma that you could almost call this drink aroma therapy. Now I know not everyone is a huge fan of lavender in food, Matt is one such person, but even he thought this cocoa was great. The lavender adds an extra dimension to the cocoa that is unexpected but fits so well. Matt says he feels like it made the chocolate taste more chocolatey.

Dark Chocolate & Lavender Cocoa

2 c milk (we use non-fat but this would be so wonderful with 2% or full fat)
1 T culinary lavender
2 T Hershey's Special Dark Unsweetened Cocoa
1/4 c sugar
1/4 c water

Place the lavender in a tea ball or tie in a piece of cheese cloth. Heat the milk until hot but not boiling, this took me about 2 minutes in the microwave. Put the prepared lavender in the milk & let it seep for about 15 minutes.

Meanwhile, put the cocoa, sugar & water in a saucepan. Heat over medium-low heat until the sugar is melted & the mixture is hot. Remove the lavender from the milk. Pour the milk into the chocolate mixture. Heat & stir until hot but not boiling. Divide between two mugs.

Makes 2 servings

So far I have only found Hershey's Special Dark at Super Target & on Amazon (It's a steal to buy it on Amazon since you get 6 containers for $18.99). I find we like it's flavor even better than dutch processed cocoa. I love the dark color it gives all my chocolate baked goods, remember these cupcakes? If you can't find it you can use any unsweetened cocoa you like.

Saturday, December 6, 2008

8 Weeks of Cookies - Chocolate Covered Cherry Cookies

Now that I've done 4 cookies that are traditional for my family to have at Christmas, it's time to move on the the cookies from Matt's family.
Chocolate Covered Cherry Cookies
These Chocolate Covered Cherry Cookies are a favorite of Matt's (I've noticed he has a thing for chocolate cookies). His Mom sent us the recipe for these a couple years ago & I'm not sure where it comes from originally. To me these cookies are taste like rich little brownie bites topped with cherry & frosting, nothing wrong with that at all!

I used Hershey's Special Dark Cocoa to make the cookie portion of these. This wonderful cocoa is 100% cacao giving my baked goods a intense dark color & chocolate flavor. I think I'd find it hard to go back to using regular cocoa after using this.

Chocolate Covered Cherry Cookies

1 1/2 c all-purpose flour
1/2 c unsweetened cocoa powder 
1/4 t baking soda
1/4 t baking powder
1/4 t salt
1/2 c unsalted butter, softened
1 c sugar
1 egg
1 1/2 t vanilla
24 maraschino cherries (I had a 10-oz jar & had one cherry left)
1/2 c semisweet chocolate chips (I actually used a mix of semisweet & bittersweet)
1/4 c sweetened condensed milk (use the leftovers to make dulce de leche)

Preheat oven to 350 F.

Mix the flour, cocoa, baking soda, baking powder & salt together, set aside.

In a mixer beat the butter until softened. Add the sugar to the butter & beat until light & fluffy. Beat in the egg and vanilla. Add the flour mixture & beat until well mixed.

Roll the dough into 1-inch balls & place them 2 inches apart on an ungreased cookie sheets. Use your thumb to make an indentation in the center of each cookie.

Drain the cherries reserving the juice. Remove the stems & cut the cherries in half. Place 1/2 of a cherry into the indentation in each cookie.

Put the chocolate chips & condensed milk in a small saucepan. Stir over low heat until the chocolate is melted. Stir in 4 teaspoons of the cherry juice. Spoon 1/2 - 1 teaspoon of chocolate over the top of each cherry covering it completely. If the chocolate is too thick add a little more cherry juice.

Bake for 10 minutes & cool on a rack.

Makes 48 cookies

These cookies will freeze well. Individually freeze them on a cookie sheet. Once frozen place them in a box with wax paper between layers then back into the freezer.
-------------------------------------------------------------------------
8 Weeks of Cookies
Apricot Foldover Cookies
Swedish Peppernut Cookies
Related Posts with Thumbnails

Get Email Updates!

Enter your email address:

Delivered by FeedBurner

Measurement Abbreviations

T = Tablespoon
t = teaspoon
c = cup
lb = pound
oz - ounce

Labels

Blog Archive

Contributors

Blog Directory for Minneapolis, Minnesota