Thursday, August 27, 2009

Daring Bakers - Dobos Torte

The August 2009 Daring Bakers' challenge was hosted by Angela of A Spoonful of Sugar and Lorraine of Not Quite Nigella. They chose the spectacular Dobos Torte based on a recipe from Rick Rodgers' cookbook Kaffeehaus: Exquisite Desserts from the Classic Cafés of Vienna, Budapest, and Prague.
IMG_5012
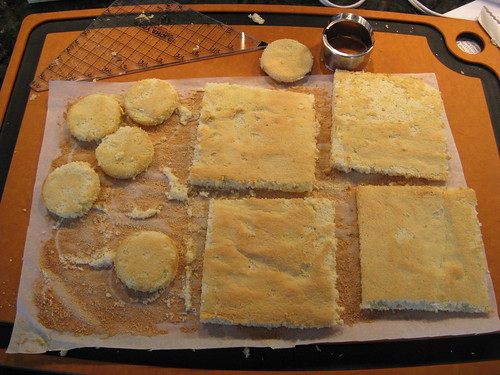
This one looked really daunting but went together surprisingly well plus I beat one of my cooking nemesis, caramel. I cut the recipe in half to make a small cake perfect for just Matt & I. I simplified the cooking of the sponge layers by making it in one big piece is a jelly roll pan & then cutting it into 4" squares.
IMG_5034
Because I don't have an offset spatula (Hey, Matt this would be a great present for me, hint, hint) it was hard to get a really flat even sponge but I figure buttercream is made to fill in all those nooks & crannies. Speaking of the buttercream, it was so tasty & relatively easy to make. I used some toasted, salted hazelnuts that the nice people at Oh Nuts! sent me on the side of the cake. I thought the salty flavor would play nicely with the chocolate & caramel.

What follows is the recipe. My notes are in italics. I made 1/2 of this recipe.

Equipment
2 baking sheets I used one Jelly Roll Pan (baking sheet with sides)
9” (23cm) springform tin and 8” cake tin, for templates I didn't use these at all instead I used a ruler to cut out my sponge
mixing bowls (1 medium, 1 large)
a sieve
a double boiler (a large saucepan plus a large heat-proof mixing bowl which fits snugly over the top of the pan)
a small saucepan
a whisk (you could use a balloon whisk for the entire cake, but an electric hand whisk or stand mixer will make life much easier) I used a hand mixer
metal offset spatula Don't have this so I just used a butter knife
sharp knife
a 7 1/2” cardboard cake round, or just build cake on the base of a sprinfrom tin. I just made my cake right on a plate
piping bag and tip, optional

Prep times
Sponge layers 20 mins prep, 40 mins cooking total if baking each layer individually. Only 5 - 7 minutes to cook if you do one layer & cut it.
Buttercream: 20 mins cooking. Cooling time for buttercream: about 1 hour plus 10 minutes after this to beat and divide.
Caramel layer: 10-15 minutes.
Assembly of whole cake: 20 minutes

Sponge cake layers
6 large eggs, separated, at room temperature
1 1/3 cups (162g) confectioner's (icing) sugar, divided
1 teaspoon (5ml) vanilla extract
1 cup plus 2 tablespoons (112g) sifted cake flour (SUBSTITUTE 95g plain flour + 17g cornflour (cornstarch) sifted together)
pinch of salt

NB. The sponge layers can be prepared in advance and stored interleaved with parchment and well-wrapped in the fridge overnight.

1.Position the racks in the top and centre thirds of the oven and heat to 400F (200C).

2.Cut six pieces of parchment paper to fit the baking sheets. Using the bottom of a 9" (23cm) springform tin as a template and a dark pencil or a pen, trace a circle on each of the papers, and turn them over (the circle should be visible from the other side, so that the graphite or ink doesn't touch the cake batter.)
I just lined a jelly roll pan with parchment paper
3.Beat the egg yolks, 2/3 cup (81g) of the confectioner's (icing) sugar, and the vanilla in a medium bowl with a mixer on high speed until the mixture is thick, pale yellow and forms a thick ribbon when the beaters are lifted a few inches above the batter, about 3 minutes. (You can do this step with a balloon whisk if you don't have a mixer.
4.In another bowl, using clean beaters, beat the egg whites until soft peaks form. Gradually beat in the remaining 2/3 cup (81g) of confectioner's (icing)sugar until the whites form stiff, shiny peaks. Using a large rubber spatula, stir about 1/4 of the beaten whites into the egg yolk mixture, then fold in the remainder, leaving a few wisps of white visible. Combine the flour and salt. Sift half the flour over the eggs, and fold in; repeat with the remaining flour.

5.Line one of the baking sheets with a circle-marked paper. Using a small offset spatula, spread about 3/4cup of the batter in an even layer, filling in the traced circle on one baking sheet. I spread the batter in the jelly roll about 1/2-inch thick. Bake on the top rack for 5 minutes, until the cake springs back when pressed gently in the centre and the edges are lightly browned. Mine took 7 minutes. While this cake bakes, repeat the process on the other baking sheet, placing it on the centre rack. When the first cake is done, move the second cake to the top rack.
IMG_5000
Invert the first cake onto a flat surface and carefully peel off the paper. Slide the cake layer back onto the paper and let stand until cool. I found the sponge stuck to the parchment after awhile with the top side down so I flipped it back over. Rinse the baking sheet under cold running water to cool, and dry it before lining with another parchment. Continue with the remaining papers and batter to make a total of six layers. Skip all this if you do one big piece like me. Completely cool the layers. Using an 8" springform pan bottom or plate as a template, trim each cake layer into a neat round. (A small serrated knife is best for this task.)
I used a ruler & cut out four 4-inch squares. I cut out circles to use for the caramel layer. I just realized it was supposed to be five layers & the top not four, oops.
IMG_5001

Chocolate Buttercream
4 large eggs, at room temperature
1 cup (200g) caster (ultrafine or superfine white) sugar I used powdered sugar.
4oz (110g) bakers chocolate or your favourite dark chocolate, finely chopped I used 67% bittersweet chocolate
2 sticks plus 2 tablespoons (250g) unsalted butter, at room temperature.

NB. This can be prepared in advance and kept chilled until required.

1.Prepare a double-boiler: quarter-fill a large saucepan with water and bring it to a boil.
2.Meanwhile, whisk the eggs with the sugar until pale and thickened, about five minutes. You can use a balloon whisk or electric hand mixer for this.

3.Fit bowl over the boiling water in the saucepan (water should not touch bowl) and lower the heat to a brisk simmer. Cook the egg mixture, whisking constantly, for 2-3 minutes until you see it starting to thicken a bit. Whisk in the finely chopped chocolate and cook, stirring, for a further 2-3 minutes.
4.Scrape the chocolate mixture into a medium bowl and leave to cool to room temperature. It should be quite thick and sticky in consistency.
5.When cool, beat in the soft butter, a small piece (about 2 tablespoons/30g) at a time. An electric hand mixer is great here, but it is possible to beat the butter in with a spatula if it is soft enough. You should end up with a thick, velvety chocolate buttercream. Chill while you make the caramel topping. My buttercream didn't seem thick enough so I beat about 1/3 c more powdered sugar in it which helped. It chilled up nicely.
Lorraine's note: If you're in Winter just now your butter might not soften enough at room temperature, which leads to lumps forming in the buttercream. Male sure the butter is of a very soft texture I.e. running a knife through it will provide little resistance, before you try to beat it into the chocolate mixture. Also, if you beat the butter in while the chocolate mixture is hot you'll end up with more of a ganache than a buttercream!

Caramel topping
1 cup (200g) caster (superfine or ultrafine white) sugar I just used granulated white sugar.
12 tablespoons (180 ml) water
8 teaspoons (40 ml) lemon juice Next time I'll use vanilla.
1 tablespoon neutral oil (e.g. grapeseed, rice bran, sunflower)

1.Choose the best-looking cake layer for the caramel top. To make the caramel topping: Line a jellyroll pan with parchment paper and butter the paper. Place the reserved cake layer on the paper. Score the cake into 12 equal wedges. Lightly oil a thin, sharp knife and an offset metal spatula.
Or like me cut out shapes to coat with the caramel.
2.Stir the sugar, water and lemon juice in a small saucepan. Bring to a boil over a medium heat, stirring often to dissolve the sugar. Once dissolved into a smooth syrup, turn the heat up to high and boil without stirring, swirling the pan by the handle occasionally and washing down any sugar crystals on the sides of the pan with a wet brush until the syrup has turned into an amber-coloured caramel.

3.The top layer is perhaps the hardest part of the whole cake so make sure you have a oiled, hot offset spatula ready. I also find it helps if the cake layer hasn't just been taken out of the refrigerator. I made mine ahead of time and the cake layer was cold and the toffee set very, very quickly—too quickly for me to spread it. Immediately pour all of the hot caramel over the cake layer. You will have some leftover most probably but more is better than less and you can always make nice toffee pattern using the extra to decorate. Using the offset spatula, quickly spread the caramel evenly to the edge of the cake layer. Let cool until beginning to set, about 30 seconds. Using the tip of the hot oiled knife (keep re-oiling this with a pastry brush between cutting), cut through the scored marks to divide the caramel layer into 12 equal wedges. Cool another minute or so, then use the edge of the knife to completely cut and separate the wedges using one firm slice movement (rather than rocking back and forth which may produce toffee strands). Cool completely. I used a ladle to pour the caramel over the pieces to be covered & then spread with a oiled butter knife. Make sure to cut away the excess caramel before it sets.
Angela's note: I recommend cutting, rather than scoring, the cake layer into wedges before covering in caramel (reform them into a round). If you have an 8” silicon round form, then I highly recommend placing the wedges in that for easy removal later and it also ensures that the caramel stays on the cake layer. Once set, use a very sharp knife to separate the wedges.

Assembling the Dobos
a 7” cardboard round
12 whole hazelnuts, peeled and toasted
½ cup (50g) peeled and finely chopped hazelnuts

1.Divide the buttercream into six equal parts.

2.Place a dab of chocolate buttercream on the middle of a 7 1/2” cardboard round and top with one cake layer. Spread the layer with one part of the chocolate icing. Repeat with 4 more cake layers. Spread the remaining icing on the sides of the cake.
I didn't use a cardboard round so I just made my cake on a plate & cleaned it up a bit when done.
3.Optional: press the finely chopped hazelnuts onto the sides of the cake.

4.Propping a hazelnut under each wedge so that it sits at an angle, arrange the wedges on top of the cake in a spoke pattern. If you have any leftover buttercream, you can pipe rosettes under each hazelnut or a large rosette in the centre of the cake. Refrigerate the cake under a cake dome until the icing is set, about 2 hours. Let slices come to room temperature for the best possible flavour.

If you are not reading this post in a feed reader or at http://agoodappetite.blogspot.com OR at http://agoodappetite.com then the site you are reading is illegally publishing copyrighted material. Contact me at katbaro AT yahoo DOT COM. All recipes, text and photographs in this post are the original creations & property of the author unless otherwise noted.
© 2007-2009 Kathy Lewinski

Wednesday, August 26, 2009

Espresso Glazed Steak

This is one of the best steaks we've ever made. I'm not sure if it was the lovely cut of beef we bought from Chase Brook Natural or the amazing Espresso Glaze.
Espresso glazed steak
There is something about the flavors of coffee & beef that just go together so well. The little bit of molasses in the glaze adds just the perfect amount of sweetness.

We served the steak with some smashed potatoes & creamed red mizuna. Mizuna is a leafy green vegetable that we got from our CSA for the first time this year. They warned us in the newsletter that it can be a little bitter (a bit like mustard to us) & to add some sweetness when cooking it. I decided to cream it like I would spinach using this recipe. I think creaming the mizuna really mellowed it out & it made a great side dish for the beef.

Espresso Glazed Steak

Black Espresso Rub

1/4 c ground espresso beans (we just used instant espresso)
2 t lemon zest
3 T sugar
2 T kosher salt
2 t garlic powder
1 t ground coriander
2 t ground black pepper
1 t ground chipotle

Combine. Can be stored in the fridge for 1 month.

Steak (We shared a t-bone but this recipe will make enough for 4 rib-eyes)
1/2 c black espresso rub
3 T melted butter
2 T brewed espresso (once again we used instant with 2 T hot water)
1 T molasses

Rub your steak with the prepared Black Espresso Rub & let sit at room temperature for 30 - 60 minutes.

Prepare the glaze by mixing the butter, espresso & molasses together.

Cook the steaks on an oiled grill over high heat until nicely crusted on both sides. Move to lower heat & finish cooking until desired doneness. Brush both sides of the steaks with the glaze while cooking over the low heat. Let rest 5 minutes before serving.

If you are not reading this post in a feed reader or at http://agoodappetite.blogspot.com OR at http://agoodappetite.com then the site you are reading is illegally publishing copyrighted material. Contact me at katbaro AT yahoo DOT COM. All recipes, text and photographs in this post are the original creations & property of the author unless otherwise noted.
© 2007-2009 Kathy Lewinski

Tuesday, August 25, 2009

Zucchini Yeast Rolls and Freezing Bread

When I was reading through the numerous food blogs I read everyday I came across this post on Today's Menu Take It or Leave It. I still had a lot of zucchini in the fridge so this looked like a great option.
Hiding the veggies #1
(This batch was par-baked, frozen & then finished on the day we wanted to eat them.)

What a great way to use zucchini. Really other than a little green in the rolls you won't know they had vegetables in them. The rolls were a little heavier than a white roll but not too heavy. They have a nice slightly sweet flavor. I think they would we perfect with a soup or stew. I did have a problem with the recipe in the amount of flour is called for. I could not get it to form a smooth, elastic dough without adding almost twice the amount of flour. I think the zucchini has so much water in it but can also vary from zucchini to zucchini so that was probably part of the issue. To that end though I have halved the amount of water the recipe calls for.

I also thought it would be a good chance to try different ways of freezing bread to prepare later. After the first rise, when the dough was rolled into 2.5 oz balls, I put half the balls on a greased cookie sheet & then into the freezer. After they were frozen I put them into a freezer bag & wrote cooking directions on it. The night before I want to use these I take the number I want out & leave them in the fridge to thaw. On baking day, they would be place them on a greased baking sheet & let rise until doubled & then bake as normal.
Zucchini Yeast Rolls
(This batch was frozen after the first rise.)

For the other half of the batch, I parbaked them liked the take & bake breads you get at the grocery store. I followed the recipe through the second rise & then only baked them for 15 minutes. I let the rolls cool to room temperature and then froze them. On the day I want to make them I'lI take the number I want out & bake them at 400 F for 8 - 10 minutes. They won't don't even need to be thawed.

Both methods worked well for freezing bread dough & having fresh baked rolls at a later time but the par-baked method was really the winner. Since the rolls could be baked right from frozen the only lead time needed was the time to preheat the oven & bake them. The other method worked fine but you have to take the extra time to thaw them & let them rise, though they took less time to bake than they did fresh.

Zucchini Yeast Rolls
(adapted from Simply In Season)

2 - 3 c zucchini, grated
1 /2 c water
1/2 c sugar
3 T olive oil
2 t salt
1 c bread flour
1 c whole wheat flour
1/3 c powdered milk
2 T yeast
1 3/4 - 2 1/2 c bread flour (I actually ended up using close to 5)

Combine the zucchini, water, sugar, oil & salt in a microwave safe bowl. Heat for about 2 minutes until warm (no hotter than 110 F).

In a large mixing bowl combine the 1 cup bread flour, wheat flour, milk & yeast. Stir in the warm wet ingredients until smooth. Stir in more bread flour until you get a soft dough (mine was still pretty sticky). Knead for about 10 minutes until you get a smooth, elastic dough. Place the dough in an oiled bowl. Turn to coat with oil. Cover & let rise for 10 minutes.

Divide the dough into 2.5 oz balls. Place on a baking pan that is either greased or covered with a silicon pad. Cover & let rise until about double (I let mine rise for 2 hours).

Preheat oven to 350 F. Brush the rolls with milk for a soft crust or an egg wash for a shine crust. Bake the rolls for 25 - 30 minutes until brown.

Makes 20 rolls.

If you are not reading this post in a feed reader or at http://agoodappetite.blogspot.com OR at http://agoodappetite.com then the site you are reading is illegally publishing copyrighted material. Contact me at katbaro AT yahoo DOT COM. All recipes, text and photographs in this post are the original creations & property of the author unless otherwise noted.
© 2007-2009 Kathy Lewinski

Monday, August 24, 2009

We're off

A Good Appetite is off on a South Asian adventure to India for the next couple of weeks.
#208 - Our visas are here!
We've left plenty of posts to keep you cooking while we are gone but won't be available to answer any questions or comment on other blogs. We'll be back in early September hopefully with lots of photos & stories to share.

If you are not reading this post in a feed reader or at http://agoodappetite.blogspot.com OR at http://agoodappetite.com then the site you are reading is illegally publishing copyrighted material. Contact me at katbaro AT yahoo DOT COM. All recipes, text and photographs in this post are the original creations & property of the author unless otherwise noted.
© 2007-2009 Kathy Lewinski

Friday, August 21, 2009

Pick a Peck of Pickled Peppers

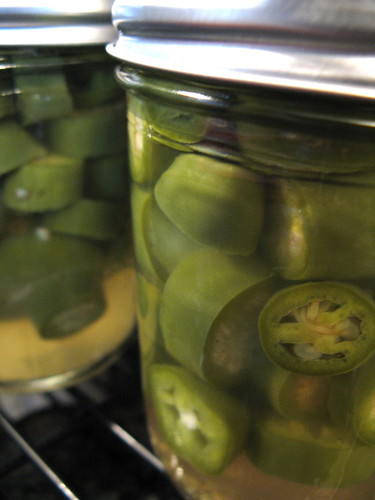
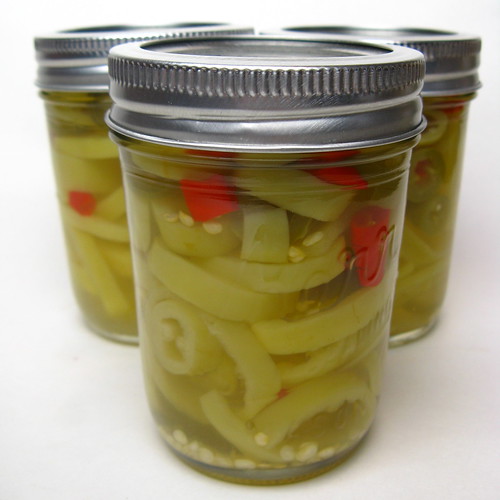
We have had a bumper crop of jalapenos & little spicy red peppers (no idea what they are, Matt picked them up at the Friends Sale) this year despite the cool summer. On top of that Matt hasn't been able to resist buying trays of peppers at the Kingfield Farmers Market for only $2.00. There is no way we can go through that many hot peppers so we decided to pickle some.
#218 - Pick a Peck of Pickled Peppers
I did a batch that is just jalapenos. I figure this is the batch I can eat since most other peppers are a little too spicy for me.
Spicy Pickled Peppers
Then Matt made a batch with banana peppers, little red peppers & a few jalapenos thrown in.

Pickled peppers are super easy to make. You just make your vinegar & garlic solution & pour it hot over sliced peppers. This recipe is easily adapted for the amount of peppers you have. The peppers are good in sandwiches (totally great on a banh mi) or even straight out of the jar as a snack.

Pickled Hot Peppers

5 1/2 c hot peppers (use any mixture of your choice)
3 c white vinegar
1 c water
2 garlic cloves, crushed

Prepare five half-pint jars by boiling them for 20 minutes. Boil the lids for 5.

In a stainless steel or enamel saucepan bring the vinegar, water & garlic to a boil. Reduce heat & let simmer for 5 minutes to infuse the garlic. Discard garlic. (I think you could leave it in if you wanted a more garlic flavor.)

Pack the hot jars with the peppers leaving a 1/2-inch headspace. Pour the hot vinegar solution over the peppers still leaving the 1/2-inch headspace. Remove any air bubbles & add more liquid if needed. Clean the rims of the jars, place the lids on top & hand tighten the neckbands.

Process in boiling water for 10 minutes. Turn the heat off & let sit for 5 more minutes. Remove the jars without drying them & let them cool undisturbed for 12 - 24 hours. The lids should pull downward with a pop. Any jars where the lid does not pull downward need to be refrigerated & used or reprocessed.

Makes 5 cups.

If you are not reading this post in a feed reader or at http://agoodappetite.blogspot.com OR at http://agoodappetite.com then the site you are reading is illegally publishing copyrighted material. Contact me at katbaro AT yahoo DOT COM. All recipes, text and photographs in this post are the original creations & property of the author unless otherwise noted.
© 2007-2009 Kathy Lewinski
Thursday, August 20, 2009

Corn Zipper Winner!

The Random Number Generator has spoken & our winner in #12 designedbyninjas!
Corn Ripper
By the way you should really check out Ken's site Design Ninjas. He finds the coolest stuff on Craigslist so we don't have to.

If you are not reading this post in a feed reader or at http://agoodappetite.blogspot.com OR at http://agoodappetite.com then the site you are reading is illegally publishing copyrighted material. Contact me at katbaro AT yahoo DOT COM. All recipes, text and photographs in this post are the original creations & property of the author unless otherwise noted.
© 2007-2009 Kathy Lewinski
Zesty Zucchini Relish

Our quest to use up all the zucchini continues....
Zucchini Relish
This is the type of relish you put on a hot dog or brat but fresh & flavorful because its made at home. You can make it as spicy as you want by adding more or hotter peppers. The horseradish adds quite a kick too. Even the smell of it while its cooking will clear out your sinuses!

This recipe really takes two days as the vegetables need to sit in a brine for 12 hours so plan ahead.

Zesty Zucchini Relish
(adapted from Ball Complete Book of Home Preserving for quantity)

6 c zucchini, finely chopped
2 c onion, chopped (we used a sweet onion)
1 1/2 bell peppers, seeded & chopped (we used all red though you could do a mix)
2 1/2 T canning salt
1 1/4 c sugar
1 1/4 c white vinegar
1/2 T nutmeg
1/2 T ground turmeric
2 T prepared horseradish
1 jalapeno, including seeds chopped

Put the zucchini, onion, peppers & salt in a large glass or stainless steel bowl. Cover & let sit for 12 hours or overnight at room temperature. Drain & rinse with cool water. Squeeze out as much liquid as possible with your hands.

Place the drained vegetables in a large stainless steel or enamel saucepan. Add the sugar, vinegar, nutmeg, turmeric, horseradish & chili pepper. Bring to a boil. Reduce & allow to simmer for about 45 minutes stirring from time to time. It is done most of the liquid has been reduced & it has the consistency of a thin relish.

Meanwhile, prepare 5 half-pint jars by boiling them for 20 minutes. Boil the lids for five.

Fill the hot jars with the hot relish leaving 1/2-inch head space. Clean the rims. Put the top on & hand screw on the neckbands. Place the jars back into the boiling water & process for 15 minutes. Turn off the heat & let sit for 5 more minutes. Remove the jars, do not dry them, and let them sit for 12 - 24 hours to cool. If the top does not pull downwards the relish has not been processed properly, either refrigerate & use or reprocess.

Makes 5 half-pints

If you are not reading this post in a feed reader or at http://agoodappetite.blogspot.com OR at http://agoodappetite.com then the site you are reading is illegally publishing copyrighted material. Contact me at katbaro AT yahoo DOT COM. All recipes, text and photographs in this post are the original creations & property of the author unless otherwise noted.
© 2007-2009 Kathy Lewinski

Wednesday, August 19, 2009

Green Chili and Sweet Corn Mac and Cheese

We tend to watch a little of the Food Network while getting ready for bed at night which often leads to discussions of ideas for meals which we promptly forget in the morning. The other night I was teasing Matt that he needed a journal next to the bed to write those things in so he went & got a post-it & wrote that night's ideas down. This dish was one of those ideas. I think we were watching Diners, Drive-ins & Dives but have no idea what inspired this.
Green Chile & Corn Mac & Cheese
Anyway, this is one heck of a mac & cheese. The corn adds a wonderful sweetness & a bit of texture. The green chiles add a very subtle chile flavor & scent. We added a little cayenne for the slightest heat at the back of the throat, add more if you like things spicier. Mac & Cheese is a favorite around our house & I think this variation will be going into rotation a lot.

Green Chili and Sweet Corn Mac & Cheese

12 oz elbow macaroni
2 T unsalted butter
2 T all-purpose flour
1/2 c heavy cream
1 c milk
6 oz queso quesadilla (or a mild melting cheese like monterey jack)
3 oz sharp cheddar
4.5 oz can chopped green chiles
1 c fresh or frozen sweet corn kernels (about 2 cobs worth)
pinch dry mustard
1/2 t cayenne (or more to taste)
salt & pepper
panko

Preheat oven to 350 F.

Cook macaroni according to directions. Drain & set aside.

Melt butter in a large saucepan over medium-low heat. Add flour & stir for 1 minute, do not let it brown. Add cream & milk a little at a time while stirring. Cook while stirring until smooth, hot & slightly thickened, about 1 minute. Turn heat to low & stir in cheese. Stir until completely melted. Stir in chiles & sweet corn. Season with mustard, cayenne plus salt & pepper to taste.

Mix the cheese sauce together with the cooked macaroni in a large casserole dish. Sprinkle panko over the top.

Bake for 25 minutes until the top is golden brown.

Serves 6

If you are not reading this post in a feed reader or at http://agoodappetite.blogspot.com OR at http://agoodappetite.com then the site you are reading is illegally publishing copyrighted material. Contact me at katbaro AT yahoo DOT COM. All recipes, text and photographs in this post are the original creations & property of the author unless otherwise noted.
© 2007-2009 Kathy Lewinski
Tuesday, August 18, 2009

Black Bean Burgers

This black bean burger recipe has been a favorite of mine for many years. I'm not a big fan of most veggie burgers but this one is so good you don't miss the meat at all. It has such a wonderful flavor & texture plus it is super easy to make. This time around I did use the Bacon Chipotle Sauce in the burgers so they aren't completely vegetarian but you can easily replace that with any salsa.
Black Bean Burger with Roasted Cauliflower
I like these burgers topped with a little sour cream or plain yogurt. Matt mixed some hot sauce & mayo together for the top of his. Cheese would be great too. For a side dish we roasted a some cauliflower tossed in olive oil & salt at 400 F for about 30 minutes then served it with the Bacon Chipotle Sauce.

Black Bean Burgers
(adapted from Bon Appétit July 1995)

1 14oz can black beans, rinsed & drained
1/3 c red onion chopped
1/4 c bread crumbs
2 T Bacon Chipotle Sauce (or your favorite salsa)
1 t ground cumin

Smash the black beans with a fork or potato masher. Stir in the remaining ingredients. Form into 2 or 3 patties. Cook on a well oiled grill or griddle 3 minutes per side. The burgers should be warm through.

Serves 2 -3

If you are not reading this post in a feed reader or at http://agoodappetite.blogspot.com OR at http://agoodappetite.com then the site you are reading is illegally publishing copyrighted material. Contact me at katbaro AT yahoo DOT COM. All recipes, text and photographs in this post are the original creations & property of the author unless otherwise noted.
© 2007-2009 Kathy Lewinski

Monday, August 17, 2009

Weekly Menu 8/17 - 8/21

We were up North at the lake with my family over the weekend. There was lots of fishing going on but luckily nothing big enough to take home.
David catches a crafty fishThat's a big one
I say luckily because this will be a clean out the fridge week for us when it comes to meals. We are leaving for two weeks in India on Saturday we don't want to have a bunch to throw away. It looks like our meals are going to be pretty basic this week.

Menu Planning Monday

Barbecued Chicken with green beans & zucchini rolls

Steak with roasted potatoes & barbecued zucchini

Veggie pasta

Pan-fried trout with potatoes

Also the tomatoes are really starting to ripen so I plan as getting as much canned as I can before leaving.
Morning 221 - Finally


If you are not reading this post in a feed reader or at http://agoodappetite.blogspot.com OR at http://agoodappetite.com then the site you are reading is illegally publishing copyrighted material. Contact me at katbaro AT yahoo DOT COM. All recipes, text and photographs in this post are the original creations & property of the author unless otherwise noted.
© 2007-2009 Kathy Lewinski
Saturday, August 15, 2009

What we did with CSA box #7 and what's in #8


What we did with CSA Box #7
1. Dark Chocolate Zucchini Cupcakes 2. Zucchini Carbonara(recipe to come) 3. Black Bean Burgers with Roasted Cauliflower & Steamed Beans(recipe to come) 4. Chorizo Stuffed Zucchini 5. Espresso Glazed Steak (recipe to come) with Smashed Potatoes & Creamed Red Mizuna 6. Smoked Chicken Tacos with Peppers & Onions 7. Asian Noodle Salad 8. Bruschetta 10. Tomato & Onion Tart with Sautéed Greens
Sorry there are so many "recipes to come" here. I've been cooking a lot & have a nice backlog of posts waiting to go up. There are a lot of zucchini dishes here that used both zucchini from the farm & our own garden.

Box #8 is pretty amazing. The farm says the cool summer is giving us one of the best seasons ever.
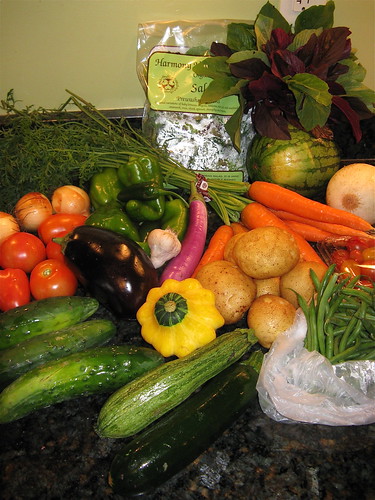
CSA Box #8

Salad Mix
Amaranth - Will go in stir-fry
Yellow Watermelon & Butterscotch Melon - We'll take these up to camp for some snacking this weekend
Carrots - Stir-fry, salad & maybe salsa
Japanese Eggplant - Stir-fry
Various Green Peppers - Matt is going to can some salsa using these
Onions - Also in the salsa
Tomatoes - In the salsa
Cucumber - Think this might be snacks for this weekend as well.
Eggplant - I actually should have left this in the swap box as Matt does not like eggplant
Garlic - Going in the salsa
Summer Squash - I'm ready to yell surrender to the zucchini & summer squash so I think I may give these to my mom
Potatoes
Beans

Find more ideas on using your CSA box at Cooking Away My CSA

If you are not reading this post in a feed reader or at http://agoodappetite.blogspot.com OR at http://agoodappetite.com then the site you are reading is illegally publishing copyrighted material. Contact me at katbaro AT yahoo DOT COM. All recipes, text and photographs in this post are the original creations & property of the author unless otherwise noted.
© 2007-2009 Kathy Lewinski

Friday, August 14, 2009

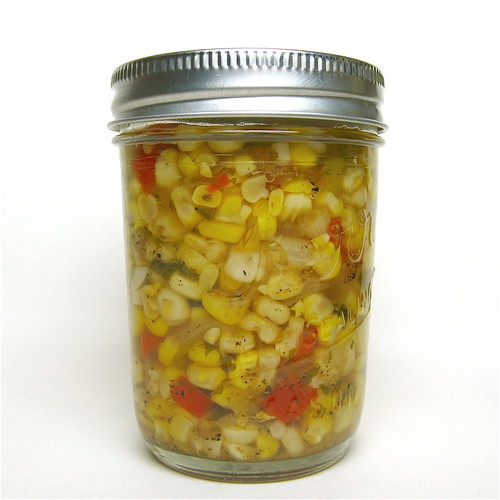
Corn Relish and a Giveaway

I really like a corn relish. Its tasty on pork chops or our black bean burgers.
Corn Relish
Minnesota sweet corn is the flavor of summer to me so I love finding ways to preserve it to last all winter.
Corn Ripper
In order to help you save the taste of summer corn through the winter I have a corn zipper to give away. This cute little smiling face will help you easily & neatly remove kernels from the cob. To enter leave a comment on this post. Please leave your email so I can contact you if you win. I'll pick a winner on Thursday, August 20th.

Corn Relish
(adapted from The Complete Book of Small-Batch Preserving)

6-7 fresh corn cobs (or 4 cups frozen corn kernels)
1 jalapeno, seeded & chopped
2 cloves garlic, minced
1 1/2 c cider vinegar
1/4 c sugar
1/2 c red onion, chopped
1/3 c green onion, chopped
1/2 c red pepper
1 t ground cumin
1 t canning salt
1/2 t ground pepper
2 T fresh cilantro, chopped

Process 5 half-pint jars & lids by boiling the jars for 20 minutes & the lids for 5.

Boil the corn cobs in a pot of salted water for 6 minutes. Let the corn cool enough to handle. Cut the kernels from the cobs measuring out 4 cups worth.

Put the corn in a large stainless steel or enamel saucepan. Add the jalapeno, garlic, vinegar, sugar, onions, pepper, cumin, salt & pepper. Bring to a boil. Reduce to simmer & let cook for 20 minutes. Stir in cilantro & let cook for 2 more minutes.

Ladle the hot relish into the hot jars leaving 1/2-inch head space. Clean the rims. Place the lids on top & hand screw on the neck bands. Process in boiling water for 15 minutes. Turn off the heat & let sit for 5 more minutes. Remove from the water without drying & let cool for 12 - 24 hours. The lids should all pull downward. If some do not they have not processed correctly & should either be refrigerated & used or reprocessed.

Makes 5 cups.

If you are not reading this post in a feed reader or at http://agoodappetite.blogspot.com OR at http://agoodappetite.com then the site you are reading is illegally publishing copyrighted material. Contact me at katbaro AT yahoo DOT COM. All recipes, text and photographs in this post are the original creations & property of the author unless otherwise noted.
© 2007-2009 Kathy Lewinski

Thursday, August 13, 2009

Lime Chipotle Marinade Winners


The random number generator has picked for winners for the Spicy Mama Lime Chipotle Marinade giveaway & here they are...

#8 - Cara
#15 - Judy in Florida
#23 - Mary D.
#25 - Mom24

Congrats to all the winners & look for another small giveaway tomorrow. Thanks to Spicy Mama for the marinade.

I've sent everyone an email asking for your mailing addresses expect for Mary D. whose email I don't have. Mary please email me with your address.

If you are not reading this post in a feed reader or at http://agoodappetite.blogspot.com OR at http://agoodappetite.com then the site you are reading is illegally publishing copyrighted material. Contact me at katbaro AT yahoo DOT COM. All recipes, text and photographs in this post are the original creations & property of the author unless otherwise noted.
© 2007-2009 Kathy Lewinski

Spiced Honey

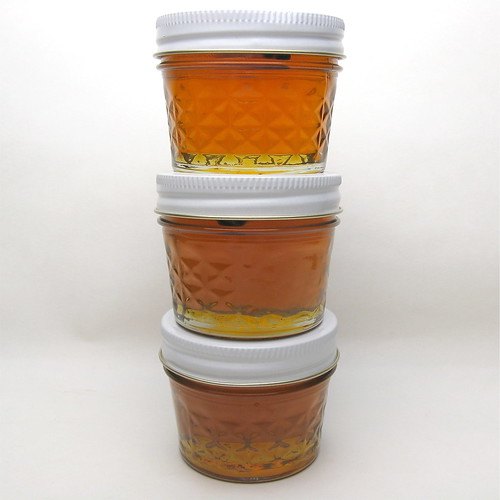
I was making Lemoncello for Recipes to Rival which required me to use the zest on a bunch of lemons but not the rest. What to do with all those lemons? I looked in my preserving books & this recipe for Spiced Honey caught my attention. The combination of lemon, cinnamon & cloves with honey sounded so good to me. It seems like it would be perfect in tea or on a hot biscuit.
Spiced Honey

Spiced Honey
(from Ball Complete Book of Home Preserving)

1 lemon, ends cut off cut into 6 slices
12 whole cloves
3 cinnamon sticks
2 2/3 c honey

Prepare the jars & lids for canning. Jars should be boiled in water for 20 minutes & lids for 5 minutes.

Insert the cloves into the lemon slices. In a large enamel or stainless steel saucepan combine the lemons, cinnamon & honey. Bring to a gentle boil over medium-high heat. Let boil for 2 minutes.

Place 2 lemon slices & on cinnamon stick into each jar of three hot sterilized half-pint jars. Add the hot honey leaving about 1/4-inch headroom. (I left the lemons out of my jars since they didn't look as nice with the zest gone. Also since I used six 1/2-cup jars instead of 3 half pint jars I cut the cinnamon sticks in half to put them in the jars.) Clean off the tops of the jars & cover with a lid. Close with a neckband & finger-tighten. Process in boiling water for 10 minutes. Turn off heat & let sit for 5 minutes. Remove jars from the water to a heat-proof surface & let cool for 12 - 24 hours (do not dry jars). Check to make sure the top of the jar has been drawn downwards, creating a seal. If it hasn't either reprocess that jar or store it in the fridge to be eaten within 3 weeks. Remove the neckbands & store jam in a cool dark place.

Makes 3 cups

If you are not reading this post in a feed reader or at http://agoodappetite.blogspot.com OR at http://agoodappetite.com then the site you are reading is illegally publishing copyrighted material. Contact me at katbaro AT yahoo DOT COM. All recipes, text and photographs in this post are the original creations & property of the author unless otherwise noted.
© 2007-2009 Kathy Lewinski
Wednesday, August 12, 2009

Chorizo Stuffed Zucchini

After harvesting five more giant zucchini from the garden Matt pulled the plants this week. I have to say I'm not sorry to see them go, I'm running out of ways to use them! This dish was Matt's idea. He thought it would be a good way to use up the zucchini as well as two chorizo links we had in the fridge.
Chorizo Stuffed Zucchini
It really came out quite good. We loved the Spanish flavors of the filling & how well the zucchini worked with them. The chorizo we use is house made at our local grocery chain, Lund's. It has such wonderful spices & flavor that there is no need to add much more to this filling. We used a young Manchego but I think any mild white melting cheese would work as well. You really don't need anything else with this dish because it is so filling.

Chorizo Stuffed Zucchini

1 large zucchini, halved length-wise & seeded (our zucchini was giant so we actually only used half of it.)
1 T olive oil
2 chorizo links, diced (these were about brat size)
1/2 c sweet onion, chopped
1 T tomato paste
1/2 c bread crumbs
2 oz young Manchego cheese, cubed

Preheat oven to 350 F.

Place the zucchini in a large pan cut side down & add water to cover as much as possible. Bring to a boil. Reduce to a simmer & let cook for about 5 minutes. Place zucchini in an oven safe dish.

Heat the olive oil in a skillet over medium-high heat. Add the chorizo & onion & cook until the onion is almost translucent. Stir in tomato paste. Turn off heat & stir in the bread crumbs & cheese.

Fill the zucchini with the stuffing. Bake for 35 - 45 minutes until the filling gets a nice crispy top.

Serves 2.


If you are not reading this post in a feed reader or at http://agoodappetite.blogspot.com OR at http://agoodappetite.com then the site you are reading is illegally publishing copyrighted material. Contact me at katbaro AT yahoo DOT COM. All recipes, text and photographs in this post are the original creations & property of the author unless otherwise noted.
© 2007-2009 Kathy Lewinski

Tuesday, August 11, 2009

Black Bean and Corn Salsa

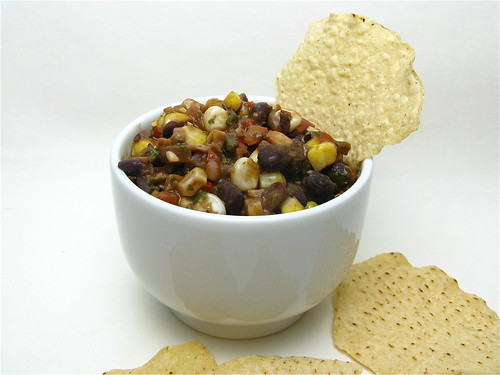
Matt absolutely loves salsa. He like a little bowl of it at lunch or as a snack with some chips. I like it too as long as its not too spicy & I prefer a fresh chunky salsa. We had a couple ears of sweet corn left from the farmers market & whipped up this salsa.
Black Bean & Corn Salsa
I love the texture & the sweetness the corn adds to this salsa. The original recipe didn't have any hot sauce in it but even I thought it needed some to balance that sweetness, just a touch will do. If you are cooking your own black beans make sure to get them nice & soft for this. I used the back of a spoon to smoosh them up a little while cooking them with the corn & seasonings.

Black Bean and Corn Salsa
(adapted from The Complete Book of Small-Batch Preserving)

1 c cooked black beans
1 c fresh corn kernels
2 jalapenos, seeded & minced
2 cloves garlic, minced
1/2 c red onion, chopped fine
2 T lime juice
2 T balsamic vinegar
1 T red vinegar
1 T olive oil
1/2 c red pepper, chopped fine
1/2 c fresh cilantro, chopped
dash of hot sauce

Put beans, corn jalapeno, garlic, onion, lime juice & vinegars all in a saucepan. Bring to a boil. Turn down heat & let simmer for 5 minutes or until all liquid is absorb, stir from time to time.

Stir in olive oil, red pepper, cilantro & hot sauce to taste.

Store in an airtight container in the fridge for 1 week or freeze.

Makes about 2 1/4 c

If you are not reading this post in a feed reader or at http://agoodappetite.blogspot.com OR at http://agoodappetite.com then the site you are reading is illegally publishing copyrighted material. Contact me at katbaro AT yahoo DOT COM. All recipes, text and photographs in this post are the original creations & property of the author unless otherwise noted.
© 2007-2009 Kathy Lewinski

Monday, August 10, 2009

Weekly Menu 8/10 - 8/14

Matt spent some time organizing our canned goods in the basement yesterday.
Our Stash
I have to say I'm feeling pretty good about what we've done so far. We are going to do some bread & butter pickles yet (we picked 14 more cucumbers yesterday), maybe some peach jam & hopefully tomatoes if they ever ripen (I'm afraid they will all ripen while we are on vacation in two weeks).

Menu Planning Monday....

Green Chili & Sweet Corn Mac & Cheese
Chicken with Cucumber & Dill
Gazpacho
Zuchhini Carbonara
Stir-Fry

If you are not reading this post in a feed reader or at http://agoodappetite.blogspot.com OR at http://agoodappetite.com then the site you are reading is illegally publishing copyrighted material. Contact me at katbaro AT yahoo DOT COM. All recipes, text and photographs in this post are the original creations & property of the author unless otherwise noted.
© 2007-2009 Kathy Lewinski

Friday, August 7, 2009

Individual Tomato and Onion Tarts

I love these individual tarts. They are such a perfect way to show off the beautiful seasonal vegetables we are getting right now plus, who can resist that buttery crust?!
Tomato Onion Tart
This wasn't originally on our menu for last week but then we got some beautiful little tomatoes (just a teaser for what's to come they say) & sweet onions in our CSA box. When I saw them I knew I wanted to make this right away. They make for a perfect little light meal served with a salad or some wilted greens like we did. I make these freeform because its so easy but you can use a mini tart pan is you prefer that look.

Individual Tomato & Onion Tarts

Crust
2/3 c all-purpose flour
1/8 t salt
4 T cold unsalted butter, cut into chunks
1 T + 1 t (or more) cold water

Filling
1 T olive oil
1 sweet onion, thinly sliced
1 t balsamic vinegar
1 - 2 oz grated Fontina cheese
6 cherry tomatoes
olive oil to brush on crust
kosher salt

Place the flour & salt for the crust into a food processor & pulse a few times to mix. Add in the butter & pulse until the mixture looks like a coarse meal. Add water & pulse. Squeeze the dough to see if it comes together, if its still dry add another 1 teaspoon. Spilt the dough into two balls & flatten them into discs. Wrap in plastic wrap & chill for 1/2 hour.

While the dough is chilling, heat the olive oil over medium-high heat in a skillet. Add the onion & cook until starting soften. Reduce heat to low & cook until the onions are very tender & brown. Stir in the balsamic & set aside.

Preheat the oven to 425 F. Remove the dough from the fridge & roll each disc into a 6-inch circle about 1/8-inch thick. Place the dough circles on a baking sheet covered with parchment paper or a silicone mat. Divide the cheese between the two dough circles placing it in the center leaving a 1 - 1 1/4-inch edge. Top with the onions & then arrange the tomatoes on top of that. Fold the edge up around the filling, pleating as you go. Brush the dough with a little olive oil. Sprinkle each tart with a little salt.

Bake for 15 minutes then reduced the heat to 375 F and bake another 15-20 minutes. The crust should be golden brown. Let sit 5 minutes before serving.

Makes 2 individual tarts

If you are not reading this post in a feed reader or at http://agoodappetite.blogspot.com OR at http://agoodappetite.com then the site you are reading is illegally publishing copyrighted material. Contact me at katbaro AT yahoo DOT COM. All recipes, text and photographs in this post are the original creations & property of the author unless otherwise noted.
© 2007-2009 Kathy Lewinski

Thursday, August 6, 2009

Crispin Cider Brined Pork and Braised Kohlrabi

I've always been a fan of hard apple cider, I find it a refreshing option from beer & wine especially on a warm summer day. Recently a new hard cider has come on the scene which in our opinion puts most others to shame. Minneapolis-based "Crispin Super-Premium Natural Hard Apple Cider is true to the apple in the way a varietal wine stays true to its grape. It’s naturally fermented with classic red wine yeasts for full-bodied taste, using premium apple juice blends not from concentrate, and without added malt, spirit or grape alcohols." It's crisp & refreshing without being overly sweet like a lot of other ciders tend to be. Right now Crispin is available in Original, Light & Brut but we are really excited about the Honey Crisp varietal coming in October.
Crispin
(photo courtesy of Crispin)
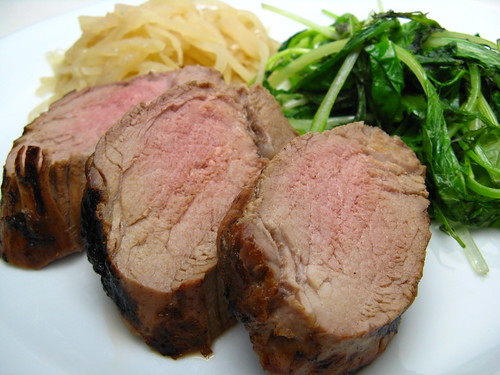
Recently, Crispin & Heavy Table announced a Summer Grilling Adventures Contest asking people to submit their best grilling recipe that uses Crispin Cider as one of the ingredients. At first it seemed like a waste to not just drink the cider over ice but then I tasted the final result. The pork gets a distinct fresh apple flavor (more apple flavor than I expected actually) with a touch of spices from the brine. The brine also helps the pork remain incredibly juicy.
Crispin Hard Cider Brined Pork
We made a side dish using some kohlrabi from our garden and Crispin as well. Kohlrabi is a member of the cabbage family so I thought it would be good braised like cabbage often is. It gets a sweet, apple flavor that is perfect with the pork. I also like the fact that kohlrabi retains a bit of a crunch.
Crispin Hard Cider Braised Kohlrabi
We used the brut variety of Crispin which they describe as "European-style extra-dry over ice. The 'champagne' of ciders; combining subtlety and sophistication; the epitome of unforced elegance. A crisp fresh apple bouquet with a brisk, refined finish that lingers on the palate."

Crispin Cider Brined Pork
Brining Time: 4 - 12 hours
Grilling TIme: 30 minutes
Resting Time: 5 minutes

1 1/4 - 1 1/2 lb pork tenderloin
1 batch Crispin Brut Hard Apple Cider Brine (see below)

Put the pork into a resealable bag. Add the brine. Get as much air as possible out of the bag & seal. Place in a bowl just big enough to hold it. Refrigerate for at least 4 hours up to overnight.

Heat grill to medium-high. Remove pork from brine & place over direct heat. Grill until pork reaches 160 F, turning from time to time. Remove pork from grill & let rest 5 minutes before slicing in 1/2-inch slices.

Serves 4

Crispin Cider Brine
(This brine would also be great with chicken or turkey.)
Cook Time: 15 minutes

12-oz bottle Crispin Brut Hard Apple Cider
1 cinnamon stick
4 whole cloves
4 whole allspice
4 whole peppercorns
1/4 t ground ginger
1 T packed brown sugar
1 T kosher salt

Put all the ingredients in a small saucepan & bring to a boil. Reduce the heat & simmer for ten minutes. (Your kitchen will start to smell like some fabulous baked good & that's not a bad thing.) Let cool to room temperature before adding to meat.

Crispin Cider Braised Kohlrabi
Prep Time: 5 minutes
Cook Time: 45 minutes

1 T butter
1 sweet onion, thinly sliced
1 lb kohlrabi, julienned
1/2 c Crispin Brut Hard Apple Cider
1 T cider vinegar
1 t brown sugar
salt & pepper

Melt butter in a saucepan over medium high heat. Add the onions & cook until turning a golden brown, about 10 - 15 minutes. Add kohlrabi, cider, vinegar & brown sugar. Season with salt & pepper. Reduce heat to a simmer, cover & cook for about 30 minutes until most of the liquid as been absorb.

Serves 4

If you are not reading this post in a feed reader or at http://agoodappetite.blogspot.com OR at http://agoodappetite.com then the site you are reading is illegally publishing copyrighted material. Contact me at katbaro AT yahoo DOT COM. All recipes, text and photographs in this post are the original creations & property of the author unless otherwise noted.
© 2007-2009 Kathy Lewinski

Wednesday, August 5, 2009

What To Do With All That Zucchini

The amount of zucchini that people get in their gardens & through CSAs can sometimes be a little overwhelming. Our garden is just growing them like crazy & we get a handful every other week from Harmony Valley. Since we've been finding all different ways to use them I thought I'd share in one handy post.
#205 - Matt's Giant Zucchini
(Just a small part of our harvest.)

Creamy Sausage & Zucchini Pasta
Zucchini & Turkey Lasagna
Dark Chocolate & Zucchini Cupcakes
Halibut with Zucchini & Garlic Mojo
Baked Penne with Sausage & Zucchini
Pesto Pasta with Corn, Zucchini & Bacon
Grilled Zucchini with Bacon Chipotle Slather Sauce
Roasted Vegetable Curry
And later we'll be making Zucchini Stuffed With Chorizo plus canning some Zucchini Relish so watch for those.

Still have too much zucchini? Preserve some of it for later. Peel, seed & grate zucchini. Give it a quick blanch in boiling water. Let drain. Freeze in small amounts. Use it in muffins quick breads for added moistness or throw it in soups & stews.
zucchini to freeze
Or why not make zucchini pickles? Zucchini has the perfect texture for pickles so why not use it instead of cucumbers. These are similar to sweet pickles with a touch of ginger flavor.
Pickled Zucchini

Summer Squash Pickles
(from Ball Complete Book of Home Preserving)

4 c summer squash or zucchini, peeled, seeded & cut into 1/2-inch cubes
1 medium onion, sliced (I used a sweet onion)
2 c water
1 1/4 c sugar
1 c white vinegar
1 t pickling salt
1 t dry mustard
1/2 t ground turmeric
1/2 t ground ginger

Prepare the jars & lids for canning. Jars should be boiled in water for 20 minutes & lids for 5 minutes.

In a large enamel or stainless steel saucepan combine the water, sugar, vinegar, salt, mustard, turmeric and ginger. Bring to a boil over medium-high heat, stirring to melt the sugar. Add the zucchini & onions. Bring back to a boil & boil for 10 minutes.

Pack into five hot sterilized half-pint jars leaving about 1/2-inch headroom. Clean off the tops of the jars & cover with a lid. Close with a neckband & finger-tighten. Process in boiling water for 10 minutes. Turn off heat & let sit for 5 minutes. Remove jars from the water to a heat-proof surface & let cool for 12 - 24 hours (do not dry jars). Check to make sure the top of the jar has been drawn downwards, creating a seal.

Makes 5 cups

If you are not reading this post in a feed reader or at http://agoodappetite.blogspot.com OR at http://agoodappetite.com then the site you are reading is illegally publishing copyrighted material. Contact me at katbaro AT yahoo DOT COM. All recipes, text and photographs in this post are the original creations & property of the author unless otherwise noted.
© 2007-2009 Kathy Lewinski
Tuesday, August 4, 2009

Summer Harvest Pizza on Honey Wheat Crust

When I was in college back in Ohio there was a pizza place near me that had the best wheat crust. It was not to heavy & slightly sweet. I was making pizza crust for dinner when I suddenly remember that crust & decided to try to replicate it at home. I thought the secret might be honey & I was right, this crust came out pretty darn close (there's may have had a touch of cinnamon in the original, as strange as that might sound.)
Summer Harvest Pizza on Honey Wheat Crust
Matt suggested we top the pizza with some of the fresh summer vegetables that are filling our fridge. We started with a layer of grated Fontina cheese. That was topped with a sweet onion from the farmer's market that I caramelized. Next came fresh sweet corn kernels straight off the cob, not need to cook them first. That was all topped with halved cherry tomatoes & pieces of raw zucchini. This was the tastiest pizza. I think sweet corn may be my new favorite pizza topping.

Honey Wheat Pizza Dough

3/4 c warm water, no hotter than 110 F
1/2 t rapid rise yeast
1 heaping T honey
1/2 t garlic powder
1 T olive oil
1/3 c wheat bran
2+ c all-purpose flour

Stir the water, yeast, honey, garlic powder & olive oil together. Stir in wheat bran. Stir in the flour 1/2 cup at a time. Once you can't stir it in anymore dump it on a floured surface & begin kneading it. Knead in more flour until you have a soft, smooth dough that isn't sticky (I do the window pane test.) Oil a bowl & put the dough in it. Turn to coat. Cover with a towel & place in a warm place to rise. Let rise for 2 hours or until doubled in size.

Oil a baking pan. Spread the dough out & cover with toppings. Bake at 450 F until browned about 15 minutes.

Makes 1 pizza

If you are not reading this post in a feed reader or at http://agoodappetite.blogspot.com OR at http://agoodappetite.com then the site you are reading is illegally publishing copyrighted material. Contact me at katbaro AT yahoo DOT COM. All recipes, text and photographs in this post are the original creations & property of the author unless otherwise noted.
© 2007-2009 Kathy Lewinski
Monday, August 3, 2009

Weekly Menu 8/3 - 8/8/09 and Pickles

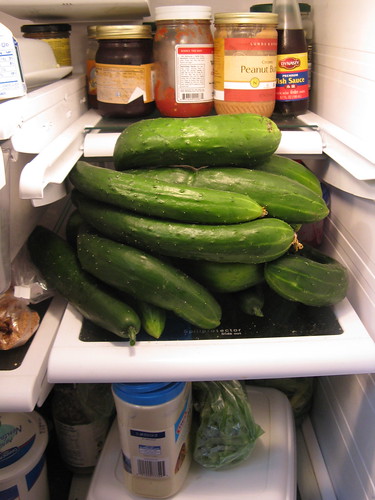
This was our fridge after Matt did some harvesting from the garden on Saturday
Too many cukes
Definitely a cuke overload. Only one thing for it, make pickles!
IMG_4935
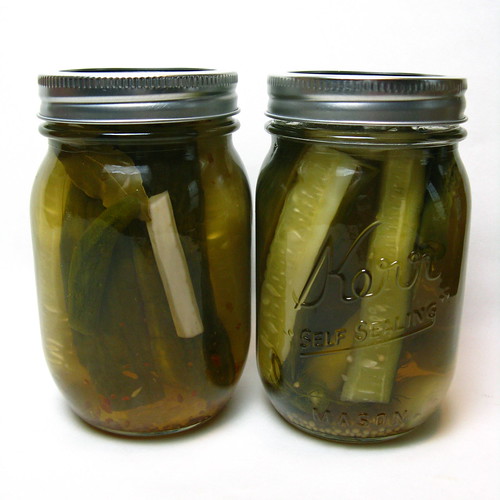
We made three different flavors of pickles by using the same brine but adding different seasonings to each jar.
IMG_4925
One type was a traditional dill with a garlic clove, fresh dill, a bay leaf & 1/2 t mustard seeds. The next was spicy with a halved jalapeno (seeds & all), a piece of fresh peeled horseradish root, a bay leaf & 1/4 t crushed red pepper flakes. The last one was sort of a mix of the two with all the items in a traditional dill plus a jalapeno.

Basic Pickle Brine
(from Ball Complete Book of Home Preserving)

4 c cider vinegar
4 c water
3/4 c sugar
1/2 c pickling or canning salt
3 T pickling spice

Tie the pickling spice into a little bundle using cheesecloth. Add everything to a stainless steel or enamel pot. Bring to a boil stirring to dissolve sugar & salt. Let boil gently for 15 minutes.

Ladle over cucumbers & seasonings that have been packed into sterilized jars leaving 1/2-inch head room. Add lid & neckband & process in boiling water (about 1-inch higher than the top to the jars) for 15 minutes. Turn water off & let sit for 5 more minutes. Remove & let cool undisturbed for 12 - 24 hour. If processed correctly the lid should pull downward making a popping sound. (Any jar that doesn't do this should be placed in the fridge & eaten.)

Allow to sit in a cool dark place for a few weeks before eating.

Makes 5 pints.
IMG_4920
For a crispier pickle, we salted our sliced cukes & let them sit for two hours to remove some of the water. We rinsed them in could water before packing them into the sterilized jars.


Smoked Chicken Fajitas - with pepper from our csa & garden

Cider Brined Pork with Cider Braised Kohlrabi

Chorizo Stuffed Zucchini

Espresso Glazed Rib-eye with Creamed Mizuna

Black Bean Burgers with Roasted Cauliflower & Bacon Chipotle Sauce

If you are not reading this post in a feed reader or at http://agoodappetite.blogspot.com OR at http://agoodappetite.com then the site you are reading is illegally publishing copyrighted material. Contact me at katbaro AT yahoo DOT COM. All recipes, text and photographs in this post are the original creations & property of the author unless otherwise noted.
© 2007-2009 Kathy Lewinski

Saturday, August 1, 2009

Recipes to Rival - A Taste of Italy

This month's Recipes to Rival challenge came from Lauren of Fried Pickles and Ice Cream. She wanted us to have a taste of Italy by making Brucshetta and Lemoncello.
Bruschetta
Bruschetta is a really simple yet flavorful appetizer, especially when you use fresh seasonal ingredients. I waited until we got the first tomatoes of the season from both our CSA & garden before making it which meant I used cherry tomatoes instead of the called for romas. I cut a petite baguette into slices, brushed them with olive oil & then browned both sides under the broiler (the recipe called for grilling the bread). Then I rubbed each slice of bread with raw garlic. The bread is them topped with chopped tomatoes. Matt mixed our tomatoes with a little of the 10 year old balsamic vinegar we picked up at Zingerman's this spring. Finally, the bruschetta was sprinkled with a chiffonade of fresh basil from our garden. A perfect afternoon snack.
Lemoncello
Limoncello is a sweet lemony liqueur from Southern Italy. It doesn't take a ton of ingredients to make just a little patience to let it sit. The recipe called for grain alcohol but my liquor store was sold out. Surprisingly one of the employees there knew a lot about making limoncello & suggest using vodka instead letting it sit a little longer. Mine is still at the sitting stage, yes I started it too late. When its done I plan on using it to make a sorbet.

Limoncello

1 liter grain alcohol
5 1/2 cups water
5 large lemons (or 10 small lemons)
2 1/2 cups sugar

-Gently wash lemons in cool water to remove any dirt
-Peel away zest from lemon leaving as little pith (the white stiff) as possible.
-Put peels in a large sealed jar or container (I reused the alcohol bottle)
-Pour alcohol over peels and place container in a cool place.
-Leave the mixture for 7 days.
-Every day give the container a little swirl. You will see the alcohol become darker and darker every day.

-After 7 days, strain the alcohol by using a coffee filter. (The person I spoke to about making lemoncello said it should actually sit for 1 month with grain alcohol & 4 months with vodka. I may let mine sit a month & see what happens.)

-Prepare the simple syrup. Bring the water to a boil and add the sugar to dissolve.

-Mix the syrup with the alcohol. BE CAREFUL... DO NOT DO THIS NEAR A FLAME!!!

-Pour the limoncello into bottles or containers. Let cool completely. Store in the freezer until ready to serve!

*Date your limoncello. After a year it will no longer be delicious.

If you are not reading this post in a feed reader or at http://agoodappetite.blogspot.com OR at http://agoodappetite.com then the site you are reading is illegally publishing copyrighted material. Contact me at katbaro AT yahoo DOT COM. All recipes, text and photographs in this post are the original creations & property of the author unless otherwise noted.
© 2007-2009 Kathy Lewinski
Related Posts with Thumbnails

Get Email Updates!

Enter your email address:

Delivered by FeedBurner

Measurement Abbreviations

T = Tablespoon
t = teaspoon
c = cup
lb = pound
oz - ounce

Labels

Blog Archive

Contributors

Blog Directory for Minneapolis, Minnesota