Wednesday, June 30, 2010

Moroccan-Inspired Chard and Broccoli

When we picked the chard up from the market on Sunday I mentioned to Matt that I wanted to use it in a brown rice dish. He suggested I do something with some Moroccan flavors using raisins & olives (I actually think it was just an excuse to buy olives because he loves them so much). From that suggestion I threw this dish together with what we had fresh in the fridge.
Moroccan Inspired Broccoli & Chard
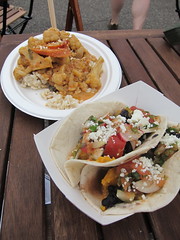
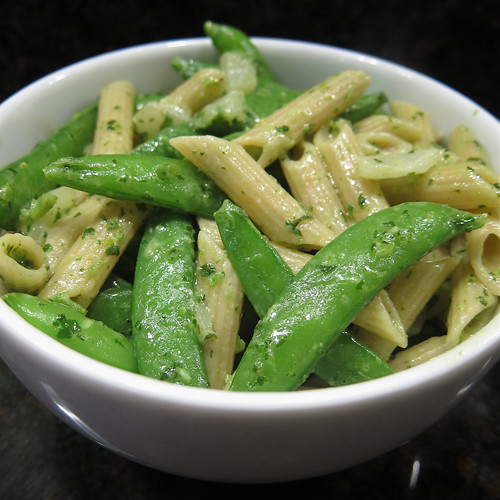
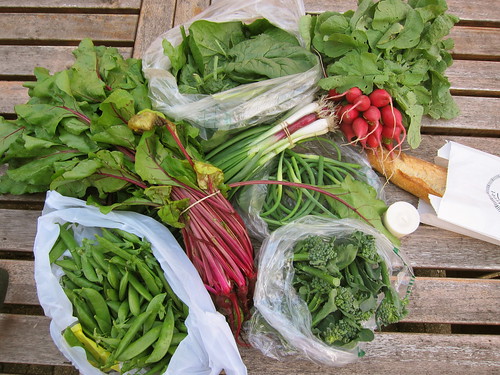
I wish this one was prettier to look at because it tasted so good. After all the indulging at Tour de Farm the day before, this was like a big plate of good for you & sometimes you just crave that. What really makes this dish flavor-wise is the play of the sweet & salty & tart. You could change up the vegetables to use whatever is in season, I can see it being a great vehicle for that overabundance of zucchini that comes a little later in the summer.

Moroccan-Inspired Chard & Broccoli

1 T olive oil
3 scallions, chopped
3 garlic scapes, chopped (or substitute a minced garlic clove)
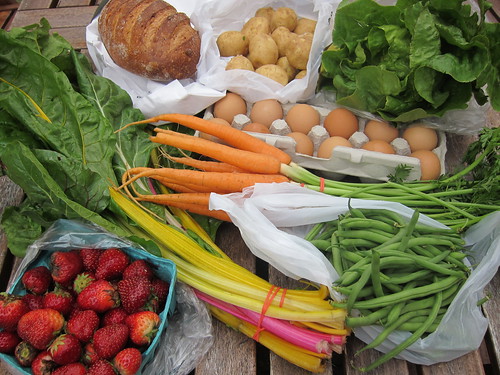
6 chard leaves & stems, chopped, separate stems from leaves (Beet greens or kale would be great too)
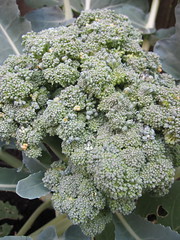
2 c broccoli, chopped (I used baby broccoli but think regular would be better as it would stay crisper)
14 oz can whole or diced tomatoes with juice
1 T tomato paste
1/4 t ground cinnamon
1/2 t ground cumin
1 t lemon juice
salt & pepper
1/4 c golden raisins
handful of sliced almonds
10 kalamata olives, sliced
fresh cilantro, chopped
2 servings cooked brown rice

Heat the olive oil in large skillet over medium-high heat. Add the scallions & garlic scapes. Cook until starting to soften. Add the chard stems & sauté from 30 more seconds. Add the broccoli, tomatoes, tomato paste, cinnamon, cumin & lemon juice. Stir to blend. Bring to a boil. Turn the heat down & simmer until the the sauce thickens slightly & the broccoli is crisp tender, 5 - 10 minutes. Stir in the chard greens, raisins, almonds & olives. Allow the greens to just wilt. Taste & add salt & pepper as needed. Serve over rice & garnish with fresh cilantro.

Serves 2

If you are not reading this post in a feed reader or at http://agoodappetite.blogspot.com OR at http://agoodappetite.com then the site you are reading is illegally publishing copyrighted material. Contact me at katbaro AT yahoo DOT COM. All recipes, text and photographs in this post are the original creations & property of the author unless otherwise noted.© 2007-2010 Kathy Lewinski

Tuesday, June 29, 2010

Tour de Farm

This weekend Matt & I finally made it to our first Tour de Farm dinner. I don't know how we missed getting tickets for any of them last year before they sold out. Tour de Farm is a series of Sunday night farm to table dinners put together by Scott Pampuch from Corner Table Restaurant. A four to five course meal is created by local chefs & paired with beers & wines. Our meal was cooked by Scott Pampuch & Michelle Gayer of Salty Tart with drinks provided by Fulton Beer (These guys did some amazing stuff with infusing beers. We had a blonde infused with strawberries & an all infused with beet greens.), Parallel 45 Vodka & wines from Solo Vino.

The farm we were at was the Tangletown Farm in Plato, MN about an hour outside of Minneapolis. If you live in the Twin Cities area you are probably familiar with there wonderful garden store in south Minneapolis but, they also have a 300 member CSA & sell fresh vegetables from the farm at the store. It was really a gorgeous setting with absolutely perfect weather (though these dinners happen rain or shine). The food was just amazing with some many of the ingredients picked right that morning from the fields surrounding the tables where we ate. The pictures really tell the whole story though so enjoy.


Created with flickr slideshow from softsea.
(Hey. this is my first time putting a slide show in a post, hope you all like it. Click on any picture in the slide show to read more about it.)

We can't wait until the next one we have tickets for in September at the historic Oliver Kelly Farm which is a family picnic where kids are welcome too. We'll be going with a 10 & 7 year old so it should be a fun day at the farm. You can still get tickets for the upcoming Tour de Farm tickets including a special New Year's Eve dinner at Star Thrower Farm, we highly recommend it.

If you are not reading this post in a feed reader or at http://agoodappetite.blogspot.com OR at http://agoodappetite.com then the site you are reading is illegally publishing copyrighted material. Contact me at katbaro AT yahoo DOT COM. All recipes, text and photographs in this post are the original creations & property of the author unless otherwise noted.© 2007-2010 Kathy Lewinski

Monday, June 28, 2010

Farmers Market Finds and the Weekly Menu 6/28 - 7/3/10

It was a beautiful sunny Sunday morning at Kingfield Farmers Market this week with so many good things to eat & take home. We started off with strawberry turnovers & bacon biscuits from Sun Street Breads followed by thai green curry & pig ear salad from the Chef Shack, what a brunch!
Kingfield Farmers MarketPig Ear Salad & Thai Green CurryChef Shack Menu 6/27
I didn't think we'd get much at the market this week since we still had things like beets, peas & onion in the fridge but, we still ended up going home with two full bags.
Farmers Market Finds 6/27
Apple of my Eye Rye Bread - with figs!
New potatoes - We'll serve these cooked on the grill with burgers this week
Buttercrunch Lettuce - for lunch salads
Eggs - a few of these already went into ice cream
Carrots - these were just too pretty to resist
Chard - Some we'll use this week but most we'll blanch & freeze for later
Beans - the first of the season
Strawberries - all of these went into a batch of Strawberry Buttermilk Ice Cream (recipe later this week)


Black Bean & Potato Tacos - this was on last week's menu but never got made

Brown Rice with chard, tomatoes & raisins

Grilled Steak with Green Beans

Brats with Broccoli Salad

Pizza - with whatever in the fridge sounds good

Burgers with Potatoes & Onions

If you are not reading this post in a feed reader or at http://agoodappetite.blogspot.com OR at http://agoodappetite.com then the site you are reading is illegally publishing copyrighted material. Contact me at katbaro AT yahoo DOT COM. All recipes, text and photographs in this post are the original creations & property of the author unless otherwise noted.© 2007-2010 Kathy Lewinski

Thursday, June 24, 2010

Gardening and Other Stuff

Bit of a crazy time at chez Good Appetite. We'll have guests three different times over the next two weeks, our front & side yards have been completely torn up for new landscaping & walkways & next week the back steps & patio will be completely replaced.
Blank Slate
It'll be so nice when it is all done & we can relax & enjoy it. In the meantime not much exciting cooking has been going on as we've been eating out or having a lot of salads at home.

Our garden, despite being attacked by slugs during a wet spell, it looking great thanks to an early, warm spring.
San MarzanosFirst TomatoesSweet 100s
The San Marzano, Brandywine & Sweet 100 tomatoes are all showing their first little green fruit. We've never grown Brandywines before & can't believe what a big plant they are. The fruit are supposed to get to be 1 to 1 1/2 pounds each!
JalapenosHo Chi Minh Pepper
The pepper plants all look great but only the jalapenos & ho chi minhs have peppers at this point. I think we are going to have a bumper jalapeno crop. The ho chi minh is something I bought on a whim at the Friends School Plant Sale. I'm hoping they do well as the guy we buy pepper plants from at the farmers market wants a few to save seeds from as they are hard to get.
Broccoli#166 - First Harvest
The broccoli is all ready to harvest & most of the peas have been eaten already. The pole beans have reached the top of their trellis already & just growing like crazy!

We'll be spending the weekend planting the new gardens out front & then Sunday we are excited to be going to our first Tour de Farm dinner. Can't wait to tell you all about it next week, cross your fingers for no thunderstorms....

If you are not reading this post in a feed reader or at http://agoodappetite.blogspot.com OR at http://agoodappetite.com then the site you are reading is illegally publishing copyrighted material. Contact me at katbaro AT yahoo DOT COM. All recipes, text and photographs in this post are the original creations & property of the author unless otherwise noted.© 2007-2010 Kathy Lewinski

Wednesday, June 23, 2010

Champagne and Thyme Mustard

After discovering how easy mustard is to make a couple weeks ago, we are now trying to stock our pantry with different flavors. Last weeks version was spicy with brown mustard & fresh garlic scapes. Today's is a different taste completely.
Champagne Thyme Mustard
This is a much sweeter, milder mustard flavored with champagne & fresh thyme. The thyme is allowed to seep in hot champagne for 1/2 hour which releases much more of the thyme flavor than I expected. The mustard is sweetened with honey which I think adds a mellower sweetness than sugar. This is a little bit of a more refined mustard in my mind than our first batch though it still has the grainy texture of more rustic mustards. Matt has been loving it on ham sandwiches for lunch.

Last time I mentioned you could play with mustard recipe to make other flavors & I think this is an easy recipe to do that with. Substitute the champagne with things like apple juice or beer. Match the vinegar with the liquid, like cider vinegar with apple juice. Use different herbs or all a little lemon zest. Just keep the quantities the same if you are planning on canning the mustard. If you are going to use it right away you can play with any of the quantities.

Champagne & Thyme Mustard
You can substitute white wine & white wine vinegar for the champagne & champagne vinegar.

6 sprigs of fresh thyme
3/4 c champagne
3/4 c yellow mustard seeds
1 c champagne vinegar
1/4 c water
1/2 c honey
1/4 t kosher salt

Put the thyme & champagne in a small non-reactive saucepan & bring to a boil. Remove from heat, cover & let seep for 30 minutes.

Drain through a sieve, pressing the to release all the liquid. Throw the thyme away. Add the mustard seeds to the liquid, cover & let sit until the mustard has absorbed almost all the liquid, 1 1/2 - 2 hours.

Put the mustard seeds plus any liquid into a blender with the vinegar & water. Process until blended, you want a slightly grainy texture.

Put back into the saucepan. Add the honey & salt. Bring to a boil over high heat while stirring. Reduce heat & simmer for about 15 minutes, stirring frequently. If the mustard is too thick add a little more water.

At this point you can put the mustard in a storage container & keep it in the fridge to use right away. Or you can can the mustard to use when you need it over the next year.

Canning the Mustard

Put five 4-ounce canning jars (without the lids or neckbands) into a large pot with enough water to cover them by 1-inch. Cover & bring to a boil. Let boil for 15 minutes. Add the lids to the boiling water & boil for 5 more minutes.

Carefully remove the hot jars to a towel covered counter. (Keep the pot of water boiling.) Spoon the hot mustard into the hot jars leaving 1/4-inch headspace. Tap them on the counter to remove any air bubbles. Add more mustard if needed. Use a wet towel or paper towel to wipe any mustard off the rims of the jars. Put the hot lids on the jars. Screw on the neckbands until they are as tight as you can get them with your fingers. Put the jars back into the pot of boiling water. Make sure you still have about 1-inch of water over the top of the jars. Cover & let boil for 10 minutes. Turn off the heat & let sit for 5 more minutes. Carefully remove the jars from the water & let sit undisturbed until completely cooled. The top of the jars should pull in with a pop sound. If a jar does not do this either use it right away or reprocess it.

Makes 2 1/2 cups.

If you are not reading this post in a feed reader or at http://agoodappetite.blogspot.com OR at http://agoodappetite.com then the site you are reading is illegally publishing copyrighted material. Contact me at katbaro AT yahoo DOT COM. All recipes, text and photographs in this post are the original creations & property of the author unless otherwise noted.© 2007-2010 Kathy Lewinski

Monday, June 21, 2010

Farmers Market Finds and the Weekly Menu 6/21 - 6/26/10

Oh, it was such a perfect Sunday at the Kingfield Farmers Market this weekend. The sun was shining, the temps were pleasant, the Kevin Anthony & Twin Cities Playboys were entertaining us with wonderful music, the food was amazing & there was even a fire juggler.
Kevin Anthony & (some of) the Twin Cities PlayboysPedal Powered SmoothiesFire Juggling
(Twin Cities Playboys, Pedal Powered Smoothies at Foxy Falafel & Fire Juggling)
Cashew Nut Curry & Black Bean Sweet Potato Tacos from Chef ShackBurnt Caramel Ice CreamStrawberries!
(Cashew Nut Curry & Sweet Potato Black Bean Tacos from Chef Shack, Burnt Caramel Ice Cream, Local Strawberries)
The amount of produce is really starting to ramp up here in the upper Midwest too.
Farmers Market Finds 6/20
Mixed Lettuce - For lunch salads
Sun Street Potato & Flax Seed Bread - Just the best bread for sandwiches & snacking
Whole Chicken - For the grill
Napa Cabbage - We'll use this in a chinese chicken salad with the leftover chicken
Kohlrabi - We love this in cole slaw
Broccoli - We'll just steam this as a side
Baby Broccoli - This will get used in pasta
Scallions - Goes in salads & just about everything else
Strawberries - because Matt was strawberry shortcakes
Radishes - for salad & on tacos
Cilantro - for tacos & fajitas
New Kingfield Market t-shirt
Fajita Beef

Plus we still have beets from last week.


Snack Dinner of cheeses, salami, beans, olives & bread
Beef Fajitas
Rotisserie Chicken with Broccoli
Potato & Black Bean Tacos
Pasta with Broccoli & Sausage
Burgers

If you are not reading this post in a feed reader or at http://agoodappetite.blogspot.com OR at http://agoodappetite.com then the site you are reading is illegally publishing copyrighted material. Contact me at katbaro AT yahoo DOT COM. All recipes, text and photographs in this post are the original creations & property of the author unless otherwise noted.© 2007-2010 Kathy Lewinski

Friday, June 18, 2010

Weekend Cocktails with UV Coconut Vodka

It's going to be a beautiful summer weekend here in Minneapolis & that calls for cold cocktails on that patio while something good is cooking on the grill.
Coconut Mojito
Lucky us, we were offered a bottle of locally produced UV Coconut Vodka* to create some summer sippers with. If you are a coconut lover this is really the liquor for you, the smell & flavor couldn't be more coconutty. I was afraid it would have that fake sort of flavor, you all know what I mean, but that wasn't an issue at all because UV uses real coconut juice to flavor this vodka. We have so many flavor combinations in our heads, here's a few we've tried so far...
IMG_3655
My favorite was the Spiked Coconut Chai. For this one I added a shot of UV vodka to an iced chai (equal part chai concentrate & milk over ice), Yummy! The Indian spices of the chai work perfectly with the coconut flavor. This one was perfect for a quiet afternoon outside with a book.
UV Coconut Mojito
Coconut Mojito - Muddled mint, simple syrup, lime juice & UV Coconut vodka. This was really good though I'd strain the mint out next time. A friend had it with no mint & loved it that way too. This one is very tropical.
Spicy Ginger Soda & Coconut Vodka
Spicy Ginger Coconut - For this one I muddled some more mint then added spicy ginger beer & UV Coconut Vodka. This one was a good idea but I wanted more spicy ginger flavor. Perhaps next time I'll add actually ginger.

We want to try something we berries next, perhaps this weekend. What would you mix with Coconut vodka?

*We were given a free bottle of UV Coconut Vodka to sample but not reimbursed in any other way to write or talk about it.

If you are not reading this post in a feed reader or at http://agoodappetite.blogspot.com OR at http://agoodappetite.com then the site you are reading is illegally publishing copyrighted material. Contact me at katbaro AT yahoo DOT COM. All recipes, text and photographs in this post are the original creations & property of the author unless otherwise noted.© 2007-2010 Kathy Lewinski

Thursday, June 17, 2010

Spring Market Pizza

When you've got a lot of veggies from the farmers market or your CSA it seems the two easiest dishes to fall back on are pizza & stir-fry. They are both things that you can can really play with whatever you have on hand & usually end up with something pretty tasty. Ok, not every combination is a success like my stir-fry last night of chicken, radishes & beet greens in a honey/soy sauce, um yeah, not my favorite. What was I thinking? So, let's talk about a combination that did work, wonderfully, if I do say so myself, this pizza.
Spring Market Pizza for one
Matt is in Silicon Valley for work & enjoying dinner at places like Amber India, jealous! So, I'm at home making single girl meals for myself. Luckily, this pizza was good enough that I don't feel bad about not getting butter chicken at Amber, well not too bad anyway.

This is really not much of a recipe, just an idea for a combination of flavors that were really tasty together. The potato & beet are boiled a little before adding them to the pizza so they come out of the oven super soft & tender. The beets add a sweetness to the pizza that plays nicely against the garlic scapes & onions. I love the colors of this pizza, the red skin of the new potato, the purple beet, the green spinach all against that golden brown cheese. I've sized the recipe for our favorite pizza crust down to feed one person which is perfect for those solo nights.

Spring Market Pizza
This pizza feed one person but can easily increased to feed more.

Pizza Crust for One

1/2 T olive oil plus extra for the bowl
1/4 c warm water
1/2 t dry yeast
1/2 t kosher salt
1/2 - 3/4 c all-purpose flour

Mix the 1/2 tablespoon of olive oil with the warm water. Stir in the yeast then the salt & wheat bran. Stir in the flour until you can't stir anymore with a spoon. Knead the dough until it is smooth & elastic, about 10 minutes. If the dough is sticky add more flour a little at a time.

Put a little olive oil in the bottom of the bowl. Put the dough in & turn it to coat with the oil. Cover & let sit until double in size, about 2 hours.

Making the Pizza

1 new potato
1 small beet
olive oil
1/2 c grated mozzarella
grated parmesan
2 - 3 spinach leaves, torn
1 garlic scape, chopped (you can use a clove of minced garlic)
1 spring onion, sliced (you can use a scallion)
2 sprigs fresh thyme leaves
salt

Preheat oven to 450 F.

Boil the potato & beet in pot of boiling water until just starting to get tender, 5 - 10 minutes. I did them separately to keep the potato from turning pink. Let cool until you can handle them then cut into 1/8 inch slices.

Grease a baking sheet with olive oil. Spread the dough out on the sheet into desired shape.

Cover the dough with the mozzarella & then sprinkle with parmesan. Top the cheese with the spinach leaves, potatoes, beets, garlic scapes & onion. Sprinkle with thyme leaves & salt.

Bake for 12 - 14 minutes until the cheese & crust are golden brown.

Serves 1

If you are not reading this post in a feed reader or at http://agoodappetite.blogspot.com OR at http://agoodappetite.com then the site you are reading is illegally publishing copyrighted material. Contact me at katbaro AT yahoo DOT COM. All recipes, text and photographs in this post are the original creations & property of the author unless otherwise noted.© 2007-2010 Kathy Lewinski

Wednesday, June 16, 2010

Peasto

Yes, you read that right. No, it's not a misspelling. It is what Matt has dubbed my latest creation, pea tendril pesto.
Peasto
We had bought a big bag of pea tendrils at the farmers market. They were great in risotto, pasta & salad but still there was a bunch left. I wanted way to use it all up before it went bad & thought why not a pesto. Make it just like you would a basil pesto.

Peasto

2 c loosely packed pea tendrils
2 T grated parmesan
1 clove garlic
1/4 c olive oil (more or less as needed)
salt & pepper

Put the pea tendrils, parmesan & garlic in a food processor. Pulse until chopped finely. With the processor running add the olive oil a little at a time until the peasto has a cream texture.

Taste & season with salt & pepper.

Makes about 1 cup

I went light with the cheese & garlic here because I wanted the main flavor to be peas. It makes for such a light, fresh pesto. You can definitely add more to your tastes or even play around with it by adding other flavors that go with peas like mint.
#161 - Peasto Pasta
We used some of the pesto in a easy pasta with some quick sautéd sugar snap peas, onions & a little cream. It would also be good as in a pasta salad or potato salad, on a pizza, with chicken & I bet fantastic with lamb. Store it in small containers in the freezer for the fresh taste of peas all year.

I noticed there were still some beautiful looking bunches of tendril at the farmers market last week so go grab yourself some while this spring treat lasts.

If you are not reading this post in a feed reader or at http://agoodappetite.blogspot.com OR at http://agoodappetite.com then the site you are reading is illegally publishing copyrighted material. Contact me at katbaro AT yahoo DOT COM. All recipes, text and photographs in this post are the original creations & property of the author unless otherwise noted.© 2007-2010 Kathy Lewinski

Tuesday, June 15, 2010

Garlic Scape Mustard

We picked up a bag of garlic scapes from Global Garlic at the Kingfield Farmers Market with a vague idea to do either a relish or mustard with them. Matt thought mustard was the way to go so, I did I little research only to find out making mustard is really very easy.
#160 - Garlic Scape Mustard
The main ingredients are just mustard seeds & vinegar. You do need quite a bit of mustard seed but you can buy both yellow & brown in bulk from Penzeys quite reasonably, a pound is less than $5. Brown mustard seeds will give you a hotter mustard. From there you can change the flavoring by adding herbs, different vinegars & such.

The process is so simple! Just soak the seeds in your liquid of choice, purée them with vinegar & then cook it down for a few minutes. Voila, mustard. I really expected it to be much more complicated. This batch is zesty from the brown mustard seeds, dry mustard & garlic scapes. It reminds me of a spicy brown mustard but it's not too hot.

Garlic Scape Mustard

2 c water
1/2 c slice garlic scapes
freshly ground pepper
1/2 c yellow mustard seeds
1/4 c brown mustard seeds
1 c cider vinegar
1/3 c dry mustard
1/4 c sugar
1 1/2 t kosher salt

Put the water & garlic scapes in a medium non-reactive saucepan. Season with a generous amount of pepper. Bring to a boil. Reduce the heat & simmer for 5 minutes. Turn off the heat & add the mustard seeds. Cover & let sit for 2 hours, or until the seeds have absorbed most of the liquid.

Put the mixture in the saucepan into a blender & add the vinegar. Blend until most of the seeds are chopped but you still have a grainy texture. Your mustard should be yellow & thickened. (if you taste the mustard at this point it will be pretty hot & vinegary but will mellow once cooked down.) Pour back into the saucepan. Whisk in the dry mustard, sugar & salt. Bring to a boil while stirring. Reduce heat & simmer for about 15 minutes, stirring frequently. If you feel like its a too thick add a little more water.

At this point you can put the mustard in a storage container & keep it in the fridge to use right away. Or you can can the mustard to use when you need it over the next year.

Canning the Mustard

Put five 4-ounce canning jars (without the lids or neckbands) into a large pot with enough water to cover them by 1-inch. Cover & bring to a boil. Let boil for 15 minutes. Add the lids to the boiling water & boil for 5 more minutes.

Carefully remove the hot jars to a towel covered counter. (Keep the pot of water boiling.) Spoon the hot mustard into the hot jars leaving 1/4-inch headspace. Tap them on the counter to remove any air bubbles. Add more mustard if needed. Use a wet towel or paper towel to wipe any mustard off the rims of the jars. Put the hot lids on the jars. Screw on the neckbands until they are as tight as you can get them with your fingers. Put the jars back into the pot of boiling water. Make sure you still have about 1-inch of water over the top of the jars. Cover & let boil for 10 minutes. Turn off the heat & let sit for 5 more minutes. Carefully remove the jars from the water & let sit undisturbed until completely cooled. The top of the jars should pull in with a pop sound. If a jar does not do this either use it right away or reprocess it.

Makes 2 1/2 cups.

We already have three other flavors planned; Champagne & Thyme, Beer & some sort of fruit mustard. Yes, we do eat a lot of mustard & like a variety on hand. What flavor combinations would you make?

If you are not reading this post in a feed reader or at http://agoodappetite.blogspot.com OR at http://agoodappetite.com then the site you are reading is illegally publishing copyrighted material. Contact me at katbaro AT yahoo DOT COM. All recipes, text and photographs in this post are the original creations & property of the author unless otherwise noted.© 2007-2010 Kathy Lewinski

Monday, June 14, 2010

Farmers Market Finds and the Weekly Menu 6/13 - 6/19/10

We went to two farmers markets this weekend...
Mpls Farmers Market Haul
On Friday, I ran to the Minneapolis Farmers Market because I heard they had local strawberries. I have to say this is one of those times I love Twitter. I sent out a tweet asking if anyone knew if there were local strawberries & the market tweeted right back, perfect!.
Strawberries - that is 2 gallons you are looking at there. The gentleman I bought them from was so worried about the quality of them he kept switching out ones that weren't perfect to him for others. All of these strawberries became 36 jars of jam. We made batches strawberry vanilla, balsamic, pepper & cardamom.
#163 - 36 cans of strawberry jam
New Potatoes - So perfect & white on the inside. That made wonderful smashed potatoes with a steak last night but I'm thinking of putting a few on a pizza this week.
Juutso Supreme - I've always wanted to try this Finnish "bread cheese." Its very firm & stands up to grilling. I put a few pieces in a dry skillet to heat up & them had them on a spinach salad, amazing. The squeak when you bite it reminds me of cheese curds.

Farmers Market Finds 6/13
Then Sunday it was off to our neighborhood Kingfield Farmers Market. Where on top of all the goodies to eat Matt bought me some beautiful pink & purple flowers,
Beets - I'm thinking a roasted beet salad, tart & perhaps pizza this week
Garlic Scapes - I made garlic scape mustard last week & want to make a second batch. I'll be sharing the recipe with you all tomorrow.
Mixed Lettuce - I've been eating salads for lunch almost everyday lately & the spring greens are really the best.
Bok Choy - These will see some stir-fry action & some will be a side sautéed with a little sesame oil
Baguette & Bacon Scones - We are really loving the breads from Sun Street Bakery lately. The scones with the house-cured bacon from Corner Table were a big hit with Matt.
We still have radishes, peas & spinach left from last week so our fridge is looking really good & green right now.

On to Menu Planning Monday...
Matt is out of town this week for work so I'm trying to think what single girl dishes I want.

Chicken & Veggie Stir-Fry - bok choy, pea pods, carrots, oh my

Potato & Beet Pizza

Chicken & Sautéed Radishes - I think this might be a good experiment

Roasted Beet & Goat Cheese Tart

Friday we are going to see John Hodgman so we'll eat out in St. Paul

I'm hoping the weather will be good enough on Saturday that we can smoke some ribs!

If you are not reading this post in a feed reader or at http://agoodappetite.blogspot.com OR at http://agoodappetite.com then the site you are reading is illegally publishing copyrighted material. Contact me at katbaro AT yahoo DOT COM. All recipes, text and photographs in this post are the original creations & property of the author unless otherwise noted.© 2007-2010 Kathy Lewinski

Friday, June 11, 2010

Get Ready For Some Canning!

Last year Matt & I really embraced canning.
#219 - Our Stash
This is just a portion of the 200 or so cans of jam, relish, salsa tomatoes, pickles & such we put away last year. It has been so wonderful to have all these items on hand that plus we know exactly what went into them. Do you know how hard it is to find jam without HFC in it?! And we've all been reading about the danger of eating tomatoes in metal cans, I haven't had to buy one can of tomatoes since last summer & have plenty to last until we can this year's batch.
Canned Goods with Labels
We also had fun with making labels for our jars to turn them into pretty gifts.

So many of you have commented to me that you'd love to do some canning but are intimidated by the process. Well, I'm here to tell you if I can do it so can you! We only do hot water bath canning (pressure cookers still scare me) which is really as easy as boiling water & making sure to keep things hot & clean. Hot water canning is good for jams, jellies, pickles, salsas, relishes, salsas, sauces & condiments that have some acid content to them. This is not the method for canning things like your fresh beans from the garden, that is where the pressure cooker comes in.

The initial investment for supplies is really not that much. I thought today I'd give you a little guide to the equipment you need & what we use plus some other tips.
The biggest piece of equipment you need is a large pot to boil the jars in. We use this Granite Ware 21-1/2-Quart Steel/Porcelain Canner. It's under $20 on Amazon & comes with a jar rack. Ok, we've never used the rack because it only works with the really large jars & we mainly use the 8-ounce jars. I like this big pot because I can usually fit a whole batch of jam in it instead of having to process multiple batches. I've also used my regular dutch oven for small batches & 4-ounce jars, just make sure it's tall enough so you can have water 1-inch above the top of the jars.


This Jar Liftercosts about $5 & makes it so easy to lift jars from the boiling water. It gives you a surprisingly firm grasp. I've heard of people using silicone gloves to pull out the jars but I prefer to keep my hands out of boiling water even in gloves, I've had water get in my dish glove cuffs too many times.


A Magnetic Lid Lifter makes getting the lids of the jars out of the water super easy too. I used to use tongs but found it hard to get a grip on a single lid. I actually bought a little magnetic tool like this for a couple bucks at the hardware store, there they say it is for picking up loose screws & such.


A Canning Funnelmakes it easy & keeps things cleaner when you are spooning your preserves into your cans. The size of the neck is made to exactly fit the opening on the canning jars. This will run you about $5 - $6.


Of course, you also need canning jars, lids & neckbands. We use the jars in 3 sizes. The 1/2 pint size is the one we use the most, its your jam jar size. We use it for jams, relishes, salsas & pickles peppers. The 4-ounce jars we use for things like mustard, pepper jelly & port wine jelly. The largest jar we use is the pint size which is good for tomatoes & pickles (I also like to store my dried beans in this size jar). The jars & neckbands are reusable year to year. You do need to buy need lids as they are not reusable but are quite cheap.


The rest of the items needed you probably already have around the kitchen; a cooling rack, dish towels, a ladle & a strainer. Sure there are other things you can get like special tools to measure the headspace (yeah, I can eye 1/4-inch, thank you) or to get the air bubbles out (I just use a clean knife or spoon) but really, the items above are what we've found we truly use. I've given Amazon links to everything but we picked most of ours at the local Ace Hardware. We've also noticed Target has started to carry some canning supplies as well as most larger grocery stores.

Finally, I'd like to suggest books about preserving....
If you only get one book get theBall Complete Book of Home Preservation. Really it's our canning bible & seems to have recipes for everything as well as lots of step-by-step instructions & tips.


Since we don't always want a large batch of something for the two of us The Complete Book of Small-Batch Preservinghas come in really handy. I also find it contains a good variation on the recipes from the Ball book.

If you don't want to invest in a book right away or can't find one of these at your local library, we've found that the package of pectin contains basic directions for making fruit jams.


Now that you've got your supplies search click the "preserving" label in our left sidebar for some recipes to get you started. We'll also we share some new things we're canning this summer starting with homemade mustard.

If you are not reading this post in a feed reader or at http://agoodappetite.blogspot.com OR at http://agoodappetite.com then the site you are reading is illegally publishing copyrighted material. Contact me at katbaro AT yahoo DOT COM. All recipes, text and photographs in this post are the original creations & property of the author unless otherwise noted.© 2007-2010 Kathy Lewinski

Thursday, June 10, 2010

Beet Risotto

Here's my love letter to the beet for this week...
Beet Risotto
Now, how is that for a big plate of pink & green & cheerful?

I've been thinking about making this risotto for the last two weeks but, I had used all my beets up to make gelato so I had to wait until I picked up another bunch at the farmers market. The idea of a pink risotto was what attracted me at first but the flavor was the true winner here. Both Matt & I were thrilled with the results. I think he's really starting to embrace the whole love of beets thing with me...let's see he now like mushrooms & beets, now how to I get him to change his mind about eggplant?!

For a risotto this is actually pretty light with no added cream & very little cheese. Beet is the main taste in this risotto, of course, but the parmesan really mellows it out. I think the little bit of sugar added to the beets helps too. I love the color contrast that the beet greens add to finished dish as well as the added nutrition you get from those dark greens. This was a really satisfying main dish but it would also make a stunning side dish.

Beet Risotto

1 T olive oil
1/2 c diced beets, about 1/4" dice
1 garlic scape, sliced (or one clove garlic, minced)
10 beet leaves & stems, chopped & separated
pinch of sugar
4 c chicken or vegetable stock
1/2 T unsalted butter
1 spring onion, white & green parts chopped (or one scallion, chopped)
1/2 c + 2 T arborio rice
2 T sherry
3 T grated Parmesan + extra for serving
salt & pepper

Heat 1/2 tablespoon of the olive oil in a skillet over medium-high heat. Add the beets, garlic scape & about one half the beet stems (save the remaining stems for another use). Sauté for about 2 minutes. Stir in the sugar until dissolved. Set aside.

Bring the broth to a simmer in a saucepan. Keep the broth simmering the whole time you are cooking.

In another saucepan, heat the remaining olive oil & the butter over medium heat. Add the onion & sauté for a minute. Add the rice & cook while stirring for another minute, coating the rice. Add the sherry & cook while stirring until evaporated. Add the stock 1/4 - 1/2 cup at a time. Cook & stir each addition until evaporated before adding the next. Test the rice from time to time to see if its getting tender. When it's tender & creamy with just a slight bite it is ready (you may not use all the broth). As you are adding your last addition of the broth also stir in the beet mixture & the chopped beet leaves. Once that final broth addition is absorbed stir in the Parmesan until melted. Season with salt & pepper as needed (we found it needed a generous amount of pepper).

Serve sprinkled with extra Parmesan if desired.

2 main dish servings or 4 side dish servings

If you are not reading this post in a feed reader or at http://agoodappetite.blogspot.com OR at http://agoodappetite.com then the site you are reading is illegally publishing copyrighted material. Contact me at katbaro AT yahoo DOT COM. All recipes, text and photographs in this post are the original creations & property of the author unless otherwise noted.© 2007-2010 Kathy Lewinski

Wednesday, June 9, 2010

Rhubarb and Almond Clafoutis

Last summer Matt kept saying he wanted to make a clafoutis but somehow we never got around to it. Then last week Stacey over at Stacey Snacks posted a lovely Cherry Pistachio Clafoutis & I was reminded that we wanted to make one too.
Rhubarb & Almond Clafoutis
I had been looking for a way to use up some rhubarb in my fridge & thought why not try using that as the fruit. I know its not traditional but Stacey encouraged me to give try it anyway. I've read that the French leave the cherry pits in clafoutis to add an almond flavor so I decided to add some slivered almonds, plus rhubarb & almond go together so well.

This was a great way to use the rhubarb, it got nice & soft during baking & I liked the tartness against the sweetness of the custard & the powdered. The almonds add some fabulous texture as well as flavor. This is my kind of dessert as its not overly sweet. Matt was happy he finally got to try a clafoutis & discovered he really liked it. It's such a simple dessert I can see making it again & again with different fruits as they come into season.

This recipe made the perfect size for the two of us (ok, big slices) but it can easily be doubled & made in a full-sized pie plate.

Rhubarb & Almond Clafoutis
(Adapted from Stacey Snacks)

unsalted butter
1/2 c sliced rhubarb, slices between 1/4" & 1/2 " thick
1 large egg
1/4 c sugar
2 T corn starch
2 T all-purpose flour
1/2 t vanilla
pinch of salt
pinch of cinnamon
1/4 c milk
1 T slivered almonds
powdered sugar for dusting

Preheat oven to 350 F.

Generously butter a 6" baking dish. Put the rhubarb slices on the bottom of the dish.

Whisk the egg, sugar & corn starch together until the corn starch is dissolved. Whisk in the flour, vanilla, salt & cinnamon. Whisk in milk. Pour the batter over the rhubarb. Sprinkle the almonds over the top.

Bake for 35 - 40 minutes until the custard has set & is golden brown.

Cool completely then dust with powdered sugar to serve.

2 - 4 servings

If you are not reading this post in a feed reader or at http://agoodappetite.blogspot.com OR at http://agoodappetite.com then the site you are reading is illegally publishing copyrighted material. Contact me at katbaro AT yahoo DOT COM. All recipes, text and photographs in this post are the original creations & property of the author unless otherwise noted.© 2007-2010 Kathy Lewinski

Tuesday, June 8, 2010

Farmers Market Finds and the Weekly Menu 6/6 - 6/12/10

Posting this a day late since Blogger seems to be having some problems in the midwest the last two days & wouldn't let me post or comment on any other blogs. ...
The Kindfield Farmers Market really started to pick up this week with even more produce vendors. Every stall looked like a luscious salad. Here's what we picked up...
Farmers Market Finds 6/6
Spinach - I've really been enjoying a spinach salad for lunch & Matt uses it instead of lettuce on sandwiches
Radishes - We'll have the bulk of these in a Radish Tortilla this week & we used some as a snack with bread & butter
Red & White Spring Onions - I use these in everything
Baby Beets - Planning on using the beets in risotto today. Not sure on the greens yet.
Sweet Peas - Some will go in a pasta salad with pea tendril pesto
Baby Broccoli - This broccoli is so sweet & tender I may just steam it as a side.
Garlic Scapes - I'm thinking of making a garlic scape mustard & perhaps a relish
Sun Street Bakery Baguette - This went right away for snack & with eggs at breakfast
Vanilla Bean Soy Candle - I just couldn't resist since it smelled so good
We also pre-ordered 20 lbs of Wild Alaskan Salmon. It's being fished in Alaska now & we'll get it as soon as the boat is back in a month or so. Nothing like having a well stocked freezer.

And on to Menu Planning Monday (ok, Tuesday)

Last night we went to w00tstock so we ate out.
Beet Risotto
Grilled Steak with Pea Pasta Salad
Friday we'll be going to see the St. Paul Saints so brats & hot dogs will be on the menu at the park.
Cedar Planked Salmon perhaps with creamed beet greens.

If you are not reading this post in a feed reader or at http://agoodappetite.blogspot.com OR at http://agoodappetite.com then the site you are reading is illegally publishing copyrighted material. Contact me at katbaro AT yahoo DOT COM. All recipes, text and photographs in this post are the original creations & property of the author unless otherwise noted.© 2007-2010 Kathy Lewinski

Related Posts with Thumbnails

Get Email Updates!

Enter your email address:

Delivered by FeedBurner

Measurement Abbreviations

T = Tablespoon
t = teaspoon
c = cup
lb = pound
oz - ounce

Labels

Blog Archive

Contributors

Blog Directory for Minneapolis, Minnesota