Thursday, July 29, 2010

Zucchini, Tomato and Egg Tart

I didn't really have this week's meals very well planned out after coming back from vacation. Last night, I was just going to have Matt make some burgers on the grill & throw together a potato salad. Then I realized I had a beautiful heirloom tomato from the garden to use as well as a crisper drawer full of zucchini. I thought about doing some sort of egg sandwich on biscuits with slices of tomato on it. That wouldn't use an of the zucchini though. I'd made a zucchini galette in the past, why not make something like that & top it with the tomato? Oh, & why not add an egg on top too?
Zucchini, Tomato & Egg Tart
Matt thought it sounded a little crazy. Yeah, crazy good.

I ended up cooking the egg a little longer than I wanted. I was hoping for a little bit of runny yolk to mix in with the vegetables but in worrying whether the white was cooked enough the yolk got cooked through. Judge the baking time on how firm you want your egg & check it from time to time. Make sure to use a tomato at the peak of the season for this because you want it to have a lot of flavor, none of that off-season, tasteless stuff.

Zucchini, Tomato & Egg Tart

Crust

1 c all-purpose flour
1/4 t salt
3 oz (4 T) cold unsalted butter, cut into small pieces
2 T water plus more if needed

Put the flour & salt into a food processor & pulse a few times to blend. Add the butter & pulse until the mixture resembles a course meal. Add the water & pulse. Pinch the dough to see if it holds together. If it doesn't add more water 1/2 teaspoon at a time until it does. Form the dough into two balls. Flatten the balls into discs. Wrap in plastic wrap & chill for 30 minutes.

Filling

2 c grated zucchini
salt
1 clove garlic, minced
2 green onions, chopped
1 1/2 oz cheese, grated
pepper
3 eggs
1 large tomato, cut into 4 slices that are then cut into 8 halves
grated Parmesan

Preheat oven to 400 F.

Put the zucchini in a colander & salt generously. Let sit for about an hour. Rinse with cold water & then squeeze out as much liquid as possible. Mix the zucchini with the garlic, onion & cheese. Season with salt & pepper.

Roll the disc of dough out into circles that are about 1/8-inch thick. Spread the zucchini mixture out in the center of each dough circle leaving an inch of dough uncovered all the way around. Fold the edge up on itself & pinch to create a raised edge.
Zucchini, Tomato & Egg Tart in Progress
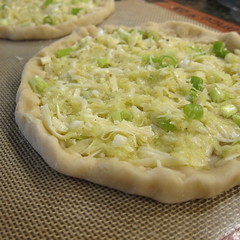
Whisk one of the eggs with a little water & brush on the edge. Bake on a baking sheet covered with parchment paper or a silicone mat for 20 minutes.

Remove the tarts from the oven. Place the tomato slices around the edge of the tart leaving a hole in the center. Crack an egg into the center of each tart. Sprinkle grated Parmesan & some salt & pepper over the top. Bake for 10 - 15 more minutes depending on how hard you want your egg.

Makes 2 individual tarts

If you are not reading this post in a feed reader or at http://agoodappetite.blogspot.com OR at http://agoodappetite.com then the site you are reading is illegally publishing copyrighted material. Contact me at katbaro AT yahoo DOT COM. All recipes, text and photographs in this post are the original creations & property of the author unless otherwise noted.© 2007-2010 Kathy Lewinski

Wednesday, July 28, 2010

Eating Seattle

We're back home after a long weekend in beautiful Seattle.
Seattle
Seattle was enjoying 4 of its 100 sunny days a year during our visit. We did lots of the tourist stuff from walking the old streets Underground to looking down at the city from the Space Needle. We also ate really well but, I'm not going to bore you with a play by play of every meal instead, I just want to highlight a few places that really stood out.

Restaurant Zoë

This was our first dinner in Seattle & it really set the bar high for the rest of the trip. The restaurant is that perfect blend of casual & fancy, one of those places you can feel comfortable dressed up or in a pair of jeans. The food was absolutely wonderful from start to finish & included a few free bites from the chef. But what really made the night was the great service. There is really a lot to be said for a server that knows about the food & how to let you enjoy the whole experience. We would highly recommend Zoë to anyone visiting Seattle.
Restaurant ZoeFois Gras over an Apricot Tarte Tartin
Pig Croustilliant over ApricotsThundering Hooves Braised Beef
(1. Restaurant Zoë 2. Seared Sonoma Artisan Fois Gras 3. Hog Croustillant 4. Thundering Hooves Braised Beef)

Citizen Coffee

We were lucky to find this coffee house/cafe right behind our hotel & ended up eating there twice. Our first day in Seattle we enjoyed sandwiches for lunch & on our last day we had breakfast (do not miss their breakfast sandwich on a homemade biscuit with egg, bacon, spinach, tomato, white cheddar & creme fresh). You can have a coffee drink there & they also serve beer & wine, plus you can buy a bottle of wine to take with you. If the weather is nice they have sidewalk & patio seating with a view of the Space Needle.
CitizenBreakfast at Citizen
(1. Citizen Coffee 2. Cowboy Casserole & Breakfast Sandwich)

Saturday we wandered into a craft market in the Pioneer Square neighborhood & decided to have lunch at the various street food trucks that were there as well. Skillet really stood out with their airstream trailer & interesting menu. Apparently, we weren't the only ones who thought so as they minute they opened there was a huge line to order. We had the pork belly banh mi with a generous helping of hand-cut fries & a tasty blackberry lemonade. A perfect lunch at a shady table in the square. You can find out where the Skillet truck is on their website.
SkilletPork Belly Banh Mi from Skillet

For a break from the crowds & crowds of people at Pike Place Market we headed upstairs to Matt's for lunch. Matt's uses goods from the market to create their dishes which makes for some interesting seasonal choices. The views on the market can't be beat either.
Matt's at the MarketView from Matt's at the Market

If you are not reading this post in a feed reader or at http://agoodappetite.blogspot.com OR at http://agoodappetite.com then the site you are reading is illegally publishing copyrighted material. Contact me at katbaro AT yahoo DOT COM. All recipes, text and photographs in this post are the original creations & property of the author unless otherwise noted.© 2007-2010 Kathy Lewinski

Tuesday, July 27, 2010

Summer Farro Risotto

This is our second recipe in a week inspired by Broders Pasta Bar here in Minneapolis. This spring Matt had a dish there that featured farro & couldn't stop talking about how much he liked the farro. Then, when we were there two weeks ago I had the risotto special which used farro instead of rice & also really liked the slightly nutty flavor & great texture of the farro. It was that dish that we tried to replicate here.
Summer Farro Risotto
We weren't familiar with farro at all so I did a little reading about it on line. Farrro (also sometimes called Emmer) is apparently the original grain from which all other grains are derived. Some people say it is the same as spelt but farro retains a firm, chewy texture when cooked that spelt doesn't. Apparently, ground it makes a good wheat flour substitute for people who can't tolerate wheat. It has begun to regain popularity in recent years especially in Italy. Farro is really good for you with lots of protein, fiber & a carbohydrate that helps to stimulate the immune system. I read that served with beans it is a complete protein which makes it great for vegetarians. To top it off it tastes really good too!

We were making a risotto-style dish but the farro requires a little preparation first with soaking & then simmering. I saw some preparations that skipped the simmering but then ended up stirring & adding broth for 45 minutes! I'd much rather simmer it for a while & then just do the hands on bit for 10 - 15 minutes. Timing was perfect to make this dinner because both the cherry tomatoes & basil were ready to be picked in our garden.
Harvest
(I wish you could just smell this photo, it's truly the smell of summer.)
The final dish was creamy like a risotto but heartier like we had made it with brown rice instead of white. The freshness of the tomatoes, basil & fresh mozzarella really made the flavors pop in your mouth. Also because we didn't add any cream this dish isn't too heavy like a lot of risottos can be.

Farro isn't something we found in our local grocery store. We actually ended up going to Broders Deli to pick some up. It's not cheap at $14 a pound but I like the health benefits of it. I want to try playing with in in other preparations like a cold salad or in soup. If you can't find farro try wheat berries as a substitute.

Summer Farro Risotto

3/4 c farro
1 T olive oil
1/2 T salted butter
2 T red onion, chopped
1 garlic clove, minced
1/4 c white wine (or chicken stock)
3/4 - 1 c chicken stock or vegetable broth
15 cherry tomatoes, halved
1 oz fresh mozzarella pearls
10 basil leaves, cut into a chiffonade
salt & pepper

Put farro into a bowl & cover with cold water. Let soak for 20 minutes. Drain.

Bring 4 cups water to a boil in a saucepan. Add 1/2 tablespoon olive oil and the soaked farro. Let simmer for 15 minutes. Drain & rinse the farro.

Bring the chicken stock to a simmer in a small saucepan. Keep simmering.

In a medium saucepan heat the remaining olive oil & the butter over medium-high heat. Add the onion & garlic. Sauté until tender & the onion is starting to look translucent. Add the farro. Stir to coat. Add the white wine & cook while stirring until absorbed. Add the hot chicken stock about 1/4 cups or so at a time, stirring until each addition is absorbed before adding the next. Keep adding stock until the farro is tender & creamy but still has a slight bite, sort of like brown rice. Stir in the tomatoes & heat through. Remove from heat & stir in the mozzarella & about 3/4's of the basil. Season to taste with salt & pepper.

Serve topped with remaining basil.

2 servings.

If you are not reading this post in a feed reader or at http://agoodappetite.blogspot.com OR at http://agoodappetite.com then the site you are reading is illegally publishing copyrighted material. Contact me at katbaro AT yahoo DOT COM. All recipes, text and photographs in this post are the original creations & property of the author unless otherwise noted.© 2007-2010 Kathy Lewinski

Monday, July 26, 2010

Farmers Market Finds and the Weekly Menu 7/26 - 7/31...Not Really

We didn't get to go to our neighborhood farmers market this weekend instead we wandered around one that is a little more famous, Pike Place Public Market in Seattle.
IMG_4903IMG_4905
IMG_4917IMG_4902IMG_4916
We managed to eat our way around the market with Rainer cherries, Nettle Gouda Cheese, Beechers Mac & Cheese, Smoked Salmon Chowder, Barbecue Pork Buns & Potato Leek Soup with Truffle Oil. To take home we bought some Italian farro & black lentils.

There's no menu for this upcoming week yet because we are still on vacation & I haven't thought that far yet. So, enjoy so more photos from our trip instead.
Space Needle at NightSkillet
SeattleIMG_4931

If you are not reading this post in a feed reader or at http://agoodappetite.blogspot.com OR at http://agoodappetite.com then the site you are reading is illegally publishing copyrighted material. Contact me at katbaro AT yahoo DOT COM. All recipes, text and photographs in this post are the original creations & property of the author unless otherwise noted.© 2007-2010 Kathy Lewinski

Friday, July 23, 2010

Smoked Sausage Gumbo

You might remember about 2 weeks ago we smoked 6 pounds of sausage for our Smokapalooza party. We had a little sausage left over & Matt suggested I turn it into gumbo.
Smoked Sausage Gumbo
It's been hot here & I didn't really feel like having gumbo cooking on the stove all day so I looked for a version that could be done in the crock pot. The crock pot has really been my friend during the hot weather since it just doesn't heat up the kitchen in the way the stove & oven do. You do have to do a little stove top prep for this recipe when you make the roux but, I just do that in the morning while it's still cool.

This gumbo turned out quite good with a great thick texture. I was a little worried the okra would make it slimy but after cooking all day thee was no slime at all. The original recipe called for a mixture of sausage & chicken but we had so much sausage I left the chicken out. It was good but I think I would have enjoyed the addition of chicken even more. I added the hot sauce & worcestershire sauce to the recipe to give it even more flavor. Of course, Matt added even more hot sauce when he ate it. All & all this was a great use for leftover sausage.

Smoked Sausage Gumbo
(adapted from Southernfood.About.com)

40 - 60 minutes prep time

4 T unsalted butter
1/4 c all-purpose flour
2 c chicken stock
1 lb smoked sausage, cut into 1/2-inch slices
1 heaping c sliced okra (I used frozen)
1/2 red pepper, chopped
1 celery stalk, chopped
1 small onion, chopped
3 cloves garlic, minced
1/2 t salt
few grinds fresh pepper
1/4 t crushed red pepper
few dashes hot sauce, something like Tabasco or Crystal
few dashed Worcestershire sauce
water

Melt the butter in a heavy saucepan over medium-high heat. Stir in the flour. Cook while stirring for about 3 - 4 minutes. Turn the heat down to medium & continue to cook, stirring constantly for about 15 minutes. You are looking for your roux to be the color of a copper penny.

Put the chicken stock into a crock pot. Stir in the roux. Add all the remaining ingredients except for the water. Add enough water so everything is almost covered (You can use more chicken stock instead of water if you want. I was using homemade stock which is really flavorful so using water won't dilute the flavor too much.)

Turn crock pot to high & let cook for 4 - 5 hours.

Serve over hot rice.

4 servings

If you are not reading this post in a feed reader or at http://agoodappetite.blogspot.com OR at http://agoodappetite.com then the site you are reading is illegally publishing copyrighted material. Contact me at katbaro AT yahoo DOT COM. All recipes, text and photographs in this post are the original creations & property of the author unless otherwise noted.© 2007-2010 Kathy Lewinski

Thursday, July 22, 2010

Apricot, Red Pepper and Prosciutto Pizza

Recently, Broders Pasta Bar here in Minneapolis has had a peach, red pepper & goat cheese pizza as a special on their menu. We keep meaning to order it (yes, we eat at Broders much too often) but always seem to end up being drawn to something else. Matt suggested we just go ahead & make our own version at home.
Pizza with Apricots, Red Pepper & Prosciutto
That inspiration was really just a starting point because in the end the only same ingredient on our pizza was the roasted red peppers. We decided to use apricots instead of peaches because we had bought a bunch of local ones over the weekend. They were the star of the this pizza thanks to the sweet, slightly tart flavor they got when cooked. Add that to the smokiness of the roasted pepper, the saltiness of the prosciutto, the bite of the red onion & the creaminess of the fresh mozzarella & you've got one heck of a flavorful pizza. The ingredients also create a beautiful palette of colors & we eat first with our eyes, right?

Apricot, Red Pepper & Prosciutto Pizza

Crust


3/4 t yeast
1/2 c warm water
1 T olive oil + extra for oiling the bowl
1/2 t kosher salt
1/2 - 3/4 c all-purpose flour

Put the yeast in a medium bowl. Add the water & olive oil & stir. Stir in the salt & 1/2 cup of the flour. Knead in a little of the remaining flour at a time until you have a smooth, elastic dough, 5 - 10 minutes. Put a little oil in a bowl & roll the dough in it to just coat. Cover with a dish towel & let rise until doubled, about 2 hours.

Assembling the Pizza

4 oz fresh mozzarella, sliced
4 apricots, pitted & sliced (you could also try peaches or nectarines)
1/2 of a roasted red pepper, sliced
1/4 c thinly sliced red onion
2 slices prosciutto, cut into strips

Preheat oven to 450 F.

Grease a baking sheet. Use your hands to spread the rising dough out on the pan. We get a pizza that is about 18" x 12". Place the mozzarella around the top of the crust. Top the cheese with the remaining ingredients.

Bake for about 13 minutes until the crust is golden brown on the bottom. I then put the pizza under the broiler for a few minutes to brown the cheese a little more but that is completely optional.

Makes 1 pizza, 2 servings for us.

If you are not reading this post in a feed reader or at http://agoodappetite.blogspot.com OR at http://agoodappetite.com then the site you are reading is illegally publishing copyrighted material. Contact me at katbaro AT yahoo DOT COM. All recipes, text and photographs in this post are the original creations & property of the author unless otherwise noted.© 2007-2010 Kathy Lewinski

Wednesday, July 21, 2010

Apricot, Blueberry and Basil Jam

Sunday morning we were at the Kingfield Farmer's Market enjoying some Sun Street Pastureland Cheddar Biscuits (to die for!) & iced coffee when I spied something round & yellow over at the Swede Lake Farms booth. Could that be stone fruit? Matt thought perhaps it could be apricots so, we finished breakfast & hurried over to see. Yes, it was apricots & right away I decide we need a bunch for jam. As I'm pondering how much we'll need, Matt suggests we do an apricot & blueberry jam. Then we're off to another booth to pick up some beautiful MN blueberries (seems last year we had a hard time finding local blueberries, not sure why). Matt's final inspiration was to add fresh basil from our herb garden because basil & blueberries just go together so well. Next thing you know we're spending Sunday afternoon canning 16 jars of jam.
Apricot, Blueberry & Basil Jam
What we ended up with was a beautiful reddish-purple jam full of bits of apricots & blueberries. The basil adds a ton of aroma to the jam as well as a flavor that makes for an unique jam. Matt says that the you know there is something different about the flavor but you wouldn't necessarily peg it as basil right away. This one might end up being a new favorite that we make every year.

Apricot, Blueberry & Basil Jam

3 c seeded & chopped apricots (measure after seeding & chopping)
3 c whole blueberries, stems removed
1/4 c lemon juice
1 package powdered pectin
7 c sugar
1/4 c chopped basil (measure after chopping, I started with about 1 cup of leaves)

Prepare the jars & lids for canning. Jars should be boiled in water for 20 minutes & lids for 5 minutes.

In a large enamel or stainless steel saucepan combine the apricots, blueberries & lemon juice. Mash a little with your spoon to break down some of the blueberries. Whisk in the pectin until completely dissolved. Turn heat to high & bring to a boil (it should not stop boiling when stirred). Stir in the sugar all at once. Return to a boil. Boil hard while stirring for 1 more minute. Remove from heat & stir in the basil. Skim off the foam.

Ladle into eight hot sterilized half-pint jars leaving about 1/4-inch headroom. Clean off the tops of the jars & cover with a lid. Close with a neckband & finger-tighten. Process in boiling water for 10 minutes. Turn off heat & let sit for 5 minutes. Remove jars from the water to a heat-proof surface & let cool for 12 - 24 hours (do not dry jars). Check to make sure the top of the jar has been drawn downwards, creating a seal. If it hasn't either reprocess that jar or store it in the fridge to be eaten within 3 weeks. Remove the neckbands & store jam in a cool dark place.

Makes 8 cups

If you are not reading this post in a feed reader or at http://agoodappetite.blogspot.com OR at http://agoodappetite.com then the site you are reading is illegally publishing copyrighted material. Contact me at katbaro AT yahoo DOT COM. All recipes, text and photographs in this post are the original creations & property of the author unless otherwise noted.© 2007-2010 Kathy Lewinski

Tuesday, July 20, 2010

Coffee and Spice Rub

Matt likes to mix up his own rubs to use for meats on the grill, flavor hamburgers & most recently baked beans.
Coffee Rub
Often the rub he creates is based on one we've bought & want to recreate. This is one of those creations. We liked the Coffee & Spice Rub from William Sonoma but I noticed recently it wasn't available on line anymore (though we did see some in the local store). Matt decided to just make his own version which was so flavorful & I'm sure cost a lot less.

Coffee Rub

2 T kosher salt
2 T ground coffee (we are currently using Peace Coffee's dark roast decaf. I recommend a dark roast for this)
1 T ancho powder (often just labeled as chili powder in the store.)
1 T smoked paprika
1 T brown sugar
1 t oregano (Mexican is you can get it)
1/2 t garlic powder
1/2 t ground black pepper
1/2 t chipotle

Mix together. Store in an airtight container.

Makes about 1/2 cup

He made this batch of rub to use in some hamburgers the other night. They turned out so flavorful! There is something about the taste of coffee that just plays so well with chili & meat.
Burgers
Matt mixes about 1 tablespoon per 1/2 pound of ground beef & works it gently with his hands until just blended. I made a roasted red pepper mayo to top the burgers (mayo mixed with puréed roasted red pepper & a little lemon juice) which added another tasty dimension.
Barbecued Ribs
We used the same rub later in the week on some smoked ribs & I can tell you it works as good with pig as it does with cow. It was so good neither of us even bothered putting barbecue sauce on the ribs!

If you are not reading this post in a feed reader or at http://agoodappetite.blogspot.com OR at http://agoodappetite.com then the site you are reading is illegally publishing copyrighted material. Contact me at katbaro AT yahoo DOT COM. All recipes, text and photographs in this post are the original creations & property of the author unless otherwise noted.© 2007-2010 Kathy Lewinski

Monday, July 19, 2010

Farmers Market Finds and the Weekly Menu 7/9 - 7/24/10

We missed the Farmers Market last week but we certainly made up for it with the amount we purchased this week!
Farmers Market Finds 7/18
This is getting into the best time at the market & we had to run to the car twice to drop off all our goodies.

Romaine Lettuce - For Cesear Salads

Apricots & Blueberries - I was really excited to see some sort of stone fruit at the market. Things like peaches don't really grow well in MN because they can't last the winter.
Blueberries!
The blueberries were beautiful & in quantity, I remember having a hard time finding MN blueberries to can last year. We've already 16 jars of apricot, blueberry & basil jam & the few remaining apricots will go on a pizza.

Kingfield Sourdough Bread - We've been eagerly awaiting this new bread from Sun Street. Sourdough is Matt's favorite & the bakery took suggestions from us on how this bread should be.

Beans - We couldn't resist getting this big basket of green beans for only $5!
Tons of Beans
We blanched & froze all 18 cups to use this winter as we are eating the smaller harvest from our own garden now.

Sweet Corn - This is some of the first MN sweet corn of the season.
First of the Sweet Corn
Peter at Peter's Pumpkins told me that he picked these the night before & that the crop will only continue to get sweeter & bigger over the next couple of weeks. He said the crop is really good this year so we are stocking the freezer for winter. We froze 6.5 cups of this batch. The rest is being made into Corn relish.

Zucchini & Onions - All the zucchini in our garden has been devastated by slugs this year so we had to buy some. The onions are just gorgeous white & fragrant. We are making this into Zesty Zucchini Relish

Garlic - Goes into everything right?!
Garlic
Global Garlic has started picking their garlic crop for the year. We go through so much garlic that the amount in our garden isn't enough so end up buying more here.

On to Menu Planning Monday...

It's a short week for us as Thursday we are out (going to see Squeeze & English Beat, woohoo) then off for a long weekend in Seattle.

Classic Beef Tacos

Pizza with Apricots, Roasted Red Pepper & Prosciutto

Farro with Cherry Tomatoes, Mozzarella & Basil

If you are not reading this post in a feed reader or at http://agoodappetite.blogspot.com OR at http://agoodappetite.com then the site you are reading is illegally publishing copyrighted material. Contact me at katbaro AT yahoo DOT COM. All recipes, text and photographs in this post are the original creations & property of the author unless otherwise noted.© 2007-2010 Kathy Lewinski

Friday, July 16, 2010

Maple Bacon Ice Cream

It was going to be really hot the day we were hosting Smokapalooza so that called for a cool dessert, ice cream, of course!
Maple Bacon Ice Cream
And to continue the smoke theme we made it with smoked bacon. The bacon gets cooked crisp then frozen before adding it to the ice cream so it retains a pretty good texture. Make sure to use a really good bacon with lots of flavor because you want that salty, smoky flavor to come through. Bacon & maple is a classic combination & they go together perfectly here for dessert. The ice cream has a great creamy texture. The addition of cornstarch helps it thicken up quickly into a custard.

Maple Bacon Ice Cream
(adapted from About.com)

2 c heavy cream
1/2 vanilla bean
1 c maple syrup
1 T cornstarch
6 large egg yolks
1/2 c milk (skim or low fat is fine)
1/4 lb good smoked bacon, chopped into small pieces

Put the cream into a large heavy saucepan. Cut the vanilla bean in half & scrap the seeds into the cream with the tip of a sharp knife. Add the bean to the pot too. Bring the cream to a simmer over medium heat.

Whisk the syrup, cornstarch & egg yolks together. Slowly whisk about a third of the cream into the egg mixture to temper it then add it back to the saucepan. Bring the mixture back up to a simmer over medium-low heat, stirring all the time. The mixture should get quite thick & coat the back of a spoon, do not let it boil.

Strain the mixture into a clean bowl, making sure to remove the vanilla pods. Stir in the milk. Let cool & then chill in the fridge overnight or until completely cold.

Cook the bacon in a skillet until crispy. Drain well on a paper towel. Put the bacon in the freezer until ready to add to the ice cream.

Process the ice cream according to your maker's instructions. Add the bacon during the last 5 minutes of processing.

Makes about 1 quart.
Maple Bacon Ice Cream Sandwich
For ease of serving we made this into ice cream sandwiches with basic oatmeal cookies. It was really good but I felt like the flavor of the bacon was a little lost against the cookies.


If you are not reading this post in a feed reader or at http://agoodappetite.blogspot.com OR at http://agoodappetite.com then the site you are reading is illegally publishing copyrighted material. Contact me at katbaro AT yahoo DOT COM. All recipes, text and photographs in this post are the original creations & property of the author unless otherwise noted.© 2007-2010 Kathy Lewinski

Thursday, July 15, 2010

Smoked Sausage

When we were in Austin, TX two years ago we went out for barbecue everyday & every barbecue included smoked sausage. Matt became a big fan of it. So, when we decide to host our own Smokapalooza last weekend he said he was going to make smoked sausage. Thursday, he turned 6 pounds of pork shoulder into 10 feet on Polish Sausage.
Making sausage filling#189 - making sausage10 feet of homemade sausage
He used the same Polish sausage recipe from our Oink! post because it was just so good with all the garlic & caraway seeds. On smoking day, the sausage went on the top rack of the smoker (the pulled pork was on the lower rack).
Putting the sausage onSmoking the sausage
The sausage takes about 2 - 3 hours to smoke & cook through. about halfway through cooking we rewrapped the sausage so the middle was on the outside & vice versa because we the outside was getting cooked more that the rest. We found with this much sausage it was hard for the smoke to get to all of the sausage evenly. Next time we'll either do less or hang the sausage (which we could do if there was nothing on the lower rack).
Matt's Homemade Smoked Sausage
The sausage had a beautiful smoke ring on the inside. The smoky flavor worked perfectly we the seasonings in the sausage. We served in with barbecue sauce & mustard. (In Austin they would offer to dip your sausage in sauce for you before serving.) It certainly made for a nice something different then what you usually get at a barbecue up here in the north. The leftovers made for some great gumbo which I'll share with you next week.

A few notes:
1. If you don't want to make sausage you could easily do this with store bought.
2. We are heat smoking here, our smoker is about 225 - 250 F so, it is safely cooking the fresh sausage. Sausage that is going to be cold smoked should be cured first.
3. You don't have to spend a lot to get a decent little smoker. Our's is the Brinkmann Smoke-N-Grill Charcoal Smoker and Grill. We paid about $40 for it at Home Depot & have been thrilled by the results we get with it.
4. If you don't have a smoker you can get a smoker box at the hardware store to use on your grill. You don't get as strong a smoky flavor though.


If you are not reading this post in a feed reader or at http://agoodappetite.blogspot.com OR at http://agoodappetite.com then the site you are reading is illegally publishing copyrighted material. Contact me at katbaro AT yahoo DOT COM. All recipes, text and photographs in this post are the original creations & property of the author unless otherwise noted.© 2007-2010 Kathy Lewinski

Wednesday, July 14, 2010

Baked Beans

Ok, I know I said yesterday the pulled pork was the star of Saturday's Smokapalooza but these beans almost stole the show.
IMG_4615
I've only ever eaten baked beans from a can but after making these I've realized how simple, & better, homemade ones are. Since I'd never made them before & was going to be serving them to a group of guinea pigs, I mean guests, I went to someone I trusted with beans for a recipe, Rancho Gordo. I figure they grow amazing beans so they must have the best recipes to use them. Of course, I had to tweak the recipe a little.

We decided to flavor the beans with the same dry rub we used on the pork. This meant we could leave the sugar, salt & some of the mustard out of the recipe. Let me just say, oh my gosh these beans were so good! Sweet but not too sweet, full of smoky bacon & so tender. Matt had a little bowl to taste them when they came out of the oven. That bowl turned into a second bowl which turned into "maybe we won't serve these because I want to eat them all myself."
My Homemade Baked Beans
Since these beans need to cook low & slow for a long time I made them the day before the party & kept them in the fridge overnight. A little before dinner we put the dutch oven right on the grill to heat the beans.

Baked Beans
(adapted from Heirloom Beans)

1 1/2 pound dry navy, yellow eye or european soldier beans or similar (we actually used a mix or navy, yellow eye & cranberry beans)
6 T dry pork rub
1 t dry mustard
2 T tomato paste
1/3 c + 1/4 c dark molasses
3 T maple syrup
3/4 pound good smoked bacon, chopped roughly
1 large yellow onion, thinly sliced
salt & pepper

Put the beans in enough water to cover them by an inch & let them soak for about 2 hours.

Pour the beans & soaking water into a large pot. Add more water to cover the beans but about an inch. Bring to a boil. Reduce heat & simmer uncovered until the beans just begin to soften, 45 - 60 minutes.

Drain the beans, retaining the cooking water. Add enough water to the cooking water to measure 3 cups. Whisk the rub, mustard, tomato paste, molasses & maple syrup into the water.

Preheat oven to 250 F.

Put 1/2 of the beans into a large dutch oven or similar pot. Top with half of the onions & all the bacon. Add remaining beans. Sprinkle the remaining onions over the top. Pour the sauce in. Cover & bake for 5 - 7 hours. Check from time to time to see if they need a little more water (mine never did). The beans should be VERY tender & the sauce should be thick & stick to the beans.

About 14 servings

I made 1/3 of this recipe this week for Matt & I & did it all in the crock pot. After the soaking I cooked the beans in the crock pot on high for about 1 1/2 hours. I drained the cooked beans saving the liquid. Then reassembled the beans with the seasonings, liquid, bacon & onions back into the crock pot. I let it cook on low for about 6 hours & they came out beautifully without heating up the kitchen at all.

If you are not reading this post in a feed reader or at http://agoodappetite.blogspot.com OR at http://agoodappetite.com then the site you are reading is illegally publishing copyrighted material. Contact me at katbaro AT yahoo DOT COM. All recipes, text and photographs in this post are the original creations & property of the author unless otherwise noted.© 2007-2010 Kathy Lewinski
Related Posts with Thumbnails

Get Email Updates!

Enter your email address:

Delivered by FeedBurner

Measurement Abbreviations

T = Tablespoon
t = teaspoon
c = cup
lb = pound
oz - ounce

Labels

Blog Archive

Contributors

Blog Directory for Minneapolis, Minnesota