Friday, October 29, 2010

Easy Pumpkin Turnovers

Here's another treat perfect for Halloween.  A bunch of family were coming for dinner & I wanted a quick, easy dessert that I could make ahead of time.  I had some leftover pumpkin purée from the Chai-Spiced Pumpkin Cake & a sheet of puff pastry in the freezer so turnovers seemed like perfect solution. Assembled in the afternoon, they just need to be popped in the oven during dinner for a fresh from the oven dessert.
Look who made the whipped cream
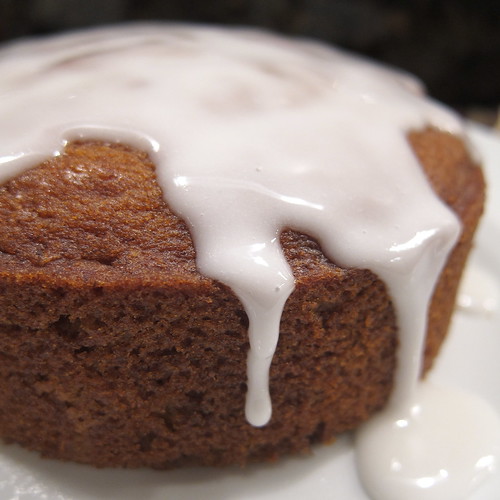
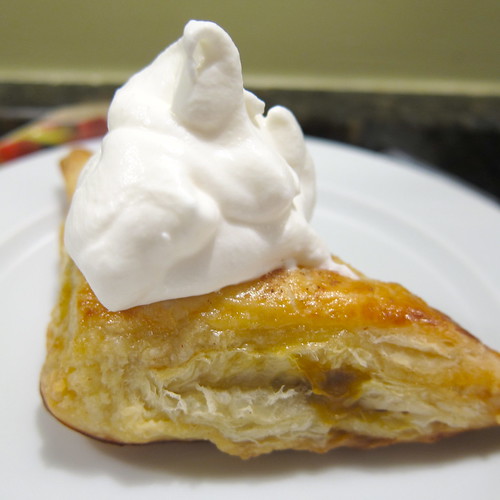
They're like little pumpkin pies with super flaky crusts.
Easy Pumpkin Tarts
Easy Pumpkin Turnovers

3/4 c or so pumpkin purée
1/4 t cinnamon
pinch nutmeg
pinch clove
pinch all spice
1 T brown sugar
1 sheet of puff pastry, thawed
flour
1 egg beaten with a little water

Preheat oven to 400 F. Prepare a baking sheet with parchment paper or a silcon pad.

Mix the pumpkin purée with the spices & sugar. Taste & adjust to your preference.

Roll the puff pastry out on a lightly floured surface until its about 1/8 inch thick. Cut into 9 squares.

Put a tablespoon or so of the pumpkin mixture in the center of each square. Use your finger or a brush to put a little of the egg wash around the edge of the squares. Fold over to form a triangle & press to seal shut. I like to also fold the edges up a little to really seal them. Brush the tops with more of the egg wash. (You can sprinkle with a little more sugar if you want.) Cut a slit into the top of each turnover with a sharp knife.

Refrigerate until ready to bake.

Bake for 15 minutes. Turn the heat down to 350 F & bake until gold brown, about 10 more minutes.

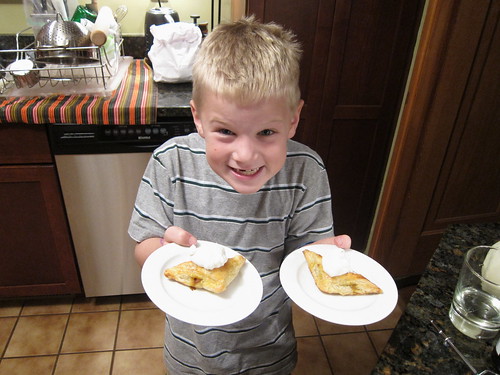
Serve warm with whip cream.

Makes 9 small turnovers.

Make sure to check out the rest of the Halloween Tricks & Treats at the #GreatHallowTweet Halloween Blog Hop by checking out all the blogs listed in my left column.

If you are not reading this post in a feed reader or at http://agoodappetite.blogspot.com OR at http://agoodappetite.com then the site you are reading is illegally publishing copyrighted material. Contact me at katbaro AT yahoo DOT COM. All recipes, text and photographs in this post are the original creations & property of the author unless otherwise noted. © 2007-2010 Kathy Lewinski

Thursday, October 28, 2010

Chai-Spiced Pumpkin Cake

This is the cake I made recently for the Kingfield Farmers Market Pumpkin Bake-off. It didn't win but I still think it was one great cake. The texture was surprisingly light & moist. The addition on the Asian spices was a nice change up from the typical pumpkin pie spices. The cayenne was my mother-in-laws idea, it doesn't add heat but brightens up all the other flavors. She says that is her trick with for a lot of recipes.
#279 - Chai-Spiced Pumkpin Cake
I was originally going to create my own chai spice mix for this but then read somewhere (I can't find where now) that Asian five spice powder mixed with cardamon made an easy chai spice blend. That seemed like a pretty easy way to go so I started there & then added a little more cinnamon because I felt like the flavor needed it.

I did a basic sugar/milk glaze for the icing but a cream cheese frosting would be good too. Want to make it a little spookier for halloween drizzle the glaze on in a spider web pattern though I really like it all drippy like this.

Since I was making cake for just Matt & me, I baked it up in two little 4" springform pans to give us each a little cake. I think this would probably be enough batter for an 8" cake too. The recipe can easily be doubled too & then you can just use the whole egg instead of only the white. For the bake-off I made two sheetpans but increasing the recipe quite a bit using whole eggs & it was still nice & light.

Chai-Spiced Pumpkin Cake

3 T unsalted butter
1/2 t Asian five spice powder
1/4 t cardamon
1/8 t cinnamon
pinch of cayenne
1/4 c and 2 t white sugar
1/8 t vanilla extract
1/4 c and 2 t pumpkin purée (check out He Cooks She Cooks for great post on making Pumpkin Purée from scratch)
1 egg white
1/4 c and 2 t all-purpose flour
1/2 t baking powder
1/4 t baking soda
1/8 t salt

Preheat oven to 350 F. Butter two 4" individual springform cake pans.

Put the butter, five spice powder, cinnamon & cayenne in a small saucepan over medium heat. Cook slowly until the butter is brown & has a nice nutty smell. Be careful not to burn it. Put into a small mixing bowl & let cool.

Whisk the sugar, vanilla & pumpkin into the butter. Then mix in the egg white.

Stir the flour, baking powder, baking soda & salt together. Then slowly mix into the wet mixture until everything is combined.

Divide the batter between the prepared cake pans. Bake for 30 minutes or until a toothpick inserted into the center comes out clean. Let cool on a rack before icing.

Makes 2 small cakes

Powdered Sugar Glaze

Powdered sugar
Milk

I really don't have a recipe for this. Typically, I start out with about 1/4 c of powdered sugar & then slowly add milk to it until I get a nice drizzly consistency. You can flavor it with vanilla or other extracts if you want too.

Check out all the other great Halloween post during the #GreatHallowTweet Halloween Blog Hop by clicking on the blogs listed on the left.

Tomorrow I'll give you an easy way to use up any pumpkin purée you have left....

If you are not reading this post in a feed reader or at http://agoodappetite.blogspot.com OR at http://agoodappetite.com then the site you are reading is illegally publishing copyrighted material. Contact me at katbaro AT yahoo DOT COM. All recipes, text and photographs in this post are the original creations & property of the author unless otherwise noted. © 2007-2010 Kathy Lewinski

Wednesday, October 27, 2010

Setting the Scene for Halloween

Some of you may know that I enjoy crafting as much as I enjoy cooking. Luckily, Holidays like Halloween give me an opportunity to do both things. Here's some of the spooky things I created to decorate the house & set our Halloween table this year.
Halloween Mantle
I created a collection of creepy potion bottles, candle holders, plates & bowls just using my computer printer & some waterslide decal paper. (See tips for making these later in this post.) The bottles, plates & bowls were all picked up very cheaply at IKEA, Michael's & Joann's. Some of the coolest bottles were only $.99.
IMG_6593 IMG_6594
The bottles were then filled. Just using colored water looks great but just a few other additions makes them look even creepier. For the cockroach bottle I added some cooked spaghetti to look like guts. In the large green bottle I added just a splash of milk to give make the liquid opaque plus if you let it sit a few days it'll also get a little chunky (make sure to have a bottle that closes somehow so you don't get the bad smell). Spices & dry goods also make good fillings, rice as maggots or brown mustard seeds as eyes.
IMG_6596
The whole collection looks great on the mantle or as a centerpiece on the table. My favorite pieces have to be the creepy doll face candle holders.
#293 - Creepy Doll Candle & Skull Plate

One other really quick & easy project I did this year were napkins with Halloween sayings on them.
Halloween Napkins
I picked up some $1.50 white bandanas from the craft store & then printed some appropriate sayings on iron-on transfer computer paper. (Make sure the sayings are printed on the paper backwards so when you print them they are the right way.) The only tricky part was making sure the sayings were set up to fit on the napkin when folded.

Tips on making dishes & jars with waterslide decals....
  1. I couldn't find the decal paper in a store so I bought it online at Lazertran. It's a little pricey but you   can get a lot of things on one sheet. We followed the directions with the paper for printing images we found online. 
  2. Other than the paper all you need is some cheap white dishes, bottles, vases, candle holders, etc.., water, a sponge & varnish if you want. 
  3. The decals will dry white so if you are placing the decal on something other than a white dish make sure to pick an image you can completely cut out.
  4. We were confused as to which way the decal went on the dish, was the side between the backing & the paper the sticky side or was the top? There were really no clear instructions about that anywhere & the decals stuck on both ways. Here's what we discovered. If you stuck the decal on by flipping it over & pasting the top down when it dried it had a shiny, almost plastic appearance. If you stuck the decal on using the side between the backing & the decal then it dried with a very flat paper appearance.
  5. At this point the decals are not permanent & can easily be peeled off. But you can varnish over them if you want to. The easiest varnish to use is clear water-based varnish from the craft store. But if you put the decal on something clear & stuck it on so it dried more papery you can seal it with oil-based varnish & the white areas will become clear.
Creepy Doll Candle Creepy Doll Candle Varnished
Here is the doll candle before varnishing & after. You can see how all the white became almost clear.

I wouldn't recommend eating off of these dishes as a fork & knife would scratch them up but they make great display & serving pieces. It was also a really fun project. My cousin & I did tons of pieces for both of our houses in one evening. Thanks to Wise Craft for this great idea.

Don't forget to check out all the other wonderful Halloween posts in the #GreatHallowTweet Halloween Blog Hop from the links on the left of this page!

If you are not reading this post in a feed reader or at http://agoodappetite.blogspot.com OR at http://agoodappetite.com then the site you are reading is illegally publishing copyrighted material. Contact me at katbaro AT yahoo DOT COM. All recipes, text and photographs in this post are the original creations & property of the author unless otherwise noted. © 2007-2010 Kathy Lewinski

Tuesday, October 26, 2010

Pumpkin Guts

Gooey, oozy & oh so tasty...
Pumpkin Guts
Pie pumpkins are the perfect individual sized serving dish especially when stuffed with bread, cheese & sausage. Plus, how cute are these to serve on your Halloween table?
Pumpkin Guts
The pumpkin flesh softens during roasting so it can be mixed into the filling when it comes time to eat creating a yummy one dish (ok, one pumpkin) meal. It's almost like having a cheese fondue with all the dippers mixed in.

We'd actually made this before a couple years ago using one large kabocha squash & then scooping out all the filling to serve. With the larger squash we found we had a lot of squash leftover after eating all the filling. With these smaller pumpkins there seemed to be a much better ratio of squash flesh to filling. I also changed the filling slightly this time by adding white wine to it.

Pumpkin Guts
(Since every pumpkin is going to be a different size you may use a little less or a little more cheese & sausage than this recipe calls for.)

8 oz bulk Italian sausage (spicy or mild, your choice)
2 pie pumpkins (about the size of a large soup bowl)
vegetable oil
3/4 c heavy cream
1/4 c white wine
pinch of nutmeg
8 slices french bread, preferably day old, about 1/2" thick
3 oz grated cheese, emmental, swiss or gruyere would be good

Cook up the bulk sausage & set aside.

Preheat oven to 400 F.

Cut off the top of the pumpkins as if you were going to carve them into a jack o'lantern. Clean the pulp & seeds from the inside & top. (Save the seeds to roast!). Lightly oil the outside of the pumpkins including the top. Oil a baking pan with sides & place the pumpkins in it.

Mix the cream, wine & nutmeg together.

Put two slices of bread in the bottom of each pumpkin. Then layer in 1/4 of the cheese & 1/4 of the sausage into each pumpkin. Top with 1/4 of the cream sauce. Press down. Repeat the layers using all the remaining bread, cheese, sausage & cream sauce. Do not go over the edge of the pumpkin. Put the tops on the pumpkin.

Place in the oven& bake for about 1 hour until the pumpkin is soft & the filling is bubbling.
Pumpkin Guts
They may ooze over a little bit. Let sit a few minutes before serving.

2 servings.

Don't forget to click through & read the other blogs in the GreatHallowTweet on the left over there & to enter to win a yourself a treat from Ghiradelli chocolate.

If you are not reading this post in a feed reader or at http://agoodappetite.blogspot.com OR at http://agoodappetite.com then the site you are reading is illegally publishing copyrighted material. Contact me at katbaro AT yahoo DOT COM. All recipes, text and photographs in this post are the original creations & property of the author unless otherwise noted. © 2007-2010 Kathy Lewinski

Monday, October 25, 2010

Farmers Market Finds, Weekly Menu and a Treat to Giveaway

Since I've been slowly stocking up on things like garlic & squash from the farmers market we didn't need that much this week.
Farmers Market Finds 10/24
Pie Pumpkins - These will get stuffed
Beets - Not sure how I'll use them yet but couldn't resist them
Leeks - Might go in the pumpkins
Figgy Rye Bread - For sandwiches
Ham & Swisscuits - These made a find breakfast sandwich this morning
French Bread - Had some last night with soup & the rest will go in the pumpkins

Our market, the Kingfield Farmers Market, is one of the latest running farmers markets in our area but we only have one weekend left & the holiday market on November 13th before it is over for the year.

On to Menu Planning Monday...
Smoked Salmon Chowder - trying finishing it off with a little cream cheese this time.
Pumpkin Guts - You've got to come back for this one.
Sausage & Peppers over Grits - Our typically recipe for the sausage & peppers but trying it over grits is new for us.
Bison & Butternut Squash Chili - Because we need to use that ground bison in the freezer
Sweet Potato Hash with Eggs - Based on some amazing hash we had at Corner Table.

Halloween Mantle
Most importantly, today begins the Great HallowTweet Halloween BlogHop. All the blogs you see listed in the banner on the left side here will be featuring Halloween themed posts all week. Click through for some fun. I thought I'd start the week off with a treat! (The tricks come later.)


Recently, we were sent some coupons to try Ghirardelli's new Luxe Milk chocolate for free. We tried both the hazelnut & almond. Even though I prefer dark chocolate, this is some of the best milk chocolate I've had. Now we have some coupons to share with you because chocolate is the perfect halloween treat, right?

1. Two winner will each receive a coupon to get either a box of Luxe Milk squares or a Luxe Milk bar for free as well as two more coupons for $1 off another box or bar.
2. Comment on this post to be entered to win.
3. Twitter this giveaway & let us know you did in a comment.
4. We must be able to email you if you are picked as the winner so make sure to leave an email address!
5. The coupons are only good in the US, sorry.
6. The winner will be picked on Halloween.

Disclaimer: We were sent coupons from Ghirardelli to use ourselves & to giveaway. We were also sent some of the Luxe Milk squares through the Foodbuzz Tastemakers Program. We were not paid in any other way to write about this product.

If you are not reading this post in a feed reader or at http://agoodappetite.blogspot.com OR at http://agoodappetite.com then the site you are reading is illegally publishing copyrighted material. Contact me at katbaro AT yahoo DOT COM. All recipes, text and photographs in this post are the original creations & property of the author unless otherwise noted. © 2007-2010 Kathy Lewinski

Friday, October 22, 2010

The Big Easy

No, this is not a post about another trip to New Orleans it's about the new Char-Broil Oil-less Turkey Fryer. We were given a Big Easy through the Foodbuzz Tastemaker Program* to try out. Matt loves his grilling toys so this was perfect for us.
IMG_6429
Matt's parent were here visiting us & it was still amazingly 80 F in Minneapolis in October so the timing was great. The fryer went together pretty quickly & runs off the same propane tanks we use with our grill. We wanted to use it right away which meant no time to thaw a turkey so, we picked up a couple of chickens to cook instead. Matt oiled the inside of the fryer & let it season for about 15 minutes then we were ready to cook.
IMG_6439IMG_6440
We seasoned one chicken pretty basic with a poultry rub & the other with cajun spices. The chickens we placed in the fryer basket with their breasts facing out. Matt put skewers into the chickens to keep a little space between them & allow the heat to flow through.
IMG_6442
Then the guys settled in to "tend" the chickens while the infrared cooking went to work.
IMG_6445
About 40 minutes later the chickens registered as done on the thermometer so we let them sit a few minutes & then easily pulled the basket with the chicken out. The chickens were beautifully browned & so, so juicy!
IMG_6450
I thought we'd have a ton of chicken leftover for the week but almost every bite was eaten up! We really liked the way the Big Easy cooked the chicken but I do have to say I wouldn't really call it fried, it was much more like broiled. It did really cooked the meat evenly on all sides. We did feel like it was a lot safer than having a big pot of hot oil hanging around. We're looking forward to doing a turkey in it (it's portable enough that we may take it with us to Michigan for Thanksgiving). The Big Easy is even set up to collect the juices so we can make gravy. I'd also like to see what it does to potatoes as I used to love broiled potatoes in college.

You can get a Big Easy through the Char-Broil, Amazon & at most big box hardware stores.

*We were given the Big Easy, a hinged basket & a Flip camera through the Foodbuzz Tastemaker Program. We were not paid or induced in anyway to write about it. We had hoped to film our first experiment but were too excited to use the Big Easy to wait for our camera to arrive. Look for out turkey film in November.

If you are not reading this post in a feed reader or at http://agoodappetite.blogspot.com OR at http://agoodappetite.com then the site you are reading is illegally publishing copyrighted material. Contact me at katbaro AT yahoo DOT COM. All recipes, text and photographs in this post are the original creations & property of the author unless otherwise noted. © 2007-2010 Kathy Lewinski

Wednesday, October 20, 2010

Fall Squash Recipes

IMG_6544


One of our readers commented that they'd like to see a series of butternut squash recipes from us because they had a bunch to use up right now. I realized we cook a lot with squash in the fall, butternut & other varieties, so, I thought I'd share a guide to some of our favorite squash recipes...


Mac & Cheese Stuffed Acorn Squash


Roast Kabocha Squash with Cheese & Sausage


Butternut Squash & Jalapeno Mac & Cheese


Orange-Glazed Autumn Pork Loin Stuffed with Squash


Roasted Butternut Squash Curry


Roasted Butternut Squash Soup


Butternut Squash & Spinach Pasta


If you are not reading this post in a feed reader or at http://agoodappetite.blogspot.com OR at http://agoodappetite.com then the site you are reading is illegally publishing copyrighted material. Contact me at katbaro AT yahoo DOT COM. All recipes, text and photographs in this post are the original creations & property of the author unless otherwise noted. © 2007-2010 Kathy Lewinski

Tuesday, October 19, 2010

Braised Chicken and Sweet Potato Curry

We eat a lot of curries at our house. The ones we make are usually quick one pot meals that are perfect for busy weeknights. The more we have them it seems the better we get at making up our own versions. I'm sure they are in no way traditional Indian curries but they have the flavor profile we enjoy.
IMG_6523
This my be one of the best curries we've made up recently. It started with the idea of braising some chicken in some leftover coconut milk & using the last of the sweet potatoes. I love using sweet potatoes in curry because their sweetness plays so well with the curry spices. My favorite sweet potato to use is the Jersey Sweet which has a red skin & white flesh. If you think you don't like sweet potatoes but have only had the orange type try one of these white beauties, their flavor will win you over!

One of the best ways to get a really flavorful curry is by making your own spice blend. We used one from the book 660 Curries. This smells (& tastes) 100 times better than any store bought curry powder. I think the addition of cinnamon is my favorite part. We mix up a batch & keep it stored in an airtight container. I will admit it took a trip to Penzeys to get some of the ingredients here, like nigella seeds, but we find now that we have them we use them.

Balti Masala
(from 660 Curries)

2 t fennel seeds
2 t coriander seeds
1 t cumin seeds
1 t mustard seeds
1/2 t whole cloves
1/2 t cardamon seeds
1/2 t nigella seeds
3 bay leaves
2 cinnamon sticks, broken into smaller pieces
2 t ground cayenne
1/2 t ground nutmeg

Heat a small skillet over medium-high heat. Add everything except the cayenne & nutmeg. Toast, shaking the skillet from time to time, until the spices start to turn ash black & the whole thing is really fragrant, 1 - 2 minutes. Remove from the skillet & let cool completely.

Put cool spices into a spice grinder (I use my coffee grinder). Grind until about the consistency of black pepper. Mix in the cayenne & nutmeg.

Store in an airtight container.

Makes about 1/3 c

Braised Chicken & Sweet Potato Curry

1/2 T olive oil
1 small onion, quartered
1 jalapeno, seeded & minced
1 clove garlic, minced
1 1/2 t balti masala
1 14.5 oz can crushed tomatoes
1/2 c coconut milk
4 boneless, skinless chicken thighs
1 1/2 - 2 c peeled, cubed sweet potatoes (about 1-inch pieces)
4 servings hot rice

Heat the oil in a large sauce pan or dutch oven over medium high heat. Add the onion, jalapeno & garlic. Sauté until the onion softens. Stir in the bati masala, tomatoes & coconut milk. Lay the chicken thighs & sweet potatoes in the liquid. Bring to a low boil. Cover, reduce heat & let simmer until the chicken is cooked & the potatoes are tender, about 30 minutes. Salt to taste.

Remove cover & allow to simmer while cooking the rice to thicken slightly.

Serve over hot rice with hot sauce for those who like it spicier & yogurt for those who like it cooler.

Makes 4 servings

If you are not reading this post in a feed reader or at http://agoodappetite.blogspot.com OR at http://agoodappetite.com then the site you are reading is illegally publishing copyrighted material. Contact me at katbaro AT yahoo DOT COM. All recipes, text and photographs in this post are the original creations & property of the author unless otherwise noted. © 2007-2010 Kathy Lewinski

Monday, October 18, 2010

Farmers Market Finds and the Weekly Menu 10/17 - 10/23/10

I love the farmers market in the fall, the crisp sunny mornings, the wonderful fall vegetables & the hot apple cider.
Swisscuit & Hot Apple Cider
We have our apple cider with one of the wonderful biscuits from Sun Street Breads. Currently, the biscuits are made with ham, mustard & swiss cheese, they are to die for!
Sun Street Breads
Though these days you have to get to the market early to grab some of Solveig's baked treats. An article in the Star Tribune 2 weeks ago has lines reaching through the whole market the last couple of Sundays. We are thrilled for her as long as we get our Sunday morning biscuit!
Farmers Market Finds 10/17
Here's this week's farmers market finds...

Sun Street Lunchbox Bread - For this week lunchtime sandwiches
Carrots
Leeks
Broccoli
Butternut Squash - Who can resist at 3 for $5!
Tomatillos - for enchiladas
Garlic - We're stocking up for the winter
Sun Street Domino & Ginger cookies

On to Menu Planning Monday....

Beef & Barley Soup with Carrots & Parsnips - Made this last night & its so perfect for this fall weather

Coconut Braised Chicken Thighs & Sweet Potatoes - An experiment to use up some coconut milk

Wild Rice, Shiitake & Butternut Hot Dish - They just all sound good together to me

Chicken Enchiladas - Using the tomatillos we found at the market plus some leftover tortillas

Potato & Leek Soup - A request from Matt

If you are not reading this post in a feed reader or at http://agoodappetite.blogspot.com OR at http://agoodappetite.com then the site you are reading is illegally publishing copyrighted material. Contact me at katbaro AT yahoo DOT COM. All recipes, text and photographs in this post are the original creations & property of the author unless otherwise noted. © 2007-2010 Kathy Lewinski

Friday, October 15, 2010

Butternut Jalapeno Mac and Cheese

Poor Matt & I, we both spent yesterday morning at the dentist. He had to get a couple of fillings & whole bunch of shots to get numbed up. I moved into my next set of invisalign liners after 4 weeks in the last pair & my teeth just ache. The assistants at the office warned me that I should cook something soft for dinner & they were right. Mac & cheese seemed to be the perfect comfort food for the occasion.
Butternut & Jalapeno Mac & Cheese
My idea to add fig & jalapeno jam to the mac & cheese was shot down (by both Matt & Scott the chef at Corner Table) but I still wanted to do something different to it. I had 1/4 of a butternut squash in the fridge & a ton of jalapenos in the garden so those became my additions.

I have to tell you this might be one of the best versions of mac & cheese I've ever made. The roasted butternut squash gives the perfect touch of sweetness against the salty cheese & slightly spicy jalapeno. Now I'm wishing I'd made a double batch so we had leftovers for lunch...

Butternut Jalapeno Mac & Cheese

1 1/2 c cubed, peeled butternut squash, 1-inch cubes
olive oil
6 oz penne pasta
1/2 T unsalted butter
1 jalapeno, seeded & minced
1 T all-purpose flour
1/4 c heavy cream
1/2 c milk
6 oz sharp white cheddar, cut into small chunk or grated
pinch of dry mustard
salt & pepper
panko

Preheat oven to 400 F.

Put the cubed butternut squash in a small roasting pan. Drizzle with enough olive oil to coat the cubes. Sprinkle with some salt. Roast until soft & starting to brown, about 30 minutes. Set aside.

Cook the pasta according to the directions. Drain & set aside.

Preheat oven to 350 F.

Melt the butter in a small saucepan over medium heat. Add the jalapeno & sauté for a minute or two. Add the flour & stir for 1 minute, do not let it brown. Slowly whisk in the cream & milk. Stir until hot & sightly thickened, about 2 minutes. Add the cheese & stir until melted. Stir in the mustard. Season with salt & pepper to taste.

Mix the roasted squash, cooked pasta & cheese sauce together in a small baking dish. Sprinkle with some panko. Bake for 25 minutes until golden brown & crispy.

2 - 3 servings.

Finally, I want to wish a Happy 4th Anniversary to the best husband a girl could have!

If you are not reading this post in a feed reader or at http://agoodappetite.blogspot.com OR at http://agoodappetite.com then the site you are reading is illegally publishing copyrighted material. Contact me at katbaro AT yahoo DOT COM. All recipes, text and photographs in this post are the original creations & property of the author unless otherwise noted. © 2007-2010 Kathy Lewinski

Wednesday, October 13, 2010

Squash and Green Bean Curry

We had a visit this weekend from Matt's parents. Matt's mom shares our love of cooking & brought us a new cookbook, 5 Spices, 50 Dishes. The idea behind the book is that you can create flavorful Indian dishes with just 5 common spices you already have in your pantry. The book is full of amazing sounding recipes but this one just called out to me because I had the butternut squash & green beans in the fridge.
Squash & Green Bean Curry
This was an interesting dish to make. The squash & beans get steamed separately them cooked briefly in coconut milk. The spice, chili & nuts are fried up & added to each serving. The resulting dish was a mild, fresh curry which we liked more with each bite. The fried mustard seeds jalapenos & almonds added so much flavor & an almost popcorn smell. This is one we'll definitely make again.

Notes on this recipe: We used jalapenos because we have a ton in the garden which gave only a mild heat. The original recipe called for green serranos so add hotter peppers if you like heat. For the nuts we used slivered almonds because we had them but the recipe called for chopped cashews. We used lite coconut milk which I think was a mistake as the sauce never got as thick as we would have liked, next time we'll suck up the extra calories & use the regular. Finally, the book said this was 4 servings, yeah, maybe as a side dish. We found it made 2 perfectly-sized entrées.

Squash & Green Bean Curry
(adapted from 5 Spices, 50 Dishes)

8 oz butternut squash, peeled & cut into 1-inch cubes
1/2 c water
salt
8 oz green beans
1 c coconut milk
1 T canola oil
1/4 t mustard seeds
2 jalapenos, minced
3 T slivered almonds
hot white rice

Put the squash, water & a pinch of salt into a medium saucepan. Bring to a boil. Cover & reduce heat to medium. Let steam until the squash is tender, about 6 minutes.

Remove the squash from the pot with a slotted spoon. Add the beans & bring back to a boil. Cover & reduce heat to medium. Let steam until crisp tender, about 2 1/2 minutes.

Add the squash back to the pan. Stir in the coconut milk & bring to a simmer. Let simmer uncovered until slightly thickened, about 15 minutes. Do not let it boil as the coconut milk with curdle. Do not stir too briskly or you'll break up the squash.

Meanwhile, in a small skillet heat the oil over high heat until smoking. Add the mustard seeds & cook until the stop popping (a splatter screen comes in really handy here). Reduce the heat to medium-low & add the jalapenos & almonds. Cook until the almonds are golden brown.

Serve the curry over hot rice & sprinkle with the pepper & nut mixture.

2 Servings

If you are not reading this post in a feed reader or at http://agoodappetite.blogspot.com OR at http://agoodappetite.com then the site you are reading is illegally publishing copyrighted material. Contact me at katbaro AT yahoo DOT COM. All recipes, text and photographs in this post are the original creations & property of the author unless otherwise noted. © 2007-2010 Kathy Lewinski

Tuesday, October 12, 2010

Sausage and Bean Soup

Here's an easy little soup that Matt made up the other night. We always make a big pot of soup so that we can have it for lunches during the week which is a nice change-up from our typical sandwich.
Sausage & Bean Soup
This soup definitely leads towards Italy with its Italian sausage & garlic. The crushed red pepper flakes give it a nice back of the throat heat without being spicy. The beans we used were Vallarta beans from Rancho Gordo. They are a rich, dense bean that added a lot of flavor. We find the broth from cooking the beans is such a good base for making soup that we don't even need to add stock. (Just one of the reasons to start with dry beans instead of canned.) Can't get Vallarta beans then try using a yellow eye or great northern or even a navy bean would be good.

I found this soup was even better after a night in the refrigerator so make it on a Sunday or Saturday afternoon & have a fabulous soup for lunch all week!

Sausage & Bean Soup

1 c dry beans (see post above for variety suggestions)
1 lb bulk Italian sausage
1 large carrot, diced
1 stalk celery, diced
1 c diced yellow onion
2 cloves garlic, minced
1/4 t crushed red pepper flakes
1/4 t marjoram
1/4 t dried thyme
1 t dried parsley
2 1/2 oz kale*, chopped
salt to taste
Parmesan curls for presentation

Rinse the beans. Put them in a crock pot or saucepan with 3 cups water. Let simmer covered until tender, about 2 hours or so. Set aside, do not throw out the cooking water.

In a large soup pot brown the sausage over medium-high heat until cooked through. Add the carrot, celery, onion & garlic. Sauté until the onions are translucent. Stir in the red pepper flakes, marjoram, thyme & parsley. Add the beans, cooking water & kale. Add about 2 more cups water or enough to cover everything. Bring to a boil. Cover, reduce heat & simmer for 15 more minutes. Add salt to taste.

Serve with a parmesan curl on the top of each bowl.

6 servings


*A note about the kale: We blanch & freeze kale throughout the summer & fall to use all winter. The blanching makes it a little more tender thus it needs less time to cook in our soups & stews. If you are using fresh kale you may need to cook the soup slightly longer to get the kale tender or try blanching the leaves for a minute before adding them in.


If you are not reading this post in a feed reader or at http://agoodappetite.blogspot.com OR at http://agoodappetite.com then the site you are reading is illegally publishing copyrighted material. Contact me at katbaro AT yahoo DOT COM. All recipes, text and photographs in this post are the original creations & property of the author unless otherwise noted. © 2007-2010 Kathy Lewinski

Monday, October 11, 2010

Farmers Market Finds and the Weekly Menu 10/11 - 10/16/10

This weekend at the Kingfield Farmers Market I participated in my first bake-off ever. We were asked to create a baked good using pumpkin this week & bring enough for 60 small servings.
IMG_6422
Then market-goers could purchase a plate with a sample of each treat & vote for their favorite. A panel of judges also chose their favorite. I brought a Chai Pumpkin Cake topped with a simple glaze (recipe coming soon).
IMG_6423
I think my cake was really good but my bet is on the pumpkin whoopie pies. I'm still waiting patiently (or not so patiently) to find out who won.
Here's what we picked up at the market this week...
IMG_6425
Onions
Sun Street Farm Girl Saison Bread & Kingfield Sourdough Bread
Italian Grilling Peppers - Went into a sweet potato hash last night
Green Beans
Eggs
Surprisingly late cherry tomatoes
Jersey Cows' Milk Cheese - Great on the bread with some fig jam
Garlic
Sweet Potatoes
IMG_6420
& some amazing duck & pork noodle soup from the Chef Shack.

We haven't really planned out menu for the week other than I have lots of leftover chicken to use & we want some sweet potato tacos as well.


If you are not reading this post in a feed reader or at http://agoodappetite.blogspot.com OR at http://agoodappetite.com then the site you are reading is illegally publishing copyrighted material. Contact me at katbaro AT yahoo DOT COM. All recipes, text and photographs in this post are the original creations & property of the author unless otherwise noted. © 2007-2010 Kathy Lewinski

Wednesday, October 6, 2010

Pork Chile Verde

This dish might not be anything too pretty to look at but, oh man, was it ever good!
Pork Chile Verde
Pork Chile Verde is one of Matt's favorite things to order when back in California & eating at a taqueria. We'd never made it at home until Matt suggested we add it to the menu this week. Our's was not exactly like the ones he gets there with shredded pork but flavor-wise he thought it was pretty darn close.

The bright green sauce has a zing of heat from the jalapenos but its not too spicy (it was mild enough for me) so if you like things hot, add some hot sauce or throw in a hotter pepper. The pork steak got very tender from the braising in just an hour. If you can't find pork steak use another fatty cut of pork such as shoulder. This sauce would also be tasty with chicken. Just writing about it is making me crave it again...

Pork Chile Verde

1 T olive oil
2 lb pork steak, cut into 1-inch cubes (or pork shoulder, something with a good amount of fat)
3/4 lb tomatillos, peeled & chopped
5 oz yellow onions, chopped
2 clove garlic, minced
4 jalapenos, seeded & chopped
2 poblano peppers, seeded & chopped
Handful fresh cilantro, roughly chopped stems & all
1 T worcestershire sauce
1/2 c water

In a large skillet with a lid heat the olive oil over medium-high heat. Add the pork & sear until brown on all sides. Remove from pan & set aside.

Add the tomatillos, onions, garlic, jalapenos, poblanos, cilantro & worcestershire to the pan. Cook until everything is softening & the tomatillos are releasing their juices. Add the pork back to the pan. Stir in the water. Bring to a boil. Cover, reduce heat & simmer until the pork is tender about 1 hour.

Remove the pork from the pot. Put everything else into a blender & purée until smooth. Put back in pan with the pork. If you want the sauce a little thicker let it simmer with the top off until it thickens, we let ours simmer for 15 more minutes. If the sauce is thick enough just heat through.

Serve over rice or in a taco. I liked mine with some sour cream on it.

Makes 4 - 5 servings.

If you are not reading this post in a feed reader or at http://agoodappetite.blogspot.com OR at http://agoodappetite.com then the site you are reading is illegally publishing copyrighted material. Contact me at katbaro AT yahoo DOT COM. All recipes, text and photographs in this post are the original creations & property of the author unless otherwise noted. © 2007-2010 Kathy Lewinski

Tuesday, October 5, 2010

Tamarin Chicken Curry

A few weeks back I won a jar of Tamarin Speculoos Spread from Elle's New England Kitchen. Tamarin (not to be confused with tamarind) Speculoos Spread is a new sandwich spread from Europe that has the texture of a smooth peanut butter but the flavor is sweet & cinnamonny. Elle asked the winner of each jar to use it in a recipe & I thought it would be perfect in a curry.
Tamarin Chicken Curry
So, I whipped up a quick & simple chicken & vegetable curry adding a good amount of the spread to the sauce. It was so good! The Tamarin Spread not only added a wonderful sweetness to the curry, it also added to the velvety, creaminess of the sauce. It's cinnamon flavor was especially good with the sweet potatoes. A little Sirracha (or a lot depending on your love of heat) added to the sauce keeps it from being too sweet.

Next I liked to try the Tamarin sauce in a dipping sauce of some sort, any ideas?

Tamarin Chicken Curry

1 T vegetable oil
6 oz onion, cut into 6 wedges
10 oz sweet potato, peeled & cut into 1/2-inch cubes
1 large carrot, peeled & sliced
florets from 1/2 a head of cauliflower
1 T curry powder
1 T all-purpose flour
2 c chicken stock
1 c water
1/2 c Tamarin Spread
2 t kosher salt
Sirracha to taste
2 c chopped cooked chicken
1/2 c coconut milk
2 c frozen green beans

In a large soup pot heat the olive oil over medium-high heat. Add the onion, sweet potato, carrot, cauliflower & curry powder. Sauté until the onion is starting to soften. Sprinkle the flour over the top & cook while stirring for 1 minute. Add the chicken stock, water, Tamarin spread, salt & Sirracha. Stir to mix. Add the chicken. Bring to a boil. Cover, reduce heat & let simmer until the vegetables are softened, about 15 minutes. Stir in the coconut milk & beans. Cook until heated through. Serve over rice.

Makes 4 - 5 servings

***Disclose: I was given a jar of Tamarin Spread for free & asked to create a recipe with it but I was not paid in any other way.

If you are not reading this post in a feed reader or at http://agoodappetite.blogspot.com OR at http://agoodappetite.com then the site you are reading is illegally publishing copyrighted material. Contact me at katbaro AT yahoo DOT COM. All recipes, text and photographs in this post are the original creations & property of the author unless otherwise noted. © 2007-2010 Kathy Lewinski

Monday, October 4, 2010

Farmers Market Finds and the Weekly Menu 10/4 - 10/9/10

Only 4 more weeks of our Kingfield Farmers Market. We'll really miss our Sunday morning routine of biscuits at Sun Street Breads followed by something tasty from Chef Shack & of course getting our fresh produce for the week.
Farmers Market Finds
Here's what we got this week...

Oatmeal Lunchbox Bread - for lunchtime sandwiches
Red Clover Honey - such a great dark color
Flower Bouquet - How beautiful are these bouquets that they make out of things like kale & onion blossoms.
Kale Bouquets
White Sweet Potatoes - We like the white ones so much more than the orange
Delicata Squash
Onions - I love to buy the little ones that are perfect recipe size
Cauliflower - Tasty in last night's curry
Heirloom Cherry Tomatoes - After the frost this weekend these are probably the last of the season. If you have a bunch of green tomatoes this still on the vine this late in the season how about making some First Frost Green Tomato Jam?
Yukon Gold Potatoes
Garlic - One of our favorite vendors & the growers of this beautiful garlic was featured in the New York Times this weekend!

On to Menu Planning Monday...

Chili Verde Pork - A hold over from last week's menu

Sausage & Bean Soup - Matt says it'll be like a ham & bean soup but with sausage

Butternut Squash Pasta

Creamy Wild Rice Soup - A cold weather favorite around here

Matt's parents will be here this weekend so I think we'll eating out Friday & Saturday.

Finally, just a little self-promotion to my other blog. Over the past two month's my friend Susi & I have been doing all this season's Project Runway challenges on dolls. This weekend our project was featured in India's Hindustan Times newpaper. Read all about it here...

If you are not reading this post in a feed reader or at http://agoodappetite.blogspot.com OR at http://agoodappetite.com then the site you are reading is illegally publishing copyrighted material. Contact me at katbaro AT yahoo DOT COM. All recipes, text and photographs in this post are the original creations & property of the author unless otherwise noted. © 2007-2010 Kathy Lewinski
Related Posts with Thumbnails

Get Email Updates!

Enter your email address:

Delivered by FeedBurner

Measurement Abbreviations

T = Tablespoon
t = teaspoon
c = cup
lb = pound
oz - ounce

Labels

Blog Archive

Contributors

Blog Directory for Minneapolis, Minnesota