
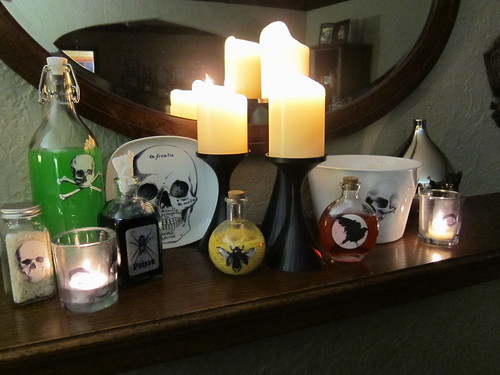
I created a collection of creepy potion bottles, candle holders, plates & bowls just using my computer printer & some waterslide decal paper. (See tips for making these later in this post.) The bottles, plates & bowls were all picked up very cheaply at IKEA, Michael's & Joann's. Some of the coolest bottles were only $.99.
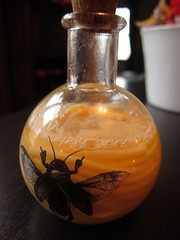
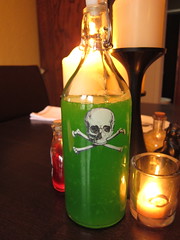
The bottles were then filled. Just using colored water looks great but just a few other additions makes them look even creepier. For the cockroach bottle I added some cooked spaghetti to look like guts. In the large green bottle I added just a splash of milk to give make the liquid opaque plus if you let it sit a few days it'll also get a little chunky (make sure to have a bottle that closes somehow so you don't get the bad smell). Spices & dry goods also make good fillings, rice as maggots or brown mustard seeds as eyes.
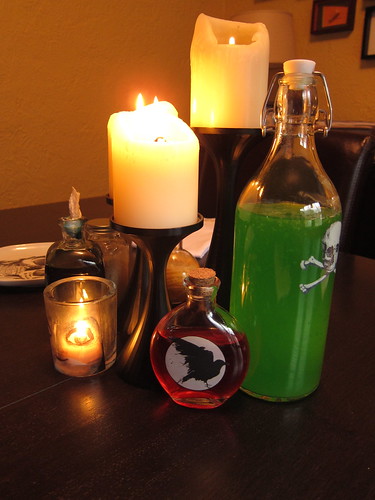
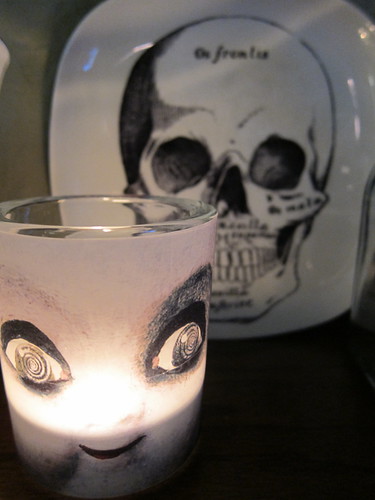
The whole collection looks great on the mantle or as a centerpiece on the table. My favorite pieces have to be the creepy doll face candle holders.
One other really quick & easy project I did this year were napkins with Halloween sayings on them.

I picked up some $1.50 white bandanas from the craft store & then printed some appropriate sayings on iron-on transfer computer paper. (Make sure the sayings are printed on the paper backwards so when you print them they are the right way.) The only tricky part was making sure the sayings were set up to fit on the napkin when folded.
Tips on making dishes & jars with waterslide decals....
- I couldn't find the decal paper in a store so I bought it online at Lazertran. It's a little pricey but you can get a lot of things on one sheet. We followed the directions with the paper for printing images we found online.
- Other than the paper all you need is some cheap white dishes, bottles, vases, candle holders, etc.., water, a sponge & varnish if you want.
- The decals will dry white so if you are placing the decal on something other than a white dish make sure to pick an image you can completely cut out.
- We were confused as to which way the decal went on the dish, was the side between the backing & the paper the sticky side or was the top? There were really no clear instructions about that anywhere & the decals stuck on both ways. Here's what we discovered. If you stuck the decal on by flipping it over & pasting the top down when it dried it had a shiny, almost plastic appearance. If you stuck the decal on using the side between the backing & the decal then it dried with a very flat paper appearance.
- At this point the decals are not permanent & can easily be peeled off. But you can varnish over them if you want to. The easiest varnish to use is clear water-based varnish from the craft store. But if you put the decal on something clear & stuck it on so it dried more papery you can seal it with oil-based varnish & the white areas will become clear.

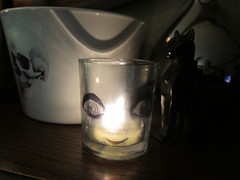
Here is the doll candle before varnishing & after. You can see how all the white became almost clear.
I wouldn't recommend eating off of these dishes as a fork & knife would scratch them up but they make great display & serving pieces. It was also a really fun project. My cousin & I did tons of pieces for both of our houses in one evening. Thanks to Wise Craft for this great idea.
Don't forget to check out all the other wonderful Halloween posts in the #GreatHallowTweet Halloween Blog Hop from the links on the left of this page!
If you are not reading this post in a feed reader or at http://agoodappetite.blogspot.com OR at http://agoodappetite.com then the site you are reading is illegally publishing copyrighted material. Contact me at katbaro AT yahoo DOT COM. All recipes, text and photographs in this post are the original creations & property of the author unless otherwise noted. © 2007-2010 Kathy Lewinski


15 comments:
Love these ideas - and the doll-face candleholders? Creepy and est evah!
Great projects and thansk for including the sources. Love Ikea for bottles and such.
How fun!! Looks great!
Great post! Those napkins are so cool! I'd love to try making them. You could do them for any occasion. I can see the possibilities are endless. Nice touch with all your spooky decorations!
man o man! I LOVE these! I wish I could have come over for the party night!!!
Amazing, Kathy! Everything looks incredibly spooky!
I love all the things you guys made. Thanks for the tip on the paper, I'm thinking about all the possibilities! Love the doll face candle holder. Spooooky!
This looks awesome! These crafty spooky things would be perfect for entertaining. Love it!
I just cam across your blog. I like it a lot.
Happy Halloween to you.
These are so cool, Kat!
Such a clever idea. So fun!
What great ideas! You are so creative. The bottles are so unique to standard Halloween decorations.
Great decor. Seriously, reading what was written on the napkins gave me the willies!
So fun! I missed out on decorating this year, but can't wait for next year!!
You are so clever! These things are brilliant!
these are dreadfully delightful. I go a little nutty in October as well because it is my son's birthday month. Every year, I would create a Halloween themed birthday. Your ideas are awesome.
Post a Comment