Sunday, July 12, 2009

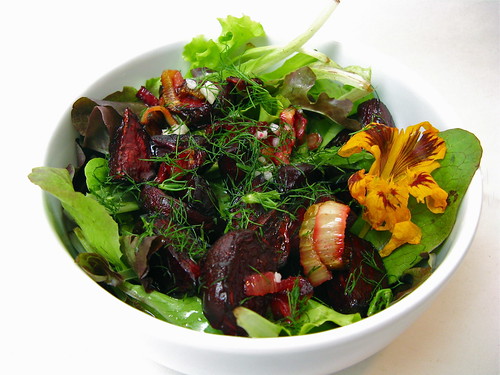
Roasted Beet and Fennel Salad

As its the time of year the fennel & beets are starting to show up in peoples CSA boxes I'm starting to read about how much people dislike these two vegetables. I guess I'm just lucky since both Matt & I really like them. I was planning to do a roasted beet salad this week & Matt suggested roasting the fennel with the beets. According to the The Flavor Bible these are two items that go together well so I did just that.
Roasted Beet & Fennel Salad
I wanted a light dressing for this salad with a little citrus tang so I did an easy Lemon Vinaigrette. (I just remembered I had originally planned on doing orange, oops!). Actually the whole salad ended up being a very light & fresh side dish perfect for this time of year. Roasting really sweetens the beets & mellows the flavor of the fennel. The strongest fennel flavor comes from the fronds that are sprinkled on top so add as much or as little as you like.

Roasted Beet & Fennel Salad

1 fennel bulb, sliced
1 1/2 c beets, cut into small pieces (you can do more this is just what I had on hand)
olive oil
kosher salt
salad greens
fennel fronds, chopped

Preheat oven to 400 F. Place the fennel bulb & beets in a small roasting pan. just coat with olive oil & sprinkle with salt. Roast for about 30 minutes or until tender. (If its too hot to roast the beets & fennel inside, cook them on your grill in a grill basket)

Place on a bed of salad greens. Dress with Lemon Vinaigrette. Sprinkle fennel fronds over the top.

Lemon Vinaigrette

2 T olive oil
1 T lemon Juice
1 T white wine vinegar
1 small clove garlic, minced
salt & pepper to taste

Serves 2

If you are not reading this post in a feed reader or at http://agoodappetite.blogspot.com OR at http://agoodappetite.com then the site you are reading is illegally publishing copyrighted material. Contact me at katbaro AT yahoo DOT COM. All recipes, text and photographs in this post are the original creations & property of the author unless otherwise noted.
© 2007-2009 Kathy Lewinski

Friday, July 10, 2009

Cherry Jams

Cherries are in season right now & on sale at all the stores in town. I know they aren't local but being a good Michigander Matt loves his cherries. I thought I'd only have enough cherries for one batch of jam but it ended up I had 8 cups of pitted cherries which was enough for two. I did one traditional batch. The cinnamon & cloves in it are optional but they are flavors we like so I added them. The flavor of the cloves really comes through here so if you don't like cloves skip it.
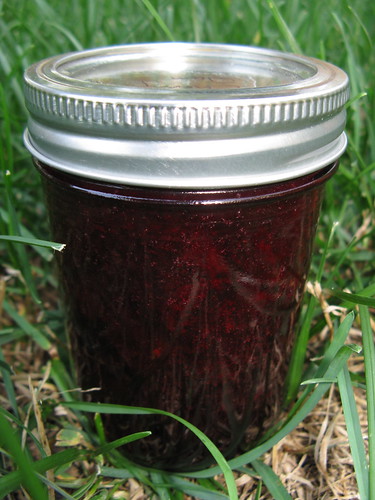
Cherry Jam

Traditional Cherry Jam
(from Ball Complete Book of Home Preserving)

4 c sweet cherries, pitted & chopped (about 2 lbs)
1/4 c lemon juice
1/2 t cinnamon
1/2 t ground cloves
1 package (1.75 oz) powdered pectin
5 c sugar

Prepare the jars & lids for canning. Jars should be boiled in water for 20 minutes & lids for 5 minutes.

In a large enamel or stainless steel saucepan combine the cherries, lemon juice, cinnamon & cloves. Whisk in the pectin until completely dissolved. Turn heat to high & bring to a boil. Stir in the sugar all at once. Return to a boil. Boil hard while stirring for 1 more minute. Remove from heat & skim of foam.

Ladle into eight hot sterilized half-pint jars leaving about 1/4-inch headroom. Clean off the tops of the jars & cover with a lid. Close with a neckband & finger-tighten. Process in boiling water for 10 minutes. Turn off heat & let sit for 5 minutes. Remove jars from the water to a heat-proof surface & let cool for 12 - 24 hours (do not dry jars). Check to make sure the top of the jar has been drawn downwards, creating a seal. If it hasn't either reprocess that jar or store it in the fridge to be eaten within 3 weeks. Remove the neckbands & store jam in a cool dark place.

Makes 6 - 8 cups (the recipe said it would make 8 we only got 6)
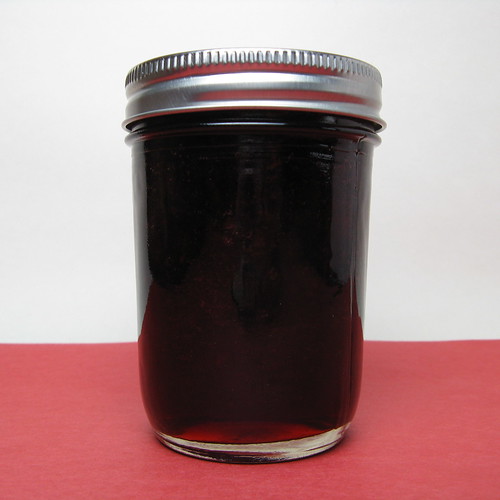
Black Forest Preserves
I decided to make something a little different for the second batch & remembered seeing Black Forest Preserves on Today's Menu. Chocolate with cherries I figure it had to be good. I added a cup more cherries than the recipe called for because I had them & because the basic cherry jam recipe with liquid pectin called for 4 cups so I figured it would work. I used Hershey's Special Dark (my favorite) for the cocoa which gives an intense chocolate flavor & a really dark color to the jam. Now I probably wouldn't put this jam on my toast in the morning but I can imagine it on a croissant or french toast, spread between layers of a cake or as the filling for turnovers. It'll probably even be good warmed up a little over ice cream.

Black Forest Preserves
(adapted from Ball Complete Book of Home Preserving)

6 1/2 c sugar
1/3 c unsweetened cocoa (I used Hershey's Special Dark)
3 - 4 c sweet cherries, pitted & chopped (the recipe calls for black cherries, i used red)
1/2 c lemon juice
2 pouches (6 oz) liquid pectin
1/2 t almond extract (or 1/4 c amaretto)

Prepare the jars & lids for canning. Jars should be boiled in water for 20 minutes & lids for 5 minutes.

Mix the sugar & cocoa together & set it aside.

In a large enamel or stainless steel pot combine the cherries and lemon juice. Stir in the sugar & cocoa. Bring to a full rolling boil over high heat while stirring. The boil should not stop when stirred. Stir in the pectin. Boil hard for 1 minute while stirring. Remove from heat. Stir in the almond extract. Skim off foam.

Ladle into eight hot sterilized half-pint jars leaving about 1/4-inch headroom. Clean off the tops of the jars & cover with a lid. Close with a neckband & finger-tighten. Process in boiling water for 10 minutes. Turn off heat & let sit for 5 minutes. Remove jars from the water to a heat-proof surface & let cool for 12 - 24 hours (do not dry jars). Check to make sure the top of the jar has been drawn downwards, creating a seal. If it hasn't either reprocess that jar or store it in the fridge to be eaten within 3 weeks. Remove the neckbands & store jam in a cool dark place.

Makes 8 cups

If you are not reading this post in a feed reader or at http://agoodappetite.blogspot.com OR at http://agoodappetite.com then the site you are reading is illegally publishing copyrighted material. Contact me at katbaro AT yahoo DOT COM. All recipes, text and photographs in this post are the original creations & property of the author unless otherwise noted.
© 2007-2009 Kathy Lewinski

Thursday, July 9, 2009

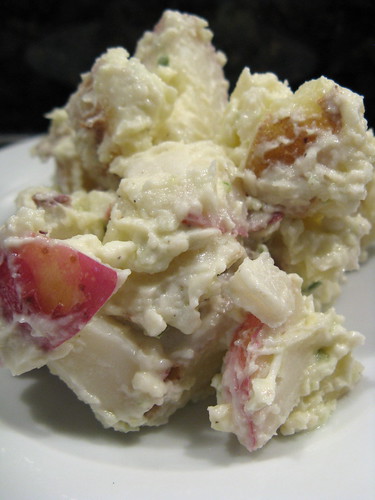
Matt's Creamy Pesto Potato Salad

I have never met anyone who loves potato salad as much as Matt. He considers it a huge treat when I get him some from the deli to have with his lunch. His favorite maybe the classic potato salad with hard boiled egg but give him a good German potato salad or even a oil & vinegar version & he's just as happy. So, when I made a big batch of garlic scape pesto he, of course, decided it would be a great flavoring for a potato salad.
Matt's Creamy Pesto Potato Salad
He kept the flavors pretty simple in this salad, a little tang from the sour cream & a little garlic from the pesto. The flavors were reminiscent of a baked potato probably due to the sour cream. The salad was a big hit at our Fourth of July bbq & I think it'll become one of our summer staples, especially with all the pesto in the freezer.
Matt's Creamy Pesto Potato Salad

Matt's Creamy Pesto Potato Salad

2 lbs waxy potatoes (we used 1lb each red potatoes & yukon gold), washed & cut into 1/2-inch cubes
2 - 3 T Garlic Scape Pesto
1/2 c sour cream
1/2 c mayonnaise
salt & pepper to taste

Boil the potatoes in salted water until fork tender about 7 - 10 minutes. Drain.

Mix the pesto, sour cream & mayonnaise together. Season with salt & a generous amount of pepper. Mix in with warm potatoes.

Serve warm or chilled

Makes 2 lbs (6 servings)

If you are not reading this post in a feed reader or at http://agoodappetite.blogspot.com OR at http://agoodappetite.com then the site you are reading is illegally publishing copyrighted material. Contact me at katbaro AT yahoo DOT COM. All recipes, text and photographs in this post are the original creations & property of the author unless otherwise noted.
© 2007-2009 Kathy Lewinski

Wednesday, July 8, 2009

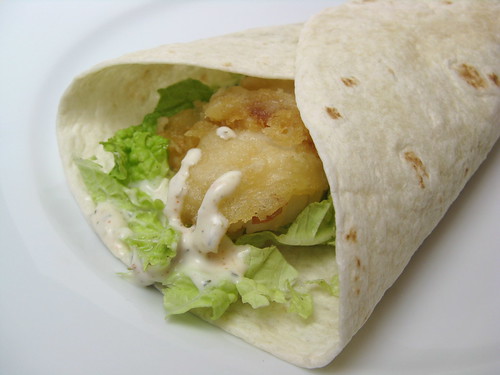
Baja Fish Tacos

Matt loves a good fish taco. While I on the other hand am almost embarrassed to say I'd never tried one, mainly because of the mistaken notion that I wouldn't like them. It's not that strange a notion really. Let's face it, I am a child of the 80's in the Midwest. To me a taco was a hard shell containing ground beef, lettuce, cheese, tomato & sour cream, preferably from Taco Bell. Fancy Mexican food was Chi Chi's.
Baja Fish Taco
Well, moving to San Francisco really opened my eyes to what Mexican food is plus Matt loves to make it at home. So, I discovered the joys of burritos, tamales, fajitas and soft tacos but I still hadn't given in to the fish taco. Until this week that is. We had some tortillas left over from making quesadillas & some nice cabbage from our CSA box so Matt sent me to the store for some firm white fish.

Ok I'm sold, this is delicious. The sauce was amazing, a little tart, a little sweet & a little spicy.

Baja Fish Tacos

1/4 c mayonnaise
1/4 c plain yogurt
1 1/2 T lime juice
1/4 t cumin
1/4 t dried dill
1/4 t dried oregano
1/8 t cayenne (or more to taste)
3/4 c firm white fish filets
1/2 c flour
6-oz beer
1/2 t salt
vegetable oil (We used peanut. You want something that can handle a high heat so olive oil won't work)
2 c cabbage, sliced
flour tortillas (we used large tortillas & needed 4, if you use taco size you'll probably need 6)

Whisk together the mayonnaise, yogurt, lime juice, cumin, dill, oregano & cayenne. Set aside.

Whisk the flour, beer & salt together. Cut the fish into your desired size.

In a pot with tall sides heat enough oil to cover your pieces of fish until very hot. Dip the fish in the batter & then carefully place into the pot. Do not crowd your pot, you'll have to do your fish in batches most likely. When the fish is crispy & golden brown use a slotted spoon to remove it from the oil & place it on a paper towel covered plate to drain. Repeat to cook all the fish.

Place some cabbage in the middle of each tortilla. Top with the sauce & fish. Roll up & eat.

Serves 2

If you are not reading this post in a feed reader or at http://agoodappetite.blogspot.com OR at http://agoodappetite.com then the site you are reading is illegally publishing copyrighted material. Contact me at katbaro AT yahoo DOT COM. All recipes, text and photographs in this post are the original creations & property of the author unless otherwise noted.
© 2007-2009 Kathy Lewinski

Tuesday, July 7, 2009

Beet Green & Amaranth Quesadilla

Neither of us were feeling really well the end of last week with a touch of the flu. We knew we wanted to make something for dinner using the items that would go bad the quickest such as the beet greens. At the same time it had to be something we could make quickly with minimal effort. The Harmony Valley newsletter mentioned a veggie quesadilla using the amaranth so we thought why not make one with a mixture of greens.
Beet Green & Amaranth Quesadilla
The bright red amaranth & beet stems gave the filling of this quesadilla an amazing color plus we felt like it had to be pretty healthy. The greens were chopped & then wilted in a little olive oil with some garlic. We added a chopped tomato but as they are still greenhouse grown here it didn't have a ton of flavor & next time I'd leave it out & just use a little salsa as a dip. This was a really satisfying meal (I couldn't even finish mine) & quite tasty but we both felt like it was missing something. Matt thought perhaps a little heat would have been good. He thought a little longer & decided what it needed was caramelized onions. He had hit the nail on the head, that touch of sweetness was what was missing.

Beet Green & Amaranth Quesadilla
(You could make this with any green you have that wilts well such as spinach, kale or swiss chard)

1 T olive oil
2 cloves garlic
2 c chopped beet greens & stems
2 c amaranth leaves
8 oz quesadilla cheese (seriously that was what it was called but any melting cheese would be good, it tasted like mozzarella or monterey jack to us.)
1 tomato, seeded & chopped (optional)
1 medium onion, sliced thin & caramelized
4 large tortilla
Olive oil for the tortillas

Sour cream & salsa for serving

Heat the olive oil in a large skillet. Add the garlic, beet greens & amaranth. Stir until the greens are wilted.

Heat a large skillet or griddle. Oil one side of two tortillas, place them oil side down on your work surface. Top with a little cheese, followed by the greens, onions & tomato. Cover with the remaining cheese. Top with the other two tortillas. Carefully place the filled quesadillas on the hot pan with the oiled side down. Cook until brown & crisp, the cheese should be starting to melt. Brush oil on the top of the quesadilla & carefully flip. Cook until that side is brown & crisp. Remove for the pan & cut into triangles to serve.

Serves 2

If you are not reading this post in a feed reader or at http://agoodappetite.blogspot.com OR at http://agoodappetite.com then the site you are reading is illegally publishing copyrighted material. Contact me at katbaro AT yahoo DOT COM. All recipes, text and photographs in this post are the original creations & property of the author unless otherwise noted.
© 2007-2009 Kathy Lewinski
Related Posts with Thumbnails

Get Email Updates!

Enter your email address:

Delivered by FeedBurner

Measurement Abbreviations

T = Tablespoon
t = teaspoon
c = cup
lb = pound
oz - ounce

Labels

Blog Archive

Contributors

Blog Directory for Minneapolis, Minnesota