Thursday, July 3, 2008

Red, White & Blue Cupcakes

Here is my humble little try at 4th of July cupcakes...
Red, White & Blue
They are really not what I planned to make this week. Originally, I was going to make a Bomb Pop cupcake but I couldn't get the flavorings I needed (why do the grocery stores here carry root beer flavoring but not cherry?). So, since I had the festive cupcake papers & sprinkles I decided to just do vanilla with the layers of colors, that might go over better with the nephews anyway.
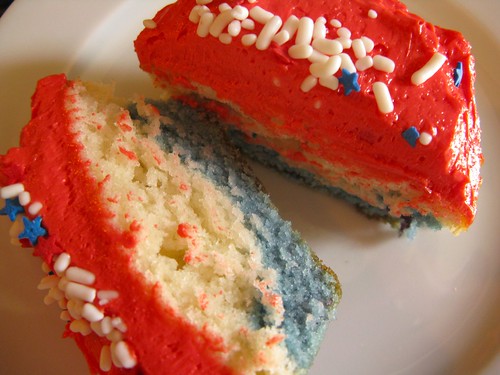
Red, White & Blue
Doing the layers of color in the cupcake was really very simple & I was happy with how that turned out. I did try adding a little blueberry flavor to the blue layer by adding some blueberry preserves but you really can't taste it.
Oh, but did I have issues with my frosting! I made a batch of Italian Buttercream yesterday that turned out beautifully creamy & smooth but despite using a whole bottle of red food coloring was still decidedly dark pink instead of red. So, I went to a store that carried cake decorating supplies & got some red paste food coloring which I figured would do the trick no problem. Today I took my frosting out of the fridge & I must have tried to re-whip it while it was still too cold because it broke into a nasty pink runny mess! I tried all the hints I could find to fix it but it was no use. Down the drain it went & I rushed to mix up another batch, at least this time I figured getting it red would be no problem. For some reason this batch of buttercream just wouldn't get as creamy & smooth as yesterday's, of course. Then even after adding the whole jar of red food coloring paste it never really got red. I decided I had to go with it because I wasn't going out for more food coloring. Then I tried to pipe the frosting on & couldn't get it to come out of the bag smoothly. That was it, I gave up, just smeared it on with a knife & added lots of sprinkles. Luckily, Matt says a lot of sprinkles can fix anything.

White & Blue Layered Cupcakes
(adapted from Martha's Stewart Coconut Cupcake)

1 1/2 c all-purpose flour
1 t baking powder
1/2 t salt
1 1/2 sticks unsalted butter, room temperature
1 c + 2 T sugar
1/4 t vanilla
1/2 c milk
4 large egg whites

Preheat oven to 350 F. Prepare 12 - 14 muffin tins.
In a small bowl mix together the flour, baking powder & salt. In a large bowl cream together butter & sugar until light & fluffy. Add vanilla & beat. On low speed add half the flour mixture until just blended. Add milk until blended. Add remaining flour & mix until just blended.
In another bowl beat the egg whites until stiff, glossy peak appear, about 2 minutes. Gently fold 1/3 of the egg into the batter until combined. Add remaining egg & fold until combined.
Split the batter into evenly into two bowls. Fold blue food coloring (& a flavoring if you wish) into 1/2 of the batter.
Scoop approximately 2 T of blue batter into each muffin tin. Shake the pan or use a spoon to smooth the batter out. Scoop approximately 2 T of the white batter on top of the blue in each tin. Spread out with the back of a spoon (or your finger) to cover the blue.
Bake for 20 minutes or until a toothpick inserted into the center comes out clean.
Allow to cool before frosting.

Makes 12 - 14 cupcakes

Italian Buttercream
(I've had success with this recipe the past, I think it just wasn't my day. As for how to get it real red, I leave that up to you.)

2 1/2 oz egg whites
1/2 c + 2T sugar
2 1/2 T water
1/2 lb butter

Heat sugar and water to 240 degrees. Whip egg whites till almost a stiff peak then shut off. When sugar is done flip mixer on low and pour the melted sugar into bowl. Immediately turn mixer on high and whip till cool. Slowly add the butter. Flavor or add coloring to your liking.

Makes enough to frost 12 cupcakes.

Sautéed Garlic Scapes & Zucchini

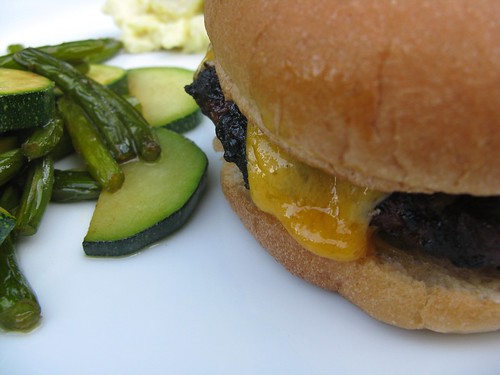
I was planning on talking about the burgers we had for dinner made with William Sonoma's Coffee & Spice Rub.
Coffee & Spice Burger
It was a good burger though I tasted mainly spice & not really any coffee. I think a good rub all & all, I'd like to try it on chicken & see how the flavor stand out then. But really for me the burger was overshadowed by the true star of the plate, the sautéed garlic scapes and zucchini.
Sauteed Garlic Scapes & Zucchini
Our CSA newsletter suggested frying the scapes in some butter & salt and then dressing them with balsamic vinegar, which sounded like a good idea to me. We also had the first two zucchini in our garden ready to pick so I thought I'd add them too since I love zucchini cooked with garlic.
The method couldn't be simpler. Slice the zucchini into 1/4-inch slices. Cut the garlic scapes into bite-sized pieces. Melt a good amount of butter in a frying pan (I used 1 T for 2 small zucchini & 6 garlic scapes) over medium-high heat. Add in the garlic scapes & generously season with kosher salt. Let sauté for about 6 minutes. The garlic scapes will begin to soften & brown a little. Add the zucchini & cook for another 2 minutes until they begin to just brown.
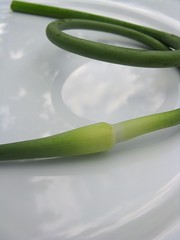
Garlic Scape
I should have added some balsamic at this point but I tasted one of the garlic scapes & knew that it didn't need anymore seasoning, just the butter & salt were enough. The garlic scapes had that wonderful mellow, sweet flavor of roasted garlic. The butter had just begin to brown a little adding a touch of nuttiness. The zucchini just accepted the flavors & gave body to the dish. We probably won't get garlic scapes again this year but if we did this is how I'd prepare them.
Oh, wait...add these sautéed to a risotto...now there's a good idea...now where can I get more scapes?

Wednesday, July 2, 2008

Chipotle Chicken Pasta Salad with Avocado

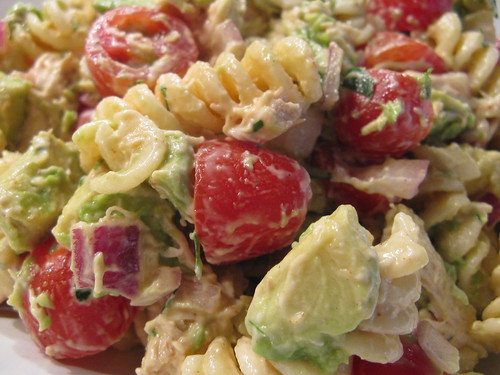
It was 90 degrees here yesterday so a perfect day to make Mr. Orph's Chipotle Chicken Pasta Salad with Avocado.
Chipotle Pasta Salad
I cooked the pasta in the morning while it was still cool & then didn't have to heat up the chicken the rest of the day. For the chicken, I used leftover chicken from one we had grilled on Sunday. I made a few slight changes to the original recipe.
1. I used ground chipotle instead of flakes & only half the amount called for. This was still spicy for me though Matt found it a little tame.
2. He didn't specify the amount of tomatoes to use, I used 6 oz (one container from the store).
3. We upped the amount of mayo in the dressing adding another 1/2 cup because Matt felt it wasn't creamy enough though the flavor was wonderful (I plan on using it again as a dip).
This was a very satisfying dinner on a hot night. The avocado & ranch dressing are the perfect foils to the heat of the chipotle. It is a bit of a rich salad, I think also from the avocados. This salad will see itself on our menu again during the dog days of summer.
See Mr. Orph's Kitchen for the full recipe.

Tuesday, July 1, 2008

Fennel Pork Tenderloin

We are big fans of pork tenderloin. There are so many ways to prepare it with difference sauces & rubs. Plus one tenderloin is perfect for us to have for dinner with enough leftover for sandwiches the next day. Plus its a pretty healthy cut of meat.
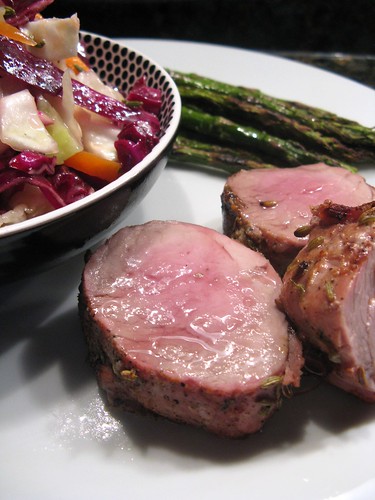
One of our favorite preparations this very simple Fennel Pork Tenderloin. The licorice favor of the fennel seems to compliment the pork really well. Typically we make this in the oven but last night we did it on the grill.
IMG_4824

1 - 1 1/2 lb pork tenderloin
1 t fennel seeds (you can toast them if you like, we typically don't bother)
1 t kosher salt
1/2 t fresh ground pepper

Mix the fennel, salt & pepper together. Dry the tenderloin & then rub it all over with the fennel mixture.
To cook in the oven: roast at 350 for about 35 minutes or until the internal temperature reached between 160 - 170 F.
To grill: Grill over direct high heat for 7 minutes. Turn over & grill for 7 minutes more. Turn off the heat & allow the pork to sit in the still closed grill for at least 5 more minutes. Internal temperature should be between 160 - 170.

Serve 4

It was good off the grill last night but we both thought it was a little better done in the oven. I'm not sure why. Perhaps the longer cooking time in the oven melds the flavors better. Maybe next time we'll try a lower temp & longer cook on the grill. It was wonderful today though sliced thin on a sandwich.

I served this with a very basic vinegar & oil coleslaw that I added fennel seeds to which made a very tasty accompaniment.

Rustic Cherry Pie

I love a good pie especially one with a great flaky crust (actually the crust is my favorite part). I've not been one to make them though, I think crust has always intimidated me & I'm afraid I'll end up with something more like cardboard than flaky goodness. But we bought some beautiful sweet cherries in the market this week & I though I'd try my hand at making a pie. Maybe joining the Daring Bakers has made me feel like I can handle any baking challenge.
I found this recipe in Small-Batch Baking & according to the directions its no harder than making biscuits. Ok, I've been making shortcakes (which are basically biscuits) over the last week so I can do this. Plus it's mainly done in a food processor so even easier. It came out buttery & flaky just like a good crust should.
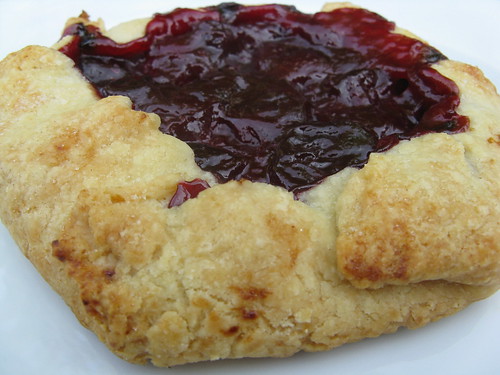
Cherry Pie
These single-serving pies look quite rustic, almost more tart-like, but the flavor is all pie. Oh & the smell while they are baking is amazing thanks to the cinnamon & vanilla in the filling. This is a great small batch recipe because it doesn't require any special small bakeware.
I'll be making these again & again this summer as different fruits come into season, I can't wait to do blueberry. I also think I'll make a double batch of the crust next time & leave two discs of the dough in the freezer to make having pies in the future even easier.

Basic Pastry

1/2 c all-purpose flour
1/4 t salt
1/4 t sugar
3 T cold unsalted butter, cut into small pieces
4 t ice water, or more as needed

Place the flour, salt & sugar in a food processor & pulse to blend. Sprinkle in the butter pieces & pulse until they are reduced to the size of small peas. Sprinkle 2 t of the water over the flour & process until small clumps of dough form. Add more water, 1 t at a time, if the dough is dry.

Tear off two pieces of wax paper & gather the dough on one of the sheets. Form the dough into a ball & then divide it in half. Form the halves into discs & wrap each separately in the wax paper. Refrigerate for 30 minutes.

After 30 minutes, place the discs on a lightly floured surface & roll out to form a 6-inch circle. Put the circles on a baking sheet covered with either parchment paper or a silicone mat. Place the baking sheet in the freezer while you make the filling.

Cherry Filling
Cherries
(I altered this recipe slightly by using lemon juice instead of the called for orange. Also I used cornstarch as my thickener instead of the quick-cooking tapioca the book uses.)

1 1/2 cup cherries, pitted
1 T water
3 T sugar
2 T lemon juice or orange juice
2 t corn starch or quick-cooking tapioca
1/8 t salt
1/4 t ground cinnamon
1/2 t vanilla

Place the cherries, water, juice, corn starch, salt & cinnamon in a sauce pan. Cook over medium-high heat until thick & bubbly, stirring constantly, for about 5-7 minutes. Remove from the heat & stir in the vanilla. Allow the filling to cool throughly.

Assembling The Pies

Water
2 t sugar

Preheat the oven to 400F. Remove the dough from the freezer. If it is too hard to bend let it stand for a few minutes. Spoon the filling into the center of each circle leaving a 1-inch border. (I found I had a little more filling than I needed.) Fold the border up over the filling, pleating as needed. Brush the crusts with a little water & sprinkle 1 T of sugar over each pie.
Bake for about 35 minutes or until the crust is golden brown. Allow to cool on the baking sheet. Serve warm or cold with vanilla ice cream.

I found these reheated nicely at 350F for 5 minutes on a baking sheet. Make sure to use a silicone pad or parchment paper for easier clean up of the filling that will bubble over.

Makes 2 single-serving pies.
Related Posts with Thumbnails

Get Email Updates!

Enter your email address:

Delivered by FeedBurner

Measurement Abbreviations

T = Tablespoon
t = teaspoon
c = cup
lb = pound
oz - ounce

Labels

Blog Archive

Contributors

Blog Directory for Minneapolis, Minnesota