Saturday, November 1, 2008

Beef Rendang

We like a good curry around Chez A Good Appetite but for us that almost always means a version of an Indian Chicken Curry. So, I was really happy to see that this month's Recipes to Rival challenge was an Indonesian Beef Curry.
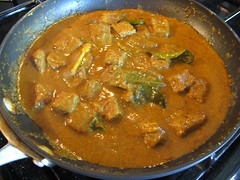
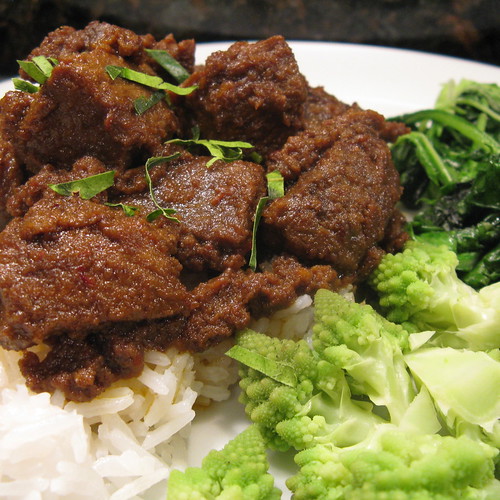
Beef Rendang
I was a little worried about finding some of the ingredients for this curry but luckily our hosts, Rayrena & Belita had done a lot of background work for us & gave us easy substitutions. I actually only had to substitute a few things since my grocery store was pretty darn good & had fresh lemon grass & kaffir lime leaves in the herb section.

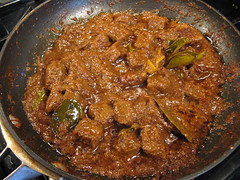
We really enjoyed the smell of this dish cooking & the way it tasted at the end. We've never had a dry curry before so it was interesting to have something that wasn't as saucy as We're used to. I used 2 fresno chiles in ours & still found it quite hot, Matt thought it had no heat at all (I'm such a wimp). I think we will make this again as its a nice change from our usual chicken curry.

Beef Rendang (Rendang Daging Sapi)


Excerpted from Cradle of Flavor: Home Cooking from the Spice Islands of Indonesia, Malaysia, and Singapore by James Oseland (W. W. Norton & Company, Inc., 2006) Copyright 2006 by James Oseland.

Makes 4 to 6 servings


For the Flavoring Paste:

* 1 whole nutmeg, cracked open with a nutcracker or a heavy, blunt object such as the bottom of a glass measuring cup

* 5 whole cloves

* 6 shallots (about 5 ounces), coarsely chopped

* 3 cloves garlic, coarsely chopped

* 5 to 20 fresh red Holland chiles or other fresh long, red chiles such as Fresno or cayenne, stemmed and coarsely chopped

* 1 piece fresh or thawed, frozen turmeric, 2 inches long, peeled and coarsely chopped (about 2 teaspoons), or 1 1/2 teaspoons ground turmeric

* 1 piece fresh ginger, 2 inches long, peeled and thinly sliced against the grain (about 2 tablespoons)

* 1 piece fresh or thawed, frozen galangal, 2 inches long, peeled and thinly sliced against the grain (about 2 tablespoons; optional)
 regular ginger may be substituted  (I just left this out)
* 5 candlenuts or unsalted macadamia nuts

 (I used almonds instead & they worked just fine)

For the remainder of the dish

* 2 pounds well-marbled boneless beef chuck or bottom round, cut into 2- to 2 1/2-inch cubes

* 2 1/2 cups unsweetened coconut milk

* 3 thick stalks fresh lemongrass, each tied into a knot

* 1 piece cinnamon stick, 4 inches long

* 7 whole fresh or thawed, frozen kaffir lime leaves

* 5 whole daun salam leaves (optional)
 OR curry leaves OR bay leaves (I used bay leaves)
* 1 teaspoon kosher salt

* 1 tablespoon very finely shredded fresh or thawed, frozen kaffir lime leaves (optional)

 OR lime zest (One tablespoon of zest from a lime is equivalent to about 6 kaffir lime leaves.)

1. To make the flavoring paste, place the nutmeg and cloves in a small food processor and pulse until ground to a dusty powder, about 2 minutes.

(This will dye the bowl of your food processor yellow!)
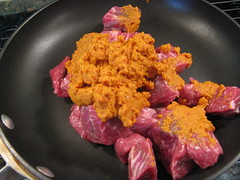
2. Add the shallots, garlic, chiles, turmeric, ginger, galangal (if using), and candlenuts to the ground spices. Pulse until you have a chunky-smooth paste the consistency of cooked oatmeal.

Beef Rendang
3. In a 12-inch skillet (nonstick works best), mix the beef and the flavoring paste until well combined. Add the coconut milk, lemongrass, cinnamon, whole lime leaves, daun salam leaves (if using), and salt. Stir well to combine and bring to a gentle boil over medium heat. Immediately reduce the heat to medium-low and simmer uncovered at a slow, steady bubble, stirring every 10 to 20 minutes with a spatula to prevent the meat and coconut milk from sticking and scorching. You'll probably need to adjust the heat periodically to maintain an even simmer.


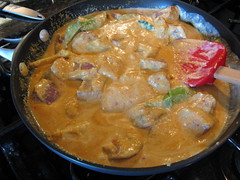
4. The meat, coconut milk, and flavoring paste will now go on a fascinating journey. At first, the broth will be thin and gorgeously bright orange. As it cooks, the coconut milk will reduce, its fats (as well as the fat the meat renders) separating from the solids. It will become progressively thicker and darker, eventually turning brown.
Beef RendangBeef RendangBeef Rendang
Continue to simmer gently until the liquid has reduced by about 95 percent, stirring every 15 minutes or so to prevent sticking. Only the meat, oils, and a bit of very thick sauce will remain in the pot. This will take anywhere from 2 to 3 hours, depending on the skillet that you use, how hot the fire is, and the richness of the coconut milk. Test the meat; it should be tender enough to poke easily with a fork. (Like one of our hosts I found my sauce was dry before my meat was tender so I added a cup of chicken broth & let it continue cooking down.) Taste some of the liquid for salt, and add a pinch more if needed.


5. When all the liquid has evaporated, reduce the heat to low (the meat and the remaining sauce are prone to burning) and allow the beef to brown slowly in the rendered fat. (The fat may be foamy at this point, but it will settle down when the cooking stops.) Stir every 5 minutes or so to prevent sticking and scorching, being careful not to break the beef apart. Continue sautéing the beef until it's the color of roasted coffee beans, 5 to 10 minutes longer. The surface of the beef should be barely moist and have an appetizing oily sheen. (If there is too much oil in the pan for your liking, skim some of it off with a spoon and set aside for later use; it's wonderful for sautéing potatoes.)


6. Remove and discard the cinnamon, lemongrass, lime leaves, and daun salam leaves (if used), and then transfer the beef to a serving dish. (Alternatively, serve this dish with all the aromatics, for a more rustic presentation.) Garnish with the shredded lime leaves, if using. Allow the beef to rest for at least 30 minutes before serving. Slightly warm room temperature will best show off its intensely aromatic flavors. This dish will taste even better the next day.


Visit Recipes to Rival for more cooking nots on this recipe.

Cream of Tomato Soup in Puff Pastry

I knew I wanted to make a soup this week so I went through the ones Matt had marked in Soup's On!: 75 Soul-Satisfying Recipes from Your Favorite Chefs & choose the Cream of Tomato Soup from Philippe Jeanty (of Bistro Jeanty in Napa). I planned on just making the soup & serving it with grilled cheese sandwiches but it looked so pretty in the book topped with puff pastry that I had to try it that way.
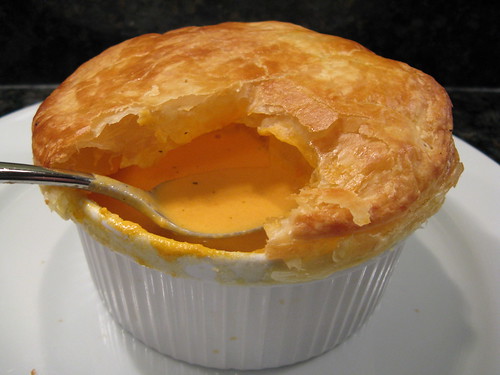
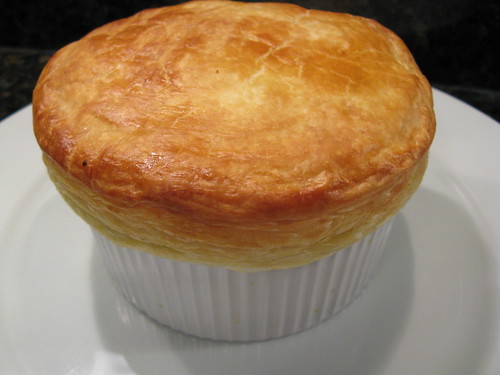
Cream of Tomato Soup with Puff Pastry
This is one soup that is not going to help your diet, with its 6 tablespoons of butter & 2 cups of heavy cream topped off with buttery pastry, but its probably one of the best tomato soups I've ever had. We found the recipe as written lacked a little something so Matt suggested adding some sherry to it & that made all the difference, suddenly the soup just came to life. One bowl of this soup topped with pastry is really quite filling & worked perfectly as a meal for us. Next time we'd like to add some lobster or lump crab meat to it, now there would be a decadent bowl of soup!

Cream of Tomato Soup in Puff Pastry

6 T unsalted butter
1 medium onion, sliced
3 cloves garlic, peeled
3/4 t whole black peppercorns
1/2 t dried thyme
1 bay leaf
2 T tomato paste
1 1/4 lb ripe tomatoes, cored & quartered (so not seed them)
2 c heavy cream
2 T sherry
salt
pepper
1 lb puff pastry sheets
1 egg

Melt the 4 T of butter in a large soup pot over medium-low heat. Add the onion, garlic, peppercorns, thyme & bay leaf. Cover & cook for 5 minutes, do not let the onions get brown. Add the tomato paste & stir for a minute. Add the tomatoes & 1/2 c water. Simmer, uncovered, over low heat until the tomatoes & onions are very soft & starting to break down about 30 - 40 minutes.

Purée the mixture using either a food mill or blender. If you are using a blender, strain the mixture after blending to remove any seeds & larger bits. Return puréed soup to the pot. Add the cream, 2 T of butter and sherry plus salt & pepper to taste (we found it needed quite a bit of salt). Bring to a simmer & then remove from heat. Allow to cool at least 2 hours before the next step.
IMG_8417
Preheat oven to 450 F. Roll out your pastry dough to 1/4-inch thick. Cut out 4 circles slightly larger than you serving bowls or ramekins. Divide the soup between the four bowls. In a small bowl beat the egg. Brush the beaten egg on the pastry circles. Place the pastry, egg side down, on each bowl pulling a little to make it taut. Gently brush the top of the pastry with more egg being careful not to push it into the soup. Place the bowls on a baking sheet & then into the oven. Bake for 10 - 15 minutes until the pastry is puffed & golden (don't open your oven too early or the pastry might fall.)

Serves 4

We only ate two servings of the soup the first night with the pastry. I had a second bowl for lunch the next day just with a slice of bread & it was just as good without the pastry shell.

Friday, October 31, 2008

Roast Kabocha Squash with Cheese & Sausage

This one makes a great presentation for Halloween. Hope you all have a spooky one!

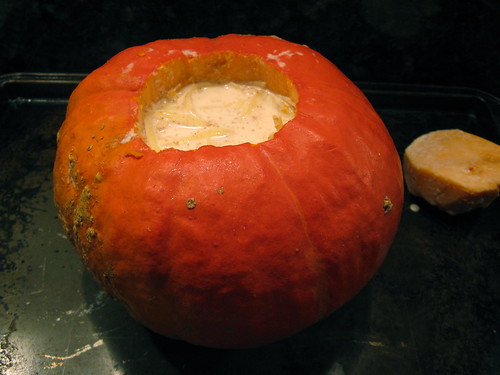
In our last CSA box we received a beautiful Kabocha squash (which I'll admit I originally thought was a pumpkin). Matt immediately knew that he wanted to prepare it similar to the Roast Pumpkin with Cheese "Fondue" that he found on Gourmet. 
IMG_8373
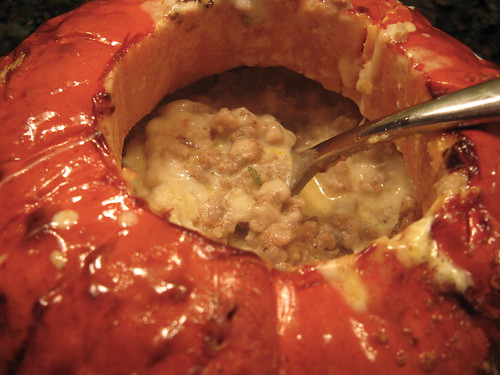
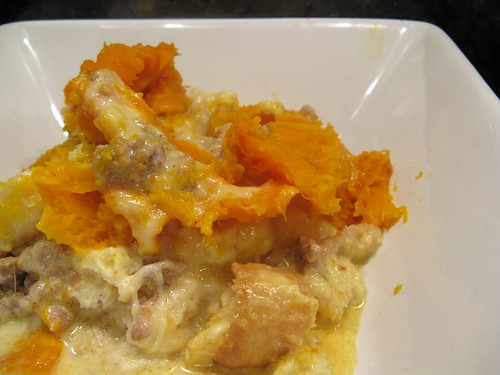
Basically, you clean out a pumpkin (or squash), fill it with bread, cheese, cream & chicken stock & then let the whole thing cook in the oven until the filling is melted & creamy & the squash is soft. We decided to add an extra component & put some cooked Italian sausage to the filling (because we love our pork!). Everything is scooped out & served together.
IMG_8378
This was one fantastic dish! Perfect for a cold winter's coming kind of night. We love, love, loved the Kabocha squash, it has a sweet yet nutty flavor that worked well with the cheeses. The addition of the sausage really added great flavor to the dish & I think helped elevate it from a side dish to a entrée.

The Gourmet recipe had you cook this in the lower third of the oven but we found that just made the bottom of our squash cook faster than the top so I would do it in the center of the oven next time.

Roast Kabocha Squash with Cheese & Sausage
(All the quantities of the filling ingredients are approximate, the amount you use will be based on the size of your squash.)

4.5 lb Kabocha squash (or pumpkin)
1/2 c chicken or vegetable broth
3/4 c heavy cream
pinch of nutmeg
6 oz of grated cheese (we used a mixture of gruyere & swiss)
7 - 10 1/2-inch slices of baguette, toasted until just crisp
4 oz bulk Italian sausage, cooked
olive oil

Preheat the oven to 450 F. Oil a roasting pan or baking sheet with sides.

Cut open your squash at the top with about a 3-inch circle. Clean out the pulp & seeds from the inside & & top.

Whisk the broth, cream & nutmeg together.

Place a layer of bread slices inside the squash. Top with some of the cheese & sausage then pour a some of the cream mixture over to soften the bread. Continue these layers until you have filled the squash about 1/2-inch from the top. Place the top bake on the squash.
IMG_8365Put the squash on your prepared pan & rub olive oil all over the skin. Bake for 1 - 1 1/2 hours of until the squash is tender. The filling will puff up & spill over the side while cooking.
IMG_8372Scoop the filling into bowls & top with squash.

Serves 2 - 4

Our squash was quite thick so there wasn't a huge inside to fill. We had enough filling with squash for the two of us but also had about 2 cups of roast squash left over to use in other things.

Thursday, October 30, 2008

Sweet Potato Baklava

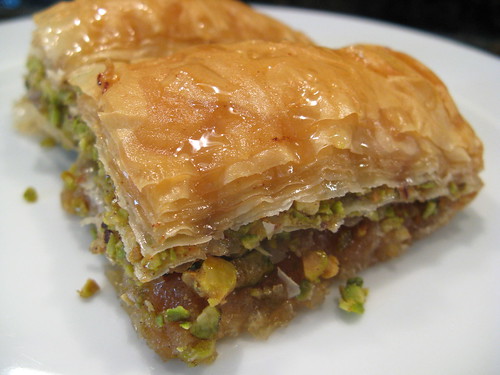
One of the reasons I've been playing around so much with sweet potatoes lately is because Saturday night we are going to the Cookin' Minnesota "No Flu For You" Dinner. We were given a list of ingredients that are said to have properties that help you stay healthy during the flu season & were asked to make something using one or more of the ingredients. I am doing a dessert & thought sweet potato seemed like the perfect ingredient (leafy greens not so much). I'm not exactly sure where I got the idea to layer my Sweet Potato Butter in baklava but I thought it would pair really well with nuts & honey (& bonus points, honey is another No Flu ingredient!). 
Sweet Potato Baklava
I've never made baklava before so I looked around on the web & found this recipe on Allrecipes which seemed like a good starting point. I still ran into some questions about the actual layering which Joy of Cooking was able to answer (seriously I think I rarely run into a cooking question that Joy can't answer).
Sweet Potato Baklava
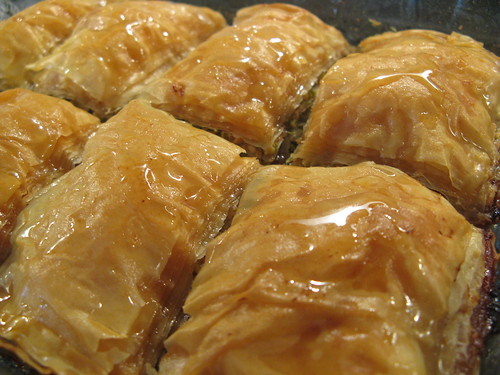
This baklava turned out really well & I think looks fabulous. I was right about how the sweet potato would taste with the other ingredients. I actually liked this version better than most I've ever had in restaurants, that added component just seems so right. Making baklava was easier than I thought too with the most tedious part being shelling the pistachios. This seems to be the winning choice to take on Saturday.

Sweet Potato Baklava

Phyllo dough (I used 11 sheets, cut in half to make 22)
2 oz chopped nuts (I used pistachios but you can use whatever you like)
1/4 c butter melted
1/8 t cinnamon
1/2 c Sweet Potato Butter (get the recipe here)
1/4 c water
1/4 c sugar
2 T honey
1/8 t vanilla

Preheat the oven to 350 F. Butter the bottom & sides of a 8" x 6" glass baking pan.

Mix the chopped nuts & cinnamon together.

Cut the phyllo sheets to fit your baking pan. Keep them covered with a damp cloth while you are working so they don't dry out. Lay two sheets on the bottom of your pan & brush them generously with butter. Repeat this 3 more times (you will have used 8 sheets of phyllo). Spread the Sweet Potato Butter over the phyllo creating a thin even coat. Lay two more sheets of phyllo on top of the sweet potato & butter them. Sprinkle about 2 tablespoons of the nuts on top. Repeat the phyllo, butter & nut layer two more times (you will have used 14 sheets of phyllo). Place two more sheets of phyllo on top of the last layer of nuts & generously brush with butter, repeat this layer 3 more times (you will have used all 22 sheets of phyllo).

Use a sharp knife to cut the baklava into squares, make sure to cut through to the bottom. Bake for 45 - 50 minutes or until crispy & golden.

When baking the baklava, bring the water & sugar to boil in a small pan. Boil & stir until the sugar is melted. Reduce the heat to low & add the honey & vanilla. Allow to simmer for 20 minutes until it is thickened. Remove from heat. Spoon this sauce over the baklava right after you take it from the oven.

Allow the baklava to cool completely before serving.

Makes 8 1"x 2" pieces

More ways to use Sweet Potato Butter

Wednesday, October 29, 2008

Making Pizza with the Daring Bakers

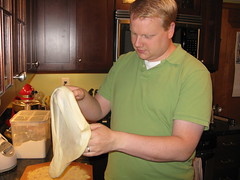
Matt & I love to make homemade pizza. We have a crust recipe we love & enjoy experimenting with toppings. So, when we saw this month's Daring Bakers challenge (hosted by Rosa's Yummy Yums) was pizza we felt a little, well, unchallenged. Then I took a look at the crust recipe from The Bread Baker's Apprentice & saw it was quite a bit more challenging than our usual crust with its kneading & overnight in the fridge plus we were supposed to try throwing it for a more authentic crust.
Daring Bakers Pizza
Ok, so making the dough went pretty easy especially using my Kitchen Aid to do the kneading. We made half a batch putting one ball in the fridge to use the next day & freezing the other two for later use. Day 2, we rested the dough another 2 hours, heated our pizza stone & got ready to throw. This is were things went wrong. We just could not throw this dough, it basically just kept sticking to it self & then got a hole. At that point the dough had been worked so much we had to let it rest again before we could roll it out (we were starving at this point). In the end we just stretched it our on our pizza paddle by hand.
Daring Bakers PizzaDaring Bakers Pizza
We topped the pizza with my Roasted Pepper & Tomato Sauce, some homemade Italian sausage, basil & mozzarella to get the flavor of our favorite pizza at Punch, a wonderful Neapolitan pizzeria in the Twin Cities. The dough slid off the pizza paddle & on to the pizza stone easily thanks to a lot of cornmeal (I was a little worried about this) & 5 minutes later we finally got to eat.

The pizza was good, mainly thanks to the toppings but we felt the crust was just too thin & really didn't taste that special at all. I think we'll stick to the crust we usually make since we love it & can have pizza in two hours instead of two days.

BASIC PIZZA DOUGH
Original recipe taken from “The Bread Baker’s Apprentice” by Peter Reinhart.

Makes 6 pizza crusts (about 9-12 inches/23-30 cm in diameter).


Ingredients

4 1/2 Cups (20 1/4 ounces/607.5 g) Unbleached high-gluten (%14) bread flour or all purpose flour, chilled
1 3/4 Tsp Salt

1 Tsp Instant yeast
1/ 4 Cup Olive oil or vegetable oil (both optional, but it’s better with)

1 3/4 Cups (14 ounces/420g or 420ml) Water, ice cold (40° F/4.5° C
1 Tb sugar
Semolina/durum flour or cornmeal for dusting


DAY ONE
Method
1. Mix together the flour, salt and instant yeast in a big bowl (or in the bowl of your stand mixer).


2. Add the oil, sugar and cold water and mix well (with the help of a large wooden spoon or with the paddle attachment, on low speed) in order to form a sticky ball of dough. On a clean surface, knead for about 5-7 minutes, until the dough is smooth and the ingredients are homogeneously distributed. If it is too wet, add a little flour (not too much, though) and if it is too dry add 1 or 2 teaspoons extra water.

NOTE: If you are using an electric mixer, switch to the dough hook and mix on medium speed for the same amount of time.The dough should clear the sides of the bowl but stick to the bottom of the bowl. If the dough is too wet, sprinkle in a little more flour, so that it clears the sides. If, on the contrary, it clears the bottom of the bowl, dribble in a teaspoon or two of cold water.
The finished dough should be springy, elastic, and sticky, not just tacky, and register 50°-55° F/10°-13° C.
3. Flour a work surface or counter.  Line a jelly pan with baking paper/parchment. Lightly oil the paper.


4. With the help of a metal or plastic dough scraper, cut the dough into 6 equal pieces (or larger if you want to make larger pizzas).

NOTE: To avoid the dough from sticking to the scraper, dip the scraper into water between cuts.


5. Sprinkle some flour over the dough. Make sure your hands are dry and then flour them.  Gently round each piece into a ball.

NOTE: If the dough sticks to your hands, then dip your hands into the flour again.


6. Transfer the dough balls to the lined jelly pan and mist them generously with spray oil. Slip the pan into plastic bag or enclose in plastic food wrap.


7. Put the pan into the refrigerator and let the dough rest overnight or for up to thee days.

NOTE: You can store the dough balls in a zippered freezer bag if you want to save some of the dough for any future baking. In that case, pour some oil(a few tablespooons only) in a medium bowl and dip each dough ball into the oil, so that it is completely covered in oil. Then put each ball into a separate bag. Store the bags in the freezer for no longer than 3 months. The day before you plan to make pizza, remember to transfer the dough balls from the freezer to the refrigerator.


DAY TWO
8. On the day you plan to eat pizza, exactly 2 hours before you make it, remove the desired number of dough balls from the refrigerator. Dust the counter with flour and spray lightly with oil. Place the dough balls on a floured surface and sprinkle them with flour. Dust your hands with flour and delicately press the dough into disks about 1/2 inch/1.3 cm thick and 5 inches/12.7 cm in diameter. Sprinkle with flour and mist with oil. Loosely cover the dough rounds with plastic wrap and then allow to rest for 2 hours.


9. At least 45 minutes before making the pizza, place a baking stone on the lower third of the oven.  Preheat the oven as hot as possible (500° F/260° C). 

NOTE: If you do not have a baking stone, then use the back of a jelly pan. Do not preheat the pan.


10. Generously sprinkle the back of a jelly pan with semolina/durum flour or cornmeal. Flour your hands (palms, backs and knuckles). Take 1 piece of dough by lifting it with a pastry scraper. Lay the dough across your fists in a very delicate way and carefully stretch it by bouncing it in a circular motion on your hands, and by giving it a little stretch with each bounce. Once the dough has expanded outward, move to a full toss.

 NOTE: Make only one pizza at a time.
During the tossing process, if the dough tends to stick to your hands, lay it down on the floured counter and reflour your hands, then continue the tossing and shaping. 
In case you would be having trouble tossing the dough or if the dough never wants to expand and always springs back, let it rest for approximately 5-20 minutes in order for the gluten to relax fully,then try again.
You can also resort to using a rolling pin, although it isn’t as effective as the toss method.


11. When the dough has the shape you want (about 9-12 inches/23-30 cm in diameter - for a 6 ounces/180g piece of dough), place it on the back of the jelly pan, making sure there is enough semolina/durum flour or cornmeal to allow it to slide and not stick to the pan.


12. Lightly top it with sweet or savory toppings of your choice.


13. Slide the garnished pizza onto the stone in the oven or bake directly on the jelly pan. Close the door and bake for abour 5-8 minutes.

NOTE: After 2 minutes baking, take a peek. For an even baking, rotate 180°.

If the top gets done before the bottom, you will need to move the stone or jelly pane to a lower shelf before the next round. On the contrary, if the bottom crisps before the cheese caramelizes, then you will need to raise the stone or jelly.


14. Take the pizza out of the oven and transfer it to a cutting board or your plate. In order to allow the cheese to set a little, wait 3-5 minutes before slicing or serving.

Other pizzas we've made...
Related Posts with Thumbnails

Get Email Updates!

Enter your email address:

Delivered by FeedBurner

Measurement Abbreviations

T = Tablespoon
t = teaspoon
c = cup
lb = pound
oz - ounce

Labels

Blog Archive

Contributors

Blog Directory for Minneapolis, Minnesota