Saturday, November 29, 2008

Daring Bakers - Caramel Cake with Caramelized Butter Frosting

This month's Daring Bakers' Challenge was all about sugar. I was a little uneasy about baking it since it required making a caramel sauce. I've tried making caramel in the past with some not very good results & a nasty pan to clean up. But the Daring Bakers is all about challenging yourself to try new things so I went ahead & dove in.
Daring Bakers Caramel Cake
Actually, making the caramel sauce that gets used in both the cake & the frosting was a lot easier than I expected & I was quite please with my results. I decided to just do half of the recipe, since there is only two of us, & make it into a two layer 4.5-inch cake. I actually ended up having enough cake batter to make the cake & two cupcakes. We ate the cupcakes out of the oven without any frosting & let me tell you this is one good cake! It's a little denser than some cakes & quite moist.
Daring Bakers Caramel Cake
The frosting is made with brown butter, a flavor we just love. Many other Bakers thought it was too sweet but we didn't think so. I added a little extra sugar like a few people suggested & the final flavor was like that of a salted caramel, yum! To decorate the cake I put my caramel sauce back on the stove & let it cook a little while longer. I then drizzled the hot caramel on parchment paper to create different shapes. Once the caramel sauce cooled I had hard candy shapes to use on the cake.
Daring Bakers Caramel Cake
You can get the recipe by Shuna Fish Lyndon on Bay Area Bites. Thanks to Dolores at Culinary Curiosity, Alex at Blondie & Brownie and Jenny at Foray into Food for hosting what has probably been my favorite challenge yet. Natalie at Gluten-a-Go-Go helped out with making the recipe work for Alternative Bakers.

Friday, November 28, 2008

8 Weeks of Cookies - Swedish Peppernut Cookies

This is another cookie that is traditionally on my family's cookie tray at Christmas time. It's funny I was talking to my Mom this morning & she had just made them too.
Swedish Peppernut Cookies
These spice cookies are just the perfect little bite. The mix of cinnamon, clove, ginger & cardamon is a great match with the flavor of the filbert plus they make your house smell like the holidays. They do tend to be a little dry so they are best served with a cup of coffee or a big glass of milk. One thing I like about these cookies is how easy they are to make, of the 4 cookies I've made so far these come together the fastest with the least amount of work.

Swedish Peppernut Cookies
adapted from Woman's Day Dec. 1971

1 c unsalted butter, at room temperature
3/4 c sugar
1 T corn syrup (light or dark will work)
1 egg
1 t cinnamon
1 t ground clove
1 t ground ginger
3/4 t ground cardamon
1/8 t pepper
2 t baking soda
3 1/4 c all-purpose flour
filberts, halved

Preheat oven to 325 F.

With an electric mixer cream the butter. Add in the sugar & corn syrup & cream until fluffy. Add the egg & spices & mixed until combined. Mix the flour & baking soda together then gradually add to the mixer until well blended.

Using about 1/4 of the dough at a time roll out to a 1-inch diameter log. Cut the logs into 3/4-inch slices. Roll each slice into a ball & place on a cookie sheet that has either been lightly greased or covered with a silicone pad. (These cookies don't spread much so you can place them pretty close together.) Press a filbert half into the center of each ball.

Bake for 15 minutes. Cool on a rack.

Makes 72 (I made half a recipe & got 53)
-------------------------------------------------------------------------
8 Weeks of Cookies
Apricot Foldover Cookies

Thursday, November 27, 2008

Happy Thanksgiving

Just a short note to wish all of you in the States a Happy Thanksgiving. I hope you are spending it with lots of friends & family around you.
#326 - Agenda
This year I am thankful for each & every one of you who visit this blog, you make doing this so much fun. I'm thankful for all the other food bloggers out there & the wonderful community you have all created, I feel like I have a group of friends around the world even if I've never met you all in person.

Wednesday, November 26, 2008

Cranberry & Horseradish Relish

I made this relish for Thanksgiving for my family at least 10 years ago & it was such a big hit I can't imagine not having it now. 
Cranberry & Horseradish Relish
This relish is an amazing blend of flavors, the tartness of the cranberries & yogurt, the sweetness of the sugar & the bite of the onions & horseradish. A perfect combination adding a great zing to the turkey. It's a fresh relish so there's no cooking involved, everything just goes in the food processor & it can be made a day or two ahead of time. It's especially good on turkey sandwiches the next day.

Cranberry & Horseradish Relish
from Bon Appetit Nov. 1997

12 oz fresh cranberries
1 small onion, peeled & quartered
1/2 c sugar
1/4 t salt
1/2 c plain yogurt or sour cream
3 T creamy horseradish

Put the cranberries, onion, sugar & salt in a food processor, pulse until processed until chunky. Stir in the yogurt & horseradish. Keep covered & refrigerated until ready to serve.

Saturday, November 22, 2008

Crockpot Porchetta

This week I'm cooking recipes from some of my favorite food bloggers.... 

This amazing, fantastic, totally delicious recipe (did I mention we liked it) comes from Lisa over Jersey Girl Cooks. Lisa is another one of those bloggers who is always making meals that I want to make too. Her blog is always such a fun read & she got to go see Martha live, lucky her. 
Crockpot Porchetta
When she posted this recipe for pork cooked in a crockpot last week I couldn't resist making it. The herb rub just sounded amazing & you know how much we love pork. This was super simple to make, once the pork has been seared in a pan you just let it sit in the crockpot the rest of the afternoon.
Crockpot Porchetta
We stuck right to Lisa's recipe except we used a small boneless pork loin so ours took a lot less time to cook. Oh man, was this every tasty. We loved it for dinner & then again the next day for sandwiches. The meat is so flavorful from the herb rub that we didn't even put anything else on the sandwiches.

Crockpot Porchetta
from Jersey Girl Cooks

3 cloves garlic
1 T fresh rosemary
1/4 c fresh flat Italian parsley
1/2 T kosher salt
1/4 T lemon pepper
1/2 T dried oregano
1/2 T fennel seed
1/4 T onion powder
pinch of red pepper flakes
2 T olive oil
2 T canola oil
1 1/4 lb boneless pork loin
1/4 c white wine
1/4 c chicken broth

Process the garlic, rosemary, parsley, salt, pepper. oregano, fennel, onion powder, red pepper flakes & olive oil in a small food processor until they form a paste. Add water if it seems a little dry.

Cut a few 1-inch slits in the pork & stuff some of the herb rub in them. Rub 1/2 of the remaining rub all over the pork.
Crockpot Porchetta
Heat the canola oil over medium heat in a large sauté pan. Add the pork to the pan & brown on all sides. When brown remove the pork to the crockpot & smear with remaining herb paste. Pour the wine & chicken broth into the sauté pan to deglaze it & let boil for about 5 minute. Pour this mixture over the pork in the crockpot. Cover & cook on high for about 3 - 4 hours or until tender (Our pork was tender in 3 hours so we turned it to low & let it stay in the crockpot another hour.)

Pull the pork apart to serve. Add a little of the sauce from the crockpot to moisten the meat if you wish.

Serves 4

We served the pork with some roasted beets over wilted spinach & roasted carnival squash. Such a great meal!

Iron Cupcake Earth - Cranberry Mocha Cupcakes

This month's Iron Cupcake Earth ingredient is Cranberry, how perfectly seasonal. I batted around a couple different flavor pairings when this one came to me. Its inspired by all the fancy espresso drinks that stores like Caribou & Starbucks have for the holidays.
Cranberry Mocha Cupcake
The cupcake is flavored with dark chocolate & espresso then studded with jewel like fresh cranberries. Whipped cream is of course the traditional topping for these coffee drinks so its the frosting on this cupcake. Then then whole thing is topped with a little grated bittersweet chocolate.
Cranberry Mocha Cupcake
I think this might be one of my favorite cupcakes I've made to date (maybe because I'm such a huge fan of mochas to start with). The cranberries give a nice tart note against the sweet mocha.

Cranberry Mocha Cupcakes

1/4 c unsalted butter
1/8 c Hershey's Special Dark Cocoa Powder
3 T hot water
1 t instant espresso
1/2 c granulated sugar
2 T well beaten egg
1/8 c buttermilk (plain yogurt will work too)
1/2 c all-purpose flour plus extra to coat the cranberries
1/4 t baking soda
1/4 t baking powder
pinch of salt
1/3 - 1/2 c fresh cranberries

Preheat oven to 350 F. Prepare muffin tins.
Melt butter in a large heavy saucepan over moderately low heat, then whisk in cocoa. Mix the instant espresso into the hot water. Add this mixture into the saucepan and whisk until smooth. Remove from heat. Whisk in separately sugar, egg, buttermilk, and vanilla. Sift flour, baking soda, baking powder, and salt into the cocoa mixture and whisk until just combined (it will be a little bit lumpy).

Roll the cranberries in a little flour to coat them. Gently mix the cranberries into the batter.

Fill muffin tins to about 2/3 full. Bake for 18 - 20 minutes until a skewer or toothpick comes out clean. It's a moist cake, so don't worry if a few crumbs stick to your tester.
Allow cupcakes to cool.

Makes 5 cupcakes

Whipped Cream Frosting
(Adapted from Allrecipes)
The gelatin in this whipped cream makes it hold up to piping, just make sure it is completely melted so you don't get lumps.

1/2 c heavy cream
1 t confectioners sugar
1/4 t vanilla
3/4 t cold water
1/4 t unflavored gelatin

Whip the cream, sugar & vanilla together just until soft peaks form. Set aside.
Mix the water & gelatin together in a small bowl and microwave briefly, about 10 seconds, until the gelatin is dissolved. Allow to cool slightly but not get hard. Add to cream & continue whipping until stiff peaks are formed. Keep in the refrigerator until ready to use.

Makes enough to frost 5 cupcakes.

Pipe frosting onto the cooled cupcakes & grate a little chocolate over the top.

If you want to join the fun of Iron Cupcake Earth next month you can find all the information here plus links to all the fabulous corporate & Esty prize sponsors. 

Voting is open on Iron Cupcake - go here to vote.

Friday, November 21, 2008

8 Weeks of Cookies - Apricot Foldovers

I think these flaky butter cookies filled with apricot preserves were my favorite of all the Christmas cookies my Mom made every year. They always seemed a little fancier, a little more grown up to me than some most other cookies.
Apricot Crescent Cookies
When I told my Mom I was going to make them this year she gave a little groan about what a pain they were to make. My sister did the same thing when I mentioned them to her. Nevertheless, I really wanted to have these on my cookie tray over the holidays so I decided to try my hand at them. Well, I think they may have been exaggerating a little because I really didn't find this cookies fussy at all. There are a few steps but they weren't really difficult. The original recipe (from Woman's Day December 1971) had you make the dough by hand. I decided to make mine in my Kitchen Aid to save time & the dough still baked up light & flaky.
Apricot Crescent Cookies
These cookies turned out as good as I remembered, buttery, delicate & fruity. I'm so glad I wasn't dissuaded from making them.

Apricot Foldovers

3/4 c unsalted butter, at room temperature
2 egg yolks
2 T sugar
pinch of salt
2 c all-purpose flour
2 T very cold water
apricot preserves
1 egg beaten with 1 T water
finely chopped nuts

In the bowl of an electric mixer fitted with a paddle, cream together the butter, egg yolks, sugar & salt. Add the flour 1/2 c at a time, scraping down the sides of the bowl in between additions. Sprinkle the cold water on the dough & form it into 2 balls. Flatten the balls into discs, wrap them in plastic wrap & chill for about an hour.

Preheat the oven to 325 F. Prepare cookie sheets either by greasing them or using silicone mats.

On a lightly floured surface roll out one of the discs of dough to 1/8-inch thick. Cut out 2 1/2-inch circles, rerolling the dough until its all used. Place 1/2 teaspoon of apricot preserves in the center of each circle (go light in the preserves or they'll just leak out). Carefully fold the dough in half over the preserves & pinch the edge to seal. Brush each cookie with the egg/water mixture & sprinkle with nuts. Repeat with the second disc of dough.
Apricot Crescents
Bake for 22 - 25 minutes until light brown. Cool on a rack.

Makes 3 dozen (the recipe actually said it made 5 dozen but I got 33 cookies & my Mom says she's never gotten more than 36.)
-------------------------------------------------------------------------
8 Weeks of Cookies

Thursday, November 20, 2008

What we did with CSA box #14 & what's in box #15

What we did with CSA box #14
1. Crockpot Porchetta (recipe tomorrow) with roasted beets on wilted spinach & carnival squash 2. Chickpea Stew with Coconut Milk 3. Sweet Potato Gnocchi with Garlic Alfredo 4. Black Bean & Butternut Squash Quesadillas 5. Seafood Stew 6. Celeriac Soup 7. Butternut Squash & Spinach Pasta 8. Curly Endive Salad with Bacon & Eggs
I still have Carrot Peanut Soup & Butternut Squash Moli to make with this box

& here's box 15...
IMG_8908
Raddicchio - We'll probably add this to a soup or stew
Spinach - I think I'll make a spinach lasagna for the freezer
Green & Rainbow Kale - I'm wondering how this would be instead of broccoli in this.
Sweet Potatoes - I've seen this sweet potato cakes on a couple blogs lately I'm thinking of trying.
Red Sunchokes - I think these will get roasted
Kabocha Squash - Unfortunately this one is too small to fill with bread, cheese & sausage. I'm thinking of a mac & cheese with squash in it.
Carrots - More carrots! I have too many carrots. I think some will go to Michigan with us to get used for Thanksgiving.
Festival Squash - Right now these are decoration in our living room. Eventually they will be roasted as a side dish.
Celeriac - The soup we made last week was so good but I'm thinking about a mash
Daikon - Probably make a Thai Radish Salad
Sweet Scarlet Turnip - We thought these were beets they are so red. I'm thinking its time for a good root vegetable stew.
Parsnips - I love these roasted & in stew or even mashed
Beets - These are also so good roasted though good in stew too.
Beauty Heart Radish - We still haven't used the ones we got in the last box either. I need to find more uses for radishes.
Garlic - I already used this whole head in the Moli for tonight's dinner.

I think our boxes through January will be very similar to this.


Chickpea Stew with Coconut Milk

This week I'm cooking recipes from some of my favorite food bloggers...

This next recipe comes from The Constables' Larder, a blog I came to know through Foodbuzz. I've become quite a fan of Giff & Lisl's blog & their way of cooking. So much of what they make strikes me as the good comforting kind of food we also like to make. When I saw this recipe last week I bookmarked it right away because it uses chickpeas which Matt really likes, it has a lot of cumin in it which is one of our favorite spices & it uses kale which we had received in our last CSA box.
Chickpea Stew with Coconut Milk
This dish was warm & satisfying, exactly like we expected. The coconut milk & cumin made it taste & smell a lot like a curry to us. Matt liked a little more heat to it & added some Sriracha to his bowl. We stuck pretty closely to the recipe the way it was written except for a few things. First, we used canned chickpeas instead of dried which saved on cooking time. If we had used dried chickpeas they would have been cooked with garlic & since we skipped that step we added garlic to the stew itself. Secondly, we added smoked paprika to the stew, I went pretty light on it so we really didn't taste it much. Thirdly, we used flowering kale since its what we had, I think it worked well in the dish as it didn't go completely soggy. Finally, we finished the stew up on the stove with the lid off as we felt it was a little thin still after baking.

Chickpea Stew with Coconut Milk
from The Constable's Larder

1 T olive oil
1 medium red onion, peeled & chopped
1 large garlic clove, peeled & minced
1 medium red potatoes, cubed into 1/2-inch pieces
1/2 head of cauliflower, cut into small pieces
10 sprigs of fresh thyme
25 leaves of flowering kale
14 oz can chickpeas, drained & well rinsed
14 oz coconut milk
1 1/2 c chicken or vegetable broth
1 T tomato paste
1 T ground cumin
1/4 t smoked paprika
1 t salt
pepper
red pepper flakes

Preheat oven to 350 F. In a large dutch oven or other oven-proof pot heat the olive oil over medium heat. Add the onion & garlic & sauté until the onion is translucent. Add the potatoes & cook a few more minutes. Next add the cauliflower & thyme and let cook another couple minutes. Add the kale, chickpeas, coconut milk, broth, tomato paste, cumin, paprika & salt. Cover & place in the oven. Bake for 1 hour stirring occasionally.

Remove from oven. If the the stew is thinner than you'd like simmer on the stove uncovered until it reduces a little. Season to taste with salt & pepper. Stir in a little red pepper flakes.

Serves 4

Wednesday, November 19, 2008

Black Bean & Butternut Squash Quesadillas

This week I'm cooking recipes from some of my favorite food bloggers...

Lori's Lipsmacking Goodness has become has become a frequent read for me since I discovered it through Recipes to Rival, an online cooking group she co-founded. It seems she's alway got something on her blog I want to make & when I saw this recipe last week I bookmarked it right away. I knew it would be a great use of the butternut squash we got in our last CSA box.
Black Bean & Butternut Squash Quesadillas
This was so wonderful. I would have never thought to put squash in a quesadilla but its flavor was a perfect match to the beans, cheese & chile. Matt thinks the filling would also be great on nachos or in enchiladas. We made no changes to the ingredients in this recipe but we put a little oil on our tortillas when cooking to help crisp them up.

Black Bean & Butternut Squash Quesadillas

2 c butternut squash, peeled & cut into 1/2-inch cubes
1 T olive oil + more to brushing on the tortillas
salt
1 med red onion, chopped
1 garlic clove, minced
1 Fresno chile, seeded & chopped
1 c black beans, drained & rinsed
1 1/2 - 2 c grated Mexican cheese mix
8 fajita size tortillas

Preheat oven to 400 F.

Place the squash in a small roasting pan. Drizzle with 1/2 tablespoon of the olive oil & sprinkle with salt. Stir to coat. Roast for about 40 minutes, stirring occasionally, until the squash is light brown & soft. Set aside. Turn oven down to 375 F.

Heat 1/2 tablespoon of olive oil in a sauté pan. Add the onions & garlic & cook until the onions are soft & translucent. Stir in the chiles, squash & beans & heat through.

Brush a little olive oil on one side of 4 tortillas & place oil side down on baking sheets. Divide the bean & squash mixture between the 4 tortillas. Top each with cheese. Place a second tortilla on top of each & press down with the palm of your hand. Brush a little olive on the top tortillas. Place in the oven & bake for 12 minutes or until the tortillas are crisp & starting to brown.

Serve with sour cream & salsa

Makes 4 quesadillas


Tuesday, November 18, 2008

Sweet Potato Gnocchi with Garlic Alfredo

We got sweet potatoes in our last CSA box & I decided I wanted to substitute sweet potatoes for regular potatoes in gnocchi. I thought I was being really novel until I saw all the recipes for this online & then Giada cooked it last week on Everyday Italian.  
Sweet Potato Gnocchi
There are a couple different versions of gnocchi recipes out there, either those that use egg or those that use ricotta cheese. I decided to use ricotta because I read it made for a light gnocchi. I ended up going with the Giada recipe except I used nutmeg instead of cinnamon. The dough was a lot stickier than I thought it would be & I ended up adding almost twice as much flour as the recipe called for & it was still sticky. I really needed to have a lot of flour on my work surface to roll the gnocchi out as well. You are supposed to roll the gnocchi over fork tines but they were just too soft to do that so I just kept the pillow shape.
Sweet Potato Gnocchi
We had planned on doing these with brown butter & sage but I had baked with brown butter earlier in the day & we had had enough of it for one day. So, Matt decided to make a garlic alfredo sauce. We thought its mellow creaminess would suit the sweetness of the gnocchi well.

We liked this dish quite a bit. I really wanted to love it but I think the sweet potato flavor didn't come through as much as I had hoped. The gnocchi was nice & light, I was afraid with the extra flour it might not be. I think we might try making this gnocchi again & serve it with the brown butter to see if you taste the sweet potato more.

Sweet Potato Gnocchi

1 lb sweet potato
1/3 c ricotta cheese
3/4 t salt
1/4 t grated nutmeg
pinch of pepper
3/4 c all-purpose flour (or more as needed) plus more for work surface

Preheat the oven to 400 F. Poke a few holes in the sweet potatoes & place in the oven. Cook for 40 - 50 minutes until soft. Remove from oven & let cool. 

Remove the skins from the cooled potatoes & mash them, you should have about 1 cup of sweet potato. Stir the ricotta, salt, nutmeg & pepper into the mashed potatoes. Add the flour 1/4 cup at a time until you have a soft dough.

Flour your work surface. Using about 1/3 of the dough at a time roll it out to a 1-inch wide rope. Use a sharp knife to cut the rope into 1-inch pieces. 

Bring a large pot of water to a boil, salt & add 1/2 of the gnocchi. Boil for 5 - 6 minutes. Remove the cooked gnocchi with a strainer & cover to keep warm while you cook the second half.

Serves 2

Garlic Alfredo

2 T unsalted butter
1 clove garlic, minced
1/2 c cream
1/2 c grated parmesan
salt & pepper

Melt the butter over medium-low heat. Add garlic & cook a few minutes. Whisk in the cream. Add the cheese a little at time, whisking to melt. Salt & pepper to taste.

serves 2

Monday, November 17, 2008

Seafood Stew

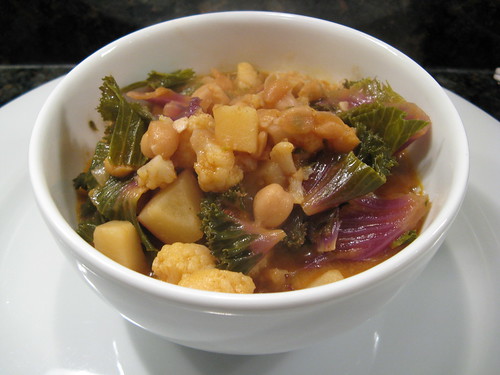
When I brought home The Art of French Cooking books last week Matt started going through them right away looking for things he wanted to try. The first thing that struck his eye (or perhaps his taste buds) was the Seafood Stew with Garlic Mayonnaise. 
Seafood Stew
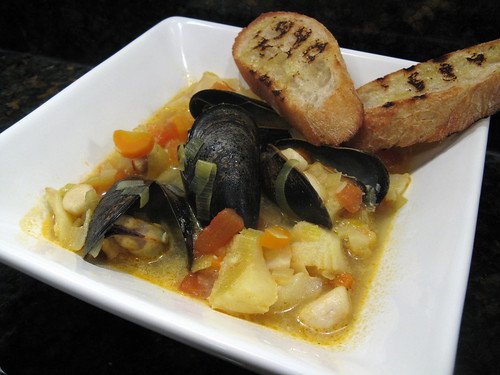
We had every intention of making this dish following the recipe exactly, right down to making our own fish stock & mayonnaise but the day's errands took much longer than originally planned. So, we ended up making a few changes in order to save some time. Despite these changes the final result was really wonderful. The broth was rich & flavorful, perfect for soaking into pieces of toasted French bread, & the fish was cooked to absolute moist perfection.

Matt's favorite part of the whole dish was the the garlic mayonnaise. Half of it we stirred into the broth while cooking. The other half we spread on the slices of toast. You could also just dallop it on top of each serving of stew.

Seafood Stew

1 T olive oil
1 leek, light green & white parts sliced
1 medium carrot, sliced
1 small onion, peeled & chopped
1 medium tomato, peeled, seeded & chopped
4 c fish stock
1/3 c white wine
pinch of saffron
pinch of dried thyme
pinch of fennel seeds
1 bay leaf
2 garlic cloves
pinch of salt
2/3 c mayonnaise
1/8 t lemon juice
pinch of cayenne pepper
1/4 t paprika
1/2 lb firm white fish fillet (we used cod), cut into large pieces
8 mussels, scrubbed & debearded
1/4 lb bay scallops
french bread, sliced & toasted if you wish

Heat the olive oil in a large soup pan or dutch oven over low heat. Add the leeks, carrots & onions. Cook for about 8 minutes until tender but not brown. Add the tomato & cook another 2 minutes. Pour in the stock & white wine then add the saffron, thyme, fennel & bay leaf. Bring to a boil. Reduce the heat, partially cover & let simmer for 30 minutes.

Meanwhile, grind the garlic cloves & salt into a paste with a mortar & pestle. Stir into the mayonnaise. Stir in the lemon juice, cayenne & paprika. Set aside.

(Traditionally the broth is strained at this time but we decided to leave the vegetables in. Our favorite little bistro in San Francisco, Baker Street Bistro, served theirs with some vegetables in it & Matt wanted to recreate their version.)

Put 1/2 the garlic mayonnaise in a small bowl, add a little of the broth & whisk to blend. Whisk into the soup pot. Bring the broth back up to a rolling boil. Add the fish to the broth & gently boil for a minute. Add the mussels & continue a gentle boil for 4 more minutes. Add the scallops & cook for 2 more minutes. 

Serve in large shallow bowls with the remaining mayonnaise & lots of bread for dipping.

Serves 2

One more note on the broth...since we used prepared fish stock we technically didn't need to use the leek, onion, carrot or tomato in this since those items were already used to make the stock but we did because we wanted the vegetables in the finished stew & we thought it would bump the flavor up more. If you do make this with prepared fish stock you can skip those ingredients if you wish but do add the saffron, thyme, bay & fennel.

Weekly Menu 11/17 - 11/22

Were back in Minnesota where its suddenly winter...
#312 - A Taste of What's to Come
I read a lot of food blogs everyday & they are always inspiring but it seems in the last week or so they've been even more so & I've bookmarked so many recipes. Because of that, I decided to make this weeks menu by cooking around the web from some of my favorite food bloggers. Please visit them if you haven't before I'm sure you'll enjoy them as much as I do.

Menu Planning Monday...

Black Bean & Butternut Squash Quesadillas - from Lori's Lipsmacking Goodness

Carrot & Peanut Soup - from Stacey Snacks

Aromatic Giouvetsi - from Kalofagas

Chickpea Stew with Coconut Milk - from Constables' Larder

Crock Pot Porchetta - from Jersey Girl Cooks

Pumpkin Moli (though I'll use butternut squash I think) - from What's Cooking 

This week I'll also be making the 3rd cookie in my 8 Weeks of Cookies series, Apricot Turnovers.

Sunday, November 16, 2008

Celeriac Soup

One of the greatest things about belonging to a CSA is getting to cook with things you've never used before such a this lovely specimen...
Celeriac
Celeriac may not win any vegetable beauty contests but it sure made a darn good soup. 
celeriac soup with bacon
We found this recipe on Serious Eats but it originally came from River Cottage. It is quite similar to a potato leek soup but a little lighter with just a slight celery flavor. We both really liked this soup quite a bit but our opinions varied when it came to toppings. We made some crispy bacon as a topping as suggested on Serious Eats. I liked the flavor of the bacon with the soup & felt it added a nice depth. Matt, on the other hand, had a second bowl without the bacon & said he liked it better that way (he added just a dab of butter to the top). Another good option for a topping would be seasoned croutons in my opinion.

Celeriac Soup
(we've changed some of the quantities in this recipe)

2 1/2 T butter
1 celeriac (about 1.5 lbs before trimming & peeling), peeled & chopped
3 leeks, white & light green parts sliced
1 small potato, peeled & chopped
2 cloves garlic, peeled & chopped
1 medium onion, peeled & chopped
2 1/4 c chicken or vegetable broth
1/4 c heavy cream
salt & pepper
4 slices bacon, cut into 1/2-inch strips & cooked until crispy

In a large soup pot melt the butter over medium heat. Add the celeriac, leeks, potato, garlic & onion. Salt & butter & let cook for about 10 minutes, stirring occasionally, until beginning to soften. Add the broth & bring to a boil. Cover & reduce the heat to low. Let the soup simmer for 20 -25 minutes until the vegetables are tender. Use a blender or immersion blender to purée the soup until smooth. Stir in the cream. Salt & pepper to taste (we found it needed quite a bit of soup). Ladle into bowls & top with bacon.

serves 4

Saturday, November 15, 2008

8 Weeks of Cookies - Candy Cane Cookies

We always had plates of Christmas cookies around the house during the holidays which my Mom baked during the weeks before so, of course I had to call her to get recipes for some of my favorites to bake this year. These candy cane cookies were one of the recipes I asked for but she couldn't find it. I remember them being similar to a sugar cookie but with peppermint flavor so I figured I could probably figure something out on my own.
Candy Cane Cookies
I used the basic sugar cookies recipe from the Better Homes & Garden Cookbook adding peppermint flavor & then splitting the dough to make the two colors. These came out exactly as I remembered so my guess of using sugar cookie dough was right on. I'll admit they are a little tedious to make but they look so cute on a cookie tray. If you've got kids get them to help you roll out the dough "snakes." 
Candy Cane Cookies
Candy Cane Cookies

1/3 c unsalted butter
1/3 c shortening
2 c all-purpose flour
1 egg
3/4 c sugar
1 T milk
1 t baking power
1 T peppermint extract
salt
red food coloring

Put the butter & shortening in the bowl of an electric mixer & beat on medium-high for 30 seconds. Add 1 cup of flour, egg, sugar, milk, baking powder, peppermint extract & a dash of salt & beat until combined. Add remaining flour & beat again. Divide the dough into two even balls about 12 ounces each. Wrap one ball in plastic wrap. Return the other ball to the mixer & beat in enough food coloring to turn the dough red (it can take quite a bit to get a good red). Wrap the red dough in plastic wrap. Chill for 3 hours (or cheat like me & freeze for 30 minutes).

Preheat the oven to 375 F. Cut a little of eat color of dough off to work with & return the rest to the fridge. Roll each color of the dough out into "snakes" about 1/4-inch thick. Cut them into 5-inch lengths. Place a piece of red next to a piece of white dough & twist them together.
Candy Cane Cookies
Then turn the twists into a cane shape.
Candy Cane Cookies
Place the cookies on an ungreased baking sheet & bake for 10 minutes until the bottoms begin to brown. Carefully move the cookies to a rack to cool, I find this is easier if they sit on the cookie sheet for a few minutes.

Makes about 50 cookies.
---------------------------------------------------------------------
8 Weeks of Cookies - Anise Mandelbrot

Friday, November 14, 2008

Butternut Squash & Spinach Pasta

After a week of eating really well but not necessarily healthy in San Francisco I figured a dish with some good vegetables in it would be just the thing. This was also a dish I could make with things that were already in the house  (thanks to my CSA) so I didn't have to spend my first day back running to the store.
IMG_8708_2
Oh, did it hit the spot. I just love the way the squash, onions & garlic develop a mellow sweetness from the roasting, its such a great combination with the slight bitterness of the spinach. The goat cheese melts in adding a little tang & a bit of creaminess while the pine nuts offer a crunch.  

Butternut Squash & Spinach Pasta

2 c butternut squash, peeled & cut into 1/2-inch cubes
1 small onion, peeled & quartered
1 garlic clove, peeled & sliced
1 1/2 T olive oil
salt
3 oz penne pasta
2 c baby spinach or regular spinach torn into pieces
1/2 T pine nuts, toasted
4 t  goat cheese

Preheat oven to 400 F. 

Place the squash, onions & garlic in a small roasting pan. Drizzle with 1 Tablespoon olive oil & salt to taste. Stir until everything is cooked. Place in the oven & cook for 40 minutes stirring occasionally, the squash & onions should be brown & soft.

Bring a pot of water to a boil. Salt & add pasta. Cook until al dente. Drain the pasta. Put the pasta back into the pot over medium heat & stir in the squash, onions, spinach & 1/2 Tablespoon olive oil. Stir until the spinach begins to wilt.

Put pasta & vegetables in a serving dish & top with pine nuts & goat cheese.

Serves 1

Wednesday, November 12, 2008

Ah, San Francisco

It's interesting, & a little odd, to be back in a city where you used to live as a tourist especially when you are staying in the most touristy section of town.
IMG_8689 IMG_8688 IMG_8673 IMG_8671 IMG_8687 IMG_8641
We've had great fun visiting our friends & eaten lots of fabulous food but today it back on a plane & home to the snow.

Tuesday, November 11, 2008

Curly Endive Salad with Bacon & Eggs

Since we were heading out of town the day after we got our latest CSA box we knew we had to use anything that would go bad while we were away right away. Luckily most of the items in this box would save until we got back 6 days later. I wasn't so sure about the curly endive but wasn't sure what to do with it. Luckily the newsletter we get with each box had the recipe for this salad in it.
Curly Endive Salad with Bacon & Eggs
Ok, believe it or not I have never had a salad with a poached egg on it before. Matt said it was definitely time to change that. This is pretty much your basic warm bacon salad but it was so good I thought it was definitely worth sharing. With a nice glass of wine this made a perfect light dinner but it would also make a great lunch or brunch. If you don't have curly endive substitute spinach or spring greens.

Curly Endive Salad with Bacon & Eggs

2 slices of bread, cut into 1/2-inch cubes
3 T olive oil
salt & pepper
3 strips of bacon, cut into 1/2-inch slices
1 head of curly endive, torn into bite-sized pieces
1 1/2 T + 1/2 t red or white wine vinegar (we used champagne vinegar)
2 eggs
1 clove garlic minced
1/4 t dried thyme

Heat 1 T of the olive oil in a frying pan. Add the bread cubes & toss to coat. Season with a little salt & pepper. Cook the bread in the pan until it is crisp & brown, stirring frequently. Remove & set aside.

Add the bacon to the hot pan & cook until crisp. Remove the bacon to a paper towel to drain but keep 2 T of the bacon fat in the pan. Mix the bacon with the endive in a heat proof bowl.

Bring a saucepan of water & 1/2 t of vinegar to a bowl. Slip the eggs one at a time into the boiling water & cook until the whites are set but the yolk is still runny, about 2 1/2 minutes. Use a slotted spoon to move the eggs to paper towel to drain & season them with salt & pepper.

While the eggs are cooking, add 2 T olive oil, garlic & thyme to the frying pan. Cook until the garlic just starts to turn brown. Add 1 1/2 T vinegar & remove from the heat. Toss the hot dressing into the endive & bacon, the endive should begin to wilt. Toss in the croutons. 

Divide the greens between two serving dishes & top each with an egg.

Serves 2

Monday, November 10, 2008

Weekly Menu 11/10 - 11/14

We're still in San Francisco for beginning of this week so this will be an abbreviated menu.
IMG_8646 IMG_8647

On to Menu Planning Monday...

Thursday - I'm on my own so I'm thinking of making myself some pasta, butternut squash, spinach, pine nuts & goat cheese.

Friday - Celeriac Soup 

Saturday - Seafood Stew - This is what happens when Matt starts reading the Art of French Cooking.

Sunday - Sweet Potato Gnocchi - I'm not sure if I'll serve these in brown butter & sage or a cream sauce. Matt is voting for the cream sauce.

Sunday, November 9, 2008

What a find!

Twice a month I volunteer at our local library in their used bookstore. This week when I went in there was a huge stack of cookbooks that had been donated. I started going through them to find some good ones to create a display when I came across these two.
Score!
The appear to both be first editions & are in beautiful condition except for the missing paper cover on Volume 1. After reading the various autobiographies & biographies of Julia Child I'm really happy to have her masterpieces in my collection. Plus Matt & I are already getting a kick out of reading through them even if we never cook a recipe they contain.

Saturday, November 8, 2008

8 Weeks of Cookies - Anise Mandelbrot

My parents are coming to visit us over Christmas so I'm preparing by baking a batch of cookies a week to freeze & bring out when everyone is here. This week I baked Mandelbrot.
Anise Mandelbrot
Mandelbrot is a twice baked Eastern European cookie that is similar to biscotti but not as hard. I had my parents email me the recipe that my family has always used, I can't tell you where it is from other than it was clipped out of a newspaper at one time. I don't think this is a very traditional mandelbrot recipe. The name means almond bread in Yiddish & our recipe calls for walnuts. Most other recipes I've seen for this call for baking soda while ours uses no leavening agent. The biggest difference is that a lot of mandelbrot recipes use lemon zest as a flavoring & ours uses anise seeds. The flavor of anise is what a really love about these cookies. Matt & I were laughing about that as we were baking these cookies because I don't like licorice!
Anise Mandelbrot
These cookies would be great served for dessert with a cup of coffee or a hot cocoa to dip them in. 

Anise Mandelbrot

1 c sugar
3/4 c canola oil
3 eggs
3 c all-purpose flour
1/4 t salt
1 t anise seeds
1 c finely chopped nuts (I used half walnuts & half almonds)

Preheat oven to 350 F. 

In a large mixing bowl beat the sugar, oil & eggs together on medium speed until well blended. Add in the flour, salt & anise seeds & mix well. Stir in the nuts.

Divide the dough in half & on a cookie sheet form two 12" x 3" loaves three inches apart. Bake for 25 minutes or until golden brown. Remove from the oven & cut the loaves into 1/2-inch slices. Turn the slices on their sides & return to the oven for another 10 minutes. Turn the cookies to the other side & bake another 10 minutes until evenly browned.

Makes 48 cookies

Friday, November 7, 2008

Shepherd's Pie

I'm a big fan of Shepherd's Pie, there is something so comforting about a stew covered in a layer of baked mashed potatoes. I don't make a traditional Shepherd's Pie since I'm not using mutton as the meat but it seems that typically you see it with beef these days anyway. 
Shepherd's Pie
I made the stew for this pie using whatever vegetables I had left in the crisper from my last CSA box. That's one of the things I love about making something like this, you can throw in whatever sounds good to you. I like to think of it more as a technique recipe than an exact ingredient recipe.

This combination turned out really tasty. The stew was flavorful & quite mellow with all the flavors blending together instead of one standing out. The mashed potatoes were creamy & rich thanks to the addition of an egg yolk. I highly recommend making Shepherd's Pie on those cold winter nights we have coming up.

Shepherd's Pie

1 lb potatoes, peeled & cut into large pieces
2 T half & half
1 T butter
1 egg yolk
salt & pepper
1 T olive oil
2 small leeks, white & light green parts sliced
2 small fennel bulbs , sliced
1 medium carrot, chopped
2 small peppers chopped 
3/4 lb lean ground beef
1 T all-purpose flour
3/4 c chicken broth
1 T tomato paste
1/4 c frozen peas
2 T fennel frond, chopped

Bring a large pot of water to a boil. Add potatoes & a dash of salt. Boil the potatoes for 20 minutes until tender. Drain. Return the potatoes to the pot, add the half & half, butter & egg yolk & mash until smooth & fluffy. Salt & pepper to taste. Set aside.

Heat the olive oil in  a skillet over medium-high heat.  Add the leeks, fennel bulb, carrots & peppers & cook until the vegetables become tender. Add the ground beef & cook until browned through. Stir in the flour & cook while stirring for a minute. Add the chicken broth & tomato paste & stir until thickened. Add the peas & fennel fronds & stir until just heated.

Divide the beef stew between two 1 1/2 c ramekins. Top with the mashed potatoes. Dot with a little butter if you wish. Place the ramekins on a baking sheet & into the oven. Bake for 30 - 35 minutes until the potatoes are golden brown.

Serves 2


What we did with CSA box #13 & what's in #14

What we did with CSA box #13
1. roast kabocha squash with cheese & sausage 2. beef rendang 3. delicata squash stuffed with wild rice & sausage 4. chicken & roasted vegetables with indian bbq sauce 5. moorish-style chickpea & spinach soup 6. Shepherd's Pie

& here's this week's box...
What's in CSA box #14

Flowering Kale - We like this cooked into soups such as this one.
Spinach - Apparently this spinach has been sweetened by the frost so I'm thinking it'll be best in a salad
Carrots - I have a ton of carrots sitting waiting to be used, does anyone have any good ideas other that carrot cake?
Curly Endive - Our CSA newsletter came with a recipe for endive salad with bacon & poached eggs which we are going to have for dinner tonight
Leeks - I think I'll roast these, yum!
Butternut Squash - I'm really wanting some butternut squash soup
Celeriac - Matt has a recipe for celeriac soup he'd like to try.
Delicata Squash - We really come to love the delicate flavor of this squash, its wonderful just roasted with a little butter.
Beauty Heart Radish - I've never had this type of radish so I'll have to experiment in different things
Sweet Potatoes - If you've follow this blog at all you know my love of sweet potatoes & seen all the ways I use it especially in baking.
Porcelain Garlic
Baby Beets - Some of these will just be roasted or steamed & the rest perhaps cooked in a tart.

Thursday, November 6, 2008

Cheddar, Apple & Bacon Tarts

For our anniversary this year Matt & I went to a favorite local restaurant, Corner Table. One of the desserts we had featured apples, cheddar cheese & bacon. We really liked the flavor combination though wished it had been served warm. Since we still have a few apples left I decided to try making my own dessert using those ingredients.
Cheddar, Apple & Bacon Tart
Don't let the bacon in this dessert scare you, the saltiness of it is a perfect match to the sweet apples & crust. I know the cheddar adds saltiness too but the bacon really takes it up a notch. 

The crust I used for this is one I adapted from the Rich Sweet Pastry recipe in Small Batch Baking. It came out a lot like a sugar cookie & Matt really liked it, but I think next time I'll try using something flakier like the crusts I've used to make galettes.

Cheddar, Apple & Bacon Tarts

1/4 c confectioners' sugar
1/2 c + 1 T all-purpose flour
salt
4 T + 1 t unsalted butter, room temperature
1 egg yolk 
2 t apple cider
1 slice bacon, cut into small pieces
1 apple, peeled, cored & cut into 1/4-inch slices
2 T sugar
1/4 t cinnamon
2 T grated sharp cheddar cheese

Put the confectioners' sugar, flour & a pinch of salt in a food processor, pulse to blend. Add 2 tablespoons + 1 teaspoon of butter and the egg yolk, pulse to blend. Add the apple cider 1 teaspoon at a time until the dough holds together. Form the dough into two balls & flatten them into discs. Wrap the discs in plastic wrap & chill for at least 30 minutes.

Roll the chilled dough out into 5 to 6-inch circles. Press into two buttered 4 1/2" x 3/4" tart pans with removable bottoms. Use the rolling pin or your hand to cut away the excess dough (save the excess dough if you want to create shapes for the top of the tarts). Prick holes with a fork in the bottom of the tarts. Put in the freezer for 15 minutes.

Preheat oven to 325 F. Put the chilled tart shells on a baking sheet. Line the inside of the shells with tin foil & then fill with pie weights or dried beans. Bake for 20 minutes. Remove the foil & weights & bake for 6 more minutes until the crusts are just dry.

In a skillet melt the remaining 2 tablespoons of butter over medium-high heat. Add the apples & stir to coat them. Let cook until the apples are getting soft on the outside but still firm in the middle. Stir in the sugar, cinnamon & a pinch of salt. Remove from heat.

Cook the bacon pieces until crisp. Drain on a paper towel.

Put one tablespoon of grated cheese into the bottom of each tart shell. Top the cheese with apple slices. Sprinkle the bacon on top of the apples.  

Bake at 325 F for 30 - 35 minutes on a baking sheet, the crust should be golden brown. Move tarts in their pans to a rack to cool slightly before removing from pans.

Makes 2 tarts

Wednesday, November 5, 2008

Moorish-Style Chickpea & Spinach Soup

This is another one of those dishes where the recipe mysteriously appeared on my kitchen counter. Actually, I really like it when Matt suggests meal ideas since coming up with a menu every week can be difficult sometimes. He found this recipe on Serious Eats Dinner Tonight & printed it because he just really likes chickpeas.
Moorish-style Chickpea & Spinach Stew
The original recipe called this a stew but we found it to be much more the consistency of soup. The person who tried the recipe for Serious Eats said they were a little disappointed with the final result because it lacked in flavor. I figured the answer for that would be to use chicken broth instead of water as the cooking liquid. That seemed to make the difference because we found this broth to be really flavorful. We could really taste the saffron. Matt especially liked it & has already said he wants it again. This is a good one to keep on hand for a busy night since it cooks up quickly & in one pot.

Moorish-Style Chickpeas & Spinach Soup
Adapted from Jose Andres Tapas: A Taste of Spain in America

2 T olive oil
3 cloves garlic, peeled
1 slice bread, crusts removed
1 T sweet paprika
pinch saffron
1/2 t cumin
1 T sherry vinegar
1 15-oz can chickpeas, drained & rinsed
1/4 lb spinach, torn
2 c chicken or vegetable broth
salt & pepper

Heat the olive oil over medium-high heat in a soup pit. Add the garlic cloves & cook until they are brown on all sides, stirring from time to time. Remove the garlic cloves. Add the bread to the pot. Toast on each side about 1 minute. Remove the bread. Put the bread & garlic cloves into a mortar & pestle & smash until they form a paste.

Turn the heat off until the pot & allow the oil to cool for a minute or two. Stir in the paprika, saffron & cumin. Then stir in the vinegar. Add the chickpeas, spinach & broth to the pot. Turn heat back on & bring to a simmer. Cook for 5 minutes & then stir in the bread & garlic paste. Let cook for 5 more minutes. Salt & pepper to taste.

Serves 2

When I posted that I was making this in my weekly menu Bill over at Tinkering With Dinner left this comment
"That stew is a variation of the Tunisian breakfast soup, leblebi, which thrives on a wide range of garnishes you might want to consider. I've got a list from when I made something quite similar here. You should at least add poached eggs; the dish is incomplete without them."
We decided to try the soup in it basic form this time before adding garnishes but I have to agree with Bill this soup would have been fantastic with an egg on it & we'll try that next time.

Tuesday, November 4, 2008

I Voted

I Voted
Did you?
If you are in the US please make your voice count & get to the polls today.

Delicata Squash Stuffed with Wild Rice & Sausage

Until we received Delicata squash in our CSA box this year neither of us had ever had it. The first two we got were just roasted & eaten with a little butter. As wonderful as that was I decided to step things up a little with our second delivery & stuff the squash to make it a full meal.
Delicata Squash stuffed with Wild Rice & Sausage
Along with squash, wild rice is one of those ingredients that just screams fall to me. The flavors & textures just blend together so well in this dish, the creamy, sweetness of the squash & nutty, bite of the wild rice mixed with the fennel & pepper of the sausage. The red & yellow peppers add a nice pop of color. This is a dish you can easily put your own spin on in so may ways, change the type of squash, use brown or white rice, leave out the sausage to make it vegetarian or serve it as a side dish, just have fun with it.

Delicata Squash Stuffed with Wild Rice & Sausage

2 Delicata squash, cut in half lengthwise, seeds & pulp removed.
1/4 c wild rice
1 T olive oil
1 shallot, minced
1 clove garlic, minced
1/4 c peppers, seeded & chopped (I used mini red & yellow peppers)
4 oz bulk Italian sausage

Preheat oven to 400 F.

Place the squash halves cut-side down in a baking dish. Add water until the pan is about 1/2-inch full. Bake for 40 - 50 minutes or until the squash in tender.

Meanwhile, bring 1 c of water to boil in a saucepan. Add the wild rice, reduce heat to low, cover & simmer for about 45 minutes or until the rice is tender. Drain any remaining water.

Heat olive oil over medium high heat in a skillet. Add the shallot, onion & peppers & cook until the onion is translucent. Add the sausage& heat until it is cooked through, stirring from time to time. Stir in rice. Salt & pepper if needed.

Spoon rice & sausage filling into the squash & serve.

Serves two as an entrée.

Monday, November 3, 2008

Weekly Menu 11/2 - 11/7/08

Screaming Pumpkin
I hope you all have a spooky Halloween weekend & ate lots of roasted pumpkin seeds. I always forget how much I love munching on these salty treats.
Pumpkin Seeds
We'll be putting our weekly cupcake on hold for the next two months & instead be doing a weekly cookie. Since we'll be having family for the holidays we want to get some favorite cookies in the freezer ahead of time. This week we'll be making Mandelbrot which are a tradition in my family.

On to the rest of Menu Planning Monday...

Delicata Squash Stuffed with Wild Rice & Sausage

Moorish- Style Chickpea & Spinach Stew - From Serious Eats

Pizza - I'm out at appointments all day Wednesday so I'm leaving it to Matt to create this pizza

Shepherd's Pie

Stir-fry - Since we are leaving town on Friday this is a good way to use anything from this week's CSA box that might go bad quickly.

Then we are off to San Francisco for a couple days which means we'll get to visit a few of our favorite restaurants, Presidio Social Club, Ti Couz & Steps of Rome.
Related Posts with Thumbnails

Get Email Updates!

Enter your email address:

Delivered by FeedBurner

Measurement Abbreviations

T = Tablespoon
t = teaspoon
c = cup
lb = pound
oz - ounce

Labels

Blog Archive

Contributors

Blog Directory for Minneapolis, Minnesota