

(this is not the actual challenge cake. Let's just call this Almond Brown Butter Cake a stand-in, imagine it with one more layer plus buttercream & whipped cream between the layers.)
This month's challenge was the Filbert Gateau with Praline Buttercream from Great Cakes by Carol Walter. Its a three layer nut cake layered with buttercream & whipped cream then coated with a fruit glaze & finally topped with a chocolate ganache. That is a lot of different pieces & a lot of time. I spent two days making this cake. Day one was spent making the actual cake layers. Day two I made the fillings, glaze & ganache & finally put the whole thing together. Let's go through the recipe...
Almond Gateau with Praline Buttercream
1 Almond Genoise
1 recipe sugar syrup, flavored with dark rum
1 recipe Praline Buttercream
½ cup heavy cream, whipped to soft peaks
1 recipe Raspberry Glaze
1 recipe Ganache Glaze, prepared just before using
Almond Genoise
Because of the amount of nuts in the recipe, this preparation is different from a classic genoise.
I chose to do almond instead of filberts mainly because I already had the almonds. This is actually 1/2 the original recipe. I used this & cooked four 4.5-inch layers of cake but only used 3 in the final cake, we ate the forth layer warm from the oven.
¾ cups almonds, toasted/skinned
1/3 cup cake flour, unsifted
1 Tbsp. cornstarch
4 large egg yolks
½ cup sugar
½ tsp. vanilla extract
¼ tsp. grated lemon rind
3 lg. egg whites
1/8 cup warm, clarified butter (100 – 110 degrees)
Position rack in the lower 3rd of the oven and preheat to 350 degrees. Grease and flour a four 4.5-inch round cake pans.
Using a food processor, process nuts, cake flour, and cornstarch for about 30 seconds. Then, pulse the mixture about 10 times to get a fine, powdery mixture. You’ll know the nuts are ready when they begin to gather together around the sides of the bowl. While you want to make sure there aren’t any large pieces, don’t over-process. Set aside.
Put the yolks in the bowl of an electric mixer, with the whisk attachment, and beat until thick and light in color, about 3-4 minutes on med-high speed. Slowly, add 6 T of sugar. It is best to do so by adding a tablespoon at a time, taking about 3 minutes for this step. When finished, the mixture should be ribbony. Blend in the vanilla and grated lemon rind. Remove and set aside.
Place egg whites in a large, clean bowl of the electric mixer with the whisk attachment and beat on medium speed, until soft peaks. Increase to med-high speed and slowly add the remaining 2 T of sugar, over 15-20 seconds or so. Continue to beat for another ½ minute. Add the yolk mixture to the whites and whisk for 1 minute.
Pour the warm butter in a liquid measure cup (or a spouted container). * It must be a deep bottom bowl and work must be fast.* Put the nut meal in a mesh strainer (or use your hand – working quickly) and sprinkle it in about 2 tablespoons at a time – folding it carefully for about 40 folds. Be sure to exclude any large chunks/pieces of nuts. Again, work quickly and carefully as to not deflate the mixture. When all but about 2 Tbsp. of nut meal remain, quickly and steadily pour the warm butter over the batter. Then, with the remaining nut meal, fold the batter to incorporate, about 13 or so folds.
I didn't bother using a strainer to add my nuts to the butter. Mixed with the butter it became more of a thick batter for me than something pourable.
With a rubber spatula, transfer the batter into the prepared pan, smoothing the surface with the spatula or back of a spoon. **If collected butter remains at the bottom of the bowl, do not add it to the batter! It will impede the cake rising while baking.
Tap the pan on the counter to remove air bubbles and bake in the preheated oven for 30-35 minutes. You’ll know the cake is done when it is springy to the touch and it separates itself from the side of the pan. Remove from oven and allow to stand for 5 minutes. Invert onto a cake rack sprayed with nonstick coating, removing the pan. Cool the cake completely.
*If not using the cake right away, wrap thoroughly in plastic wrap, then in a plastic bag, then in the refrigerator for up to 3 days. If freezing, wrap in foil, then the bag and use within 2-3 months.
Sugar Syrup
Makes 1/2 cup, good for three 4.5-inch round layers.
Again this is half of what the original recipe called for.
1/2 cup water
2 T sugar
1 Tbsp. dark rum
In a small, yet heavy saucepan, bring the water and sugar to a boil and simmer for 5 minutes. Remove from heat, add the liqueur. Cool slightly before using on the cake. *Can be made in advance
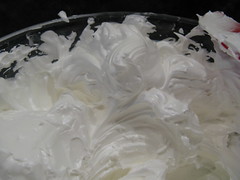
Swiss Buttercream
I had really good success with this buttercream & will use this recipe again. I did make a whole batch of this instead of half to make sure I had enough for decorating later, I could have gotten by with a half batch
4 lg. egg whites
¾ cup sugar
1 ½ cups (3 sticks) unsalted butter, slightly firm
1 ½ -2 Tbsp. Rum
1 tsp. vanilla
Place the egg whites in a lg/ bowl of a electric mixer and beat with the whisk attachment until the whites are foamy and they begin to thicken (just before the soft peak stage). Set the bowl over a saucepan filled with about 2 inches of simmering water, making sure the bowl is not touching the water. Then, whisk in the sugar by adding 1-2 tablespoon of sugar at a time over a minutes time. Continue beating 2-3 minutes or until the whites are warm (about 120 degrees) and the sugar is dissolved. The mixture should look thick and like whipped marshmallows. Remove from pan and with either the paddle or whisk attachment, beat the egg whites and sugar on med-high until its a thick, cool meringue – about 5-7 minutes. *Do not overbeat*. Set aside.
Place the butter in a separate clean mixing bowl and, using the paddle attachment, cream the butter at medium speed for 40-60 seconds, or until smooth and creamy. *Do not overbeat or the butter will become toooooo soft.*
On med-low speed, blend the meringue into the butter, about 1-2 Tbsp. at a time, over 1 minute. Add the liqueur and vanilla and mix for 30-45 seconds longer, until thick and creamy.
Refrigerate 10-15 minutes before using.
Wait! My buttercream won’t come together! Reheat the buttercream briefly over simmering water for about 5 seconds, stirring with a wooden spoon. Be careful and do not overbeat. The mixture will look broken with some liquid at the bottom of the bowl. Return the bowl to the mixer and whip on medium speed just until the cream comes back together.
Wait! My buttercream is too soft! Chill the buttercream in the refrigerator for about 10 minutes and rewhip. If that doesn’t work, cream an additional 2-4 Tbsp. of butter in a small bowl– making sure the butter is not as soft as the original amount, so make sure is cool and smooth. On low speed, quickly add the creamed butter to the buttercream, 1 Tbsp. at a time.
Refrigerate in an airtight container for up to 5 days, or can be frozen for up to 6 months. If freezing, store in 2 16-oz. plastic containers and thaw in the refrigerator overnight or at room temperature for several hours.
Praline Buttercream
I left out the rum in this since it was already in the buttercream itself. I didn't make my own praline as I found some almond paste in the store & decided to cut myself a break on this one step. I should have run the paste through the food processor before adding it to the buttercream to make it a little finer, there were too many chunks in the finished product to make it easy to decorate with.
1 recipe Swiss Buttercream
1/3 cup almond paste
1 ½ - 2 Tbsp. Jamaican rum (optional)
Blend ½ cup buttercream into the paste, then add to the remaining buttercream. Whip briefly on med-low speed to combine. Blend in rum.
Raspberry Glaze
Good for one 4.5-inch cake
I chose to use raspberry instead of apricot glaze which that the original recipe called for because we really love the taste of raspberry & chocolate. Once again this is a half recipe.
1/3 cup thick apricot preserves
1/2 Tbsp. water
In a small, yet heavy saucepan, bring the water and preserves to a slow boil and simmer for 2-3 minutes. If the mixture begins to stick to the bottom of the saucepan, add water as needed.
Remove from heat and, using a strainer, press the mixture through the mesh and discard any remnants. With a pastry brush, apply the glaze onto the cake while the cake is still warm. If the glaze is too thick, thin to a preferred consistency with drops of water.
Ganache Glaze
Makes about 1/3 cup, enough to cover the top and sides of a 4.5 inch layercake
The corn syrup was the main difference from the chocolate ganache I've used in the past. I'm not sure it really made a difference. I actually did this in the microwave & it worked just fine.
3 oz. (good) semisweet or bittersweet chocolate, like Lindt
3 oz. heavy cream
1/2 tbsp. light corn syrup
1/2 Tbsp. rum
1/4 tsp. vanilla
1/2 - 1/4 tsp. hot water, if needed
Blend vanilla and liqueur/rum together and set aside.
Break the chocolate into 1-inch pieces and place in the basket of a food processor and pulse until finely chopped. Transfer into a medium sized bowl and set aside.
Heat the cream and corn syrup in a saucepan, on low, until it reached a gentle boil. Once to the gently boil, immediately and carefully pour over the chocolate. Leave it alone for one minute, then slowly stir and mix the chocolate and cream together until the chocolate is melted and incorporated into the cream. Carefully blend in vanilla mixture. If the surface seems oily, add ½ - 1 tsp hot water. The glaze will thicken, but should still be pourable. If it doesn’t thicken, refrigerate for about 5 minutes, but make sure it doesn’t get too cold!
Assembling Cake
Cut a cardboard disk slightly smaller than the cake. Place the first layer top-side down on the disk. Using a pastry brush, moisten the layer with 3-4 Tbsp. of warm sugar syrup. Measure out 1 cup of praline buttercream and set aside.
Spread the bottom layer with a ¼-inch thickness of the remaining buttercream. Cover with ½ of the whipped cream, leaving ¼-inch border around the edge of the cake. Place the middle layer over the first, brush with sugar syrup, spreading with buttercream. Cover with the remaining whipped cream. Moisten the third layer with additional sugar syrup and place on the cake. Gently, press the sides of the cake to align the layers. Refrigerate to chill for at least 30 minutes.

Lift the cake by sliding your palm under the cardboard. Holding a serrated or very sharp night with an 8-inch blade held parallel to the sides of the cake, trim the sides so that they are perfectly straight. Cut a slight bevel at the top to help the glaze drip over the edge. Brush the top and sides of the cake with warm apricot glaze, sealing the cut areas completely. Chill while you prepare the ganache.
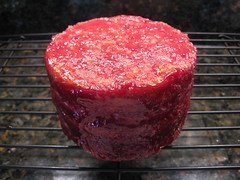
I had a hard time doing this trimming & final just decided my cake was straight enough. It also took quite a lot of glaze to get the whole thing coated smoothly, crumbs from the cut parts kept coming off.
Place a rack over a large shallow pan to catch the ganache drippings. Remove the gateau from the refrigerator and put it the rack. With a metal spatula in hand, and holding the saucepan about 10 inches above the cake, pour the ganache onto the cake’s center. Move the spatula over the top of the ganache about 4 times to get a smooth and mirror-like appearance. The ganache should cover the top and run down the sides of the cake. When the ganache has been poured and is coating the cake, lift one side of the rack and bang it once on the counter to help spread the ganache evenly and break any air bubbles. (Work fast before setting starts.) Patch any bare spots on the sides with a smaller spatula, but do not touch the top after the “bang”. Let the cake stand at least 15 minutes to set after glazing.
This whole thing about not touching the top of the cake again after getting a smooth finish is so important. I could resist the urge to co back & fix a little flaw & really messed up the shiny top. Luckily I have no pictures to show you that.
To garnish the cake, fit a 12 – 14-inch pastry bag with a #114 large leaf tip. Fill the bag with the reserved praline cream. Stating ½ inch from the outer edge of the cake, position the pastry tube at a 90 degree angle with the top almost touching the top of the cake. Apply pressure to the pastry bag, moving it slightly toward the center of the cake. As the buttercream flows on the cake, reverse the movement backward toward the edge of the cake and finish by pulling the bag again to the center. Stop applying pressure and press the bag downward, then quickly pull the tip up to break the flow of frosting. Repeat, making 12 leaves evenly spaced around the surface of the cake.
Make a second row of leaves on the top of the first row, moving the pastry bag about ¾ inch closer to the center. The leaves should overlap. Make a 3rd row, moving closer and closer to the center. Add a 4th row if you have the room. But, leave a 2-inch space in the center for a chopped filbert garnish. Refrigerate uncovered for 3-4 hours to allow the cake to set. Remove the cake from the refrigerator at least 3 hours before serving.
I didn't follow these decorating instructions at all but made up my own design, a 4.5-inch cake doesn't have a ton of room to decorate. The almond paste in the buttercream made it almost impossible to pipe it & get a nice look.
Leftover cake can be covered with foil and kept in the refrigerator for up to 5 days.
Will I make this cake again? No, I'm glad I challenged myself to do it though. It was quite frustrating to put all that time into putting it together to only have the piping turn out so messy because of the almond paste. The cake was good but pretty sweet, almost too sweet for us, with the praline buttercream, sugar syrup, fruit glaze & chocolate.
I will make nut flour cakes again. The Almond Brown Butter Cake I used as my stand-in above is a favorite & a little less of a process with only a fruit filling & chocolate ganache.
I will use that buttercream recipe again. It worked really well for me & I liked the flavor. I don't think I'll be putting almond paste in it again though.
I'm looking forward to next month's challenge, hopefully this time I can manage not to erase my own pictures!


18 comments:
I am so sorry about your pictures! The glaze on the cake looks delicious and your layers are perfect!
Oh no, sorry to hear about your pictures. That stinks. :P However, your pictures in the process look great too (as does the stand in) :)
sorry about the pictures! Great job o n completing the challenge
I've had the disappearing pictures happen to me a couple of times - I am so sorry that happened to you- that is the worst feeling.But you completed your challenge and that is what counts!
Great work and so sorry about the missing photos!
Hi Kat- I'm sorry to hear about the pictures, the cake was a lot of work but at least you have a stand in. I was afraid the cake would be too sweet too, so I didn't sweeten the whipped cream and added lime juice instead of water to the glaze. It was still very rich, but good in small amounts.
Aw, I am so sorry to hear about the pictures! That sucks, especially after how challenging this challenge was! I think your cake looked pretty cool though with the raspberry on it!
Don't you just hate when that happens!!! I've done it too and then drive myself crazy looking at every file on photoshop thinking maybe I uploaded it somewhere under another title. That you loved it and enjoyed the process is really what counts.
Thanks everyone for you kind words about the photo disaster! i just know I'll be much more careful with them in the future
You do realize that you're a superstar overacheiver, right? Just so we're on the same page....
Oh no! So sorry about your pictures
Sorry you lost your pictures!! I still have to finish mine - nothing like waiting until the last minute! I like the idea of using almonds - the hazelnuts were pretty expensive.
I'm sorry to hear about your pictures!
I'm sorry about your pictures! It looks wonderful otherwise, and your ganache is so thick on top!
Bummer about the pictures. Judging byt he stand-in, I'm sure it came out great!
Christina ~ She Runs, She Eats
Sorry to hear about your pics.
Oh no! I hate it when I lose pictures! However, I must say that the stand-in looks divine!
Bummer about your pix! Your cake sounds great though, almonds and raspberries are always a good combo. I wish I would've used almonds, realized after making the cake that I just don't care for the taste of hazelnuts. Live and learn. :)
Post a Comment