Monday, June 30, 2008

Carolina Pulled Pork

My parents were visiting from Memphis this weekend so we decided to invite the cousins over & do a some pulled pork on the grill. This really couldn't be much easier as you only have to put some rub on the pork, oil it & let it grill nice & low for 3-4 hours. The pork comes out juicy & tender (it was hard to keep people from picking at it while it stood waiting to be pulled it was so good). The Carolina Mop gets added after the pork has been pulled giving it that vinegar tang that Carolina BBQ is known for. We made 5 lbs of pork & six adults finished it in one sitting. After having it on buns we ended up just passing the bowl around nibbling until it was gone.
pulled pork

Carolina Pulled Pork

(from Mastering the Grill: The Owner's Manual for Outdoor Cooking)

1 5lb boneless pork shoulder, have your butcher tie it up for you.
2 T canola oil

Fragrant Chili Rub

2 T kosher salt
2 T paprika
1 t brown sugar
1 T ground ancho chile
1 to 3 t ground chipotle chile (make it as hot as you like)
1/2 t ground cumin
1/2 t ground pepper

Combine all ingredients. Can be stored for 1 month in an airtight container at room temperature.

Rub the pork all over with 1/4 c of the rub. Then coat it with the oil & let it sit for 30 to 60 minutes.
Pork ready for the grill
Heat the grill to 325 - 350.
Put the pork on the grill over indirect heat, cover & allow to cook for 3 to 4 hours until a thermometer registers 185F.
When the pork is done remove it to a cutting board & cover with tin foil. Allow it to rest for at least 15 minutes.
Cut the strings off the pork & cut into slices. Then using your hands or two forks tear it into shreds.

South Carolina Vinegar Mop

3/4 c apple cider vinegar
2 T sugar
2 T Tabasco
1/2 t kosher salt
1/2 t ground black pepper

Combine all the ingredients. Mix in with the pork & serve on hamburger rolls. Matt likes them with creamy coleslaw on top.

Serves 6 - 8

Somehow I ended up with no pictures of the finished sandwiches. We all dove into these so fast it would have all been a blur.

Mastering the Grill: The Owner's Manual for Outdoor Cooking also gives two other ways of flavoring this pork, a Pungent Vietnamese Sauce and a Sicilian Bath. I think we'll try the Vietnamese version next.

Weekly Menu - 6/30 - 7/4/08

I can't believe it going to be July already this week!
#182 - Droplets
(chinese pea pod blossoms in the garden)

Here's this week's Menu Planning Monday

Grilled Fennel Pork Tenderloin
- RESULT - Good the first night even better as sandwiches the next day.

Chipotle Chicken Pasta Salad - From Mr. Orph's Kitchen - RESULT - Spicy from the chipotle yet cool & creamy from the avocado & ranch dressing.

Coffee Burgers - We sampled some burgers made with the Coffee & Spice Rub at William Sonoma & liked it so much we bought some of the rub.

Whole-Wheat Linguine with Green Beans, Ricotta & Lemon - A wonderful light & healthy pasta.

Then like good Minnesotans we'll be heading up North to the lake for the 4th where we are looking forward to a fish fry with fresh caught Walleye. Let's hope the fishing gods are good to my Dad.

This week's cupcake flavor will be Bomb Pop. The perfect colors for the 4th. - Result - Due to problems finding cherry flavoring I went with a vanilla flavored Red, White & Blue cupcake instead.

Also this week we'll be talking about Carolina Pulled Pork, Rustic Cherry Pie & more ways to use my favorite Fragrant Chile Rub.

Sunday, June 29, 2008

Daring Bakers - Danish Braid

Last month I decided with all the baking I've been doing lately it was time for me to join the Daring Bakers. Oh, did I pick a challenging month to start! This month we made a Danish Braid which involved making our own butter laminated dough. But I decided I was up to it & dove in not long after the challenge was posted (I figured the longer I waited the more intimidated I might get).
IMG_4146.JPG
It is a bit of a time commitment making the dough since it has to chill for 30 minutes in between rolling it out & folding it. So, I picked an afternoon Matt was out of town & just focused on dough.

DANISH DOUGH
from Sherry Yard's The Secrets of Baking

Makes 2-1/2 pounds dough

Ingredients
For the dough (Detrempe)
1 ounce fresh yeast or 1 tablespoon active dry yeast
1/2 cup whole milk
1/3 cup sugar
Zest of 1 orange, finely grated
3/4 teaspoon ground cardamom
1-1/2 teaspoons vanilla extract
1/2 vanilla bean, split and scraped

2 large eggs, chilled
1/4 cup fresh orange juice
3-1/4 cups all-purpose flour
1 teaspoon salt

For the butter block (Beurrage)

1/2 pound (2 sticks) cold unsalted butter
1/4 cup all-purpose flour

DOUGH
Combine yeast and milk in the bowl of a mixer fitted with the paddle attachment and mix on low speed. Slowly add sugar, orange zest, card
amom, vanilla extract, vanilla seeds, eggs, and orange juice. Mix well. Change to the dough hook and add the salt with the flour, 1 cup at a time, increasing speed to medium as the flour is incorporated. Knead the dough for about 5 minutes, or until smooth. You may need to add a little more flour if it is sticky. Transfer dough to a lightly floured baking sheet and cover with plastic wrap. Refrigerate for 30 minutes.

Without a standing mixer: Combine yeast and milk in a bowl with a hand mixer on low speed or a whisk. Add sugar, orange zest, cardamom, vanilla extract, vanilla seeds, eggs, and orange juice and mix well. Sift flour and salt on your working surface and make a fountain. Make sure that the “walls” of your fountain are thick and eve
n. Pour the liquid in the middle of the fountain. With your fingertips, mix the liquid and the flour starting from the middle of the fountain, slowly working towards the edges. When the ingredients have been incorporated start kneading the dough with the heel of your hands until it becomes smooth and easy to work with, around 5 to 7 minutes. You might need to add more flour if the dough is sticky.

BUTTER BLOCK
1. Combine butter and flour in the bowl of a mixer fitted with a paddle attachment and beat on medium speed for 1 minute. Scrape down the sides of the bowl and the paddle and then beat for 1 minute more, or until smooth and lump free. Set aside at room temperature.
2. After the detrempe has chilled 30 minutes, turn
it out onto a lightly floured surface. Roll the dough into a rectangle approximately 18 x 13 inches and ¼ inch thick. The dough may be sticky, so keep dusting it lightly with flour. Spread the butter evenly over the center and right thirds of the dough. Fold the left edge of the detrempe to the right, covering half of the butter. Fold the right third of the rectangle over the center third. The first turn has now been completed. Mark the dough by poking it with your finger to keep track of your turns, or use a sticky and keep a tally. Place the dough on a baking sheet, wrap it in plastic wrap, and refrigerate for 30 minutes.
3. Place the dough lengthwise on a floured work surface. The open ends should be to your right and left. Roll the dough into another approxi
mately 13 x 18 inch, ¼-inch-thick rectangle. Again, fold the left third of the rectangle over the center third and the right third over the center third. No additional butter will be added as it is already in the dough. The second turn has now been completed. Refrigerate the dough for 30 minutes.
4. Roll out, turn, and refrigerate the dough two more times, for a total of four single turns. Make sure you are keeping track of your turns. Refrigerate the dough after the final turn for at least 5 hours or overnight. The Danish dough is now ready to be used. If you will not be using the dough within 24 hours, freeze it. To do this, roll the dough out to about 1 inch in thickness, wrap tightly in plastic wrap, and freeze. Defrost the dough slowly in the refrigerator for easiest handling. Danish dough will keep in the fr
eezer for up to 1 month.

I had a hard time rolling the dough out to the size it asked for & keeping it square. Plus the butter would ooze out or I'd get a hole in my dough. After the second turn I decided not to worry so much about the exact size & just try to get it 1/4-inch thick.
After the dough sat in the refrigerator for 5 hours, I cut it into 3 pieces & froze two to use later.
IMG_4140.JPG
(look at those layers!)

For my filling I decided to use so fresh rhubarb I had just gotten in my CSA box. I mixed it with raspberries to make a jam.

RHUBARB/RASPBERRY JAM

2 c fresh rhubarb, cut into 1-inch pieces
1 c sugar
1/2 T lemon juice
1/2 c raspberries (I used frozen)
1/4 t ground cardamom

Mix the rhubarb, sugar & lemon together. Let sit, stirring occasionally, for a few hours up to overnight until juices form.

Bring the rhubarb mixture to a boil over med-high heat until the sugar dissolves. Then increase the heat & allow to boil until slightly thickened. Add the raspberries and continue to boil until thick. Remove from heat & stir in cardamom.

The jam can be stored for 1 week in the fridge.

This made enough to fill one braid made for 1/3 of the dough recipe.


DANISH BRAID
Makes enough for 2 large braids
(since I had cut my dough in thirds I was making 10 inch braid at a time)

Ingredients
1 recipe Danish Dough
(1/3 of the recipe in my case)
2 cups filling, jam, or preserves (I only needed a cup at the very most for my small braid)

For the egg wash: 1 large egg, plus 1 large egg yolk
(I didn't bother with the second yolk)

1. Line a baking sheet with a silicone mat or parchment paper. On a lightly floured surface, roll the Danish Dough into a 15 x 20-inch rectangle
(I rolled my smaller amount out to about 15 x 11) , ¼ inch thick. If the dough seems elastic and shrinks back when rolled, let it rest for a few minutes, then roll again. Place the dough on the baking sheet.
2. Along one long side of the pastry make parallel, 5-inch-long cuts with a knife or rolling pastry wheel, each about 1 inch apart. Repeat on the opposite side, making sure to line up the cuts with those you’ve already made.
IMG_4141.JPG
3. Spoon the filling you’ve chosen to fill your braid down the center of the rectangle. Starting with the top and bottom “flaps”, fold the top flap down over the filling to cover. Next, fold the bottom “flap” up to cover filling. This helps keep the braid neat and helps to hold in the filling. Now begin folding the cut side strips of dough over the filling, alternating first left, then right, left, right, until finished. Trim any excess dough and tuck in the ends.

Egg Wash
Whisk together the whole egg and yolk in a bowl and with a pastry brush, lightly coat the braid.
IMG_4143.JPG
Proofing and Baking
1. Spray cooking oil (Pam…) onto a piece of plastic wrap, and place over the braid. Proof at room temperature or, if possible, in a controlled 90 degree F environment for about 2 hours, or until doubled in volume and light to the touch.
2. Near the end of proofing, preheat oven to 400 degrees F. Position a rack in the center of the oven.
3. Bake for 10 minutes, then rotate the pan so that the side of the braid previously in the back of the oven is now in the front. Lower the oven temperature to 350 degrees F, and bake about 15-20 minutes more, or until golden brown. Cool and serve the braid either still warm from the oven or at room temperature. The cooled braid can be wrapped airtight and stored in the refrigerator for up to 2 days, or freeze for 1 month.

I let my first braid proof for about 2 - 2.5 hours at just over 70 F. It did rise some but after cooking I didn't think it was quite as flaky as it could be. I also found that after turning the braid & turning down the oven it only needed to cook for 10 more minutes or it started to burn.
IMG_4150.JPG
Two weeks later a made a second braid with the dough in the freezer using ligonberry jam. This time I let it rise for just over 3 hours at almost 80 F. The extra time really made a difference & this braid came out much better, though I had a harder time getting the braid to stay closed at one.
IMG_4455.JPG
My third braid I filled with cream cheese & apricot jam. It was about 80 F & I let it rise for 3 hours. This braid rose nicely & I think tasted the best with the addition of the cream cheese.

This challenge was a lot of fun & I learned a lot. Will I make Danish Braid again? Probably not unless its for a special brunch or such but its awful good to know I can make it.

Thanks Kelly & Ben for hosting this month! Check out the link for the Darling Bakers Blogroll on my sidebar to see lots of other versions of the Danish Braid.

Friday, June 27, 2008

Sweet & Spicy Stir-Fry

With all these lovely green we've been getting in our CSA boxes we are making more stir-fries these days, usually about one a week. Other than some chopping, they are so quick & easy to make that they become the busy day dinner. We usually make our own stir-fry sauces & typically make them up as we go along. This is one I whipped up the other night & thought the mixture of sweet & spicy came out so well that I should share. We used sugar snap peas, garlic scapes, potato onions, carrot, red komatsuna, chicken & peanuts but, since stir-fry is such a great "whatever is in the fridge" meal that you should use what's in season & on hand.
Sweet & Spicy Stir-fry

Sweet & Spicy Stir-fry Sauce

2 T soy sauce
1/2 T brown sugar
1 T seasoned rice vinegar
1 T oyster sauce
pinch of ground ginger
pinch of dry mustard
1 clove garlic, minced
1 T Sriracha (this is the hot bit so spice it up to your taste)
pepper

Mix all ingredients together & set aside. When the meat & vegetables are almost done add sauce to the wok. Stir to coat everything & serve.

Makes enough for a stir-fry sauce for 2-3 servings.

Thursday, June 26, 2008

Dreamsicle Cupcakes

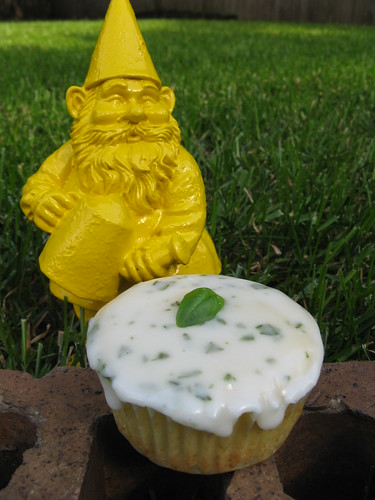
Who remembers Dreamsicles or Creamsicles? Orange sherbet over a vanilla ice cream center (or ice milk depending which one you bought)on a stick. With our hot, humid weather it seems like those frozen treat flavors were calling to me when I came up with this week's cupcake.
Dreamsicle Cupcake
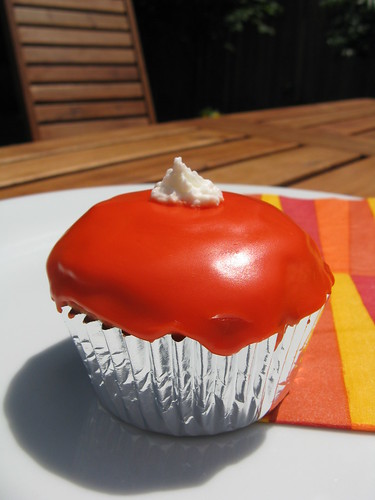
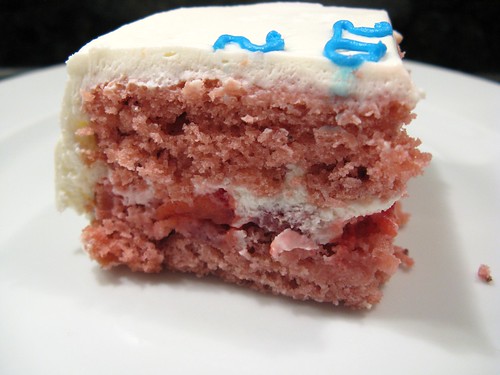
Yes, it is REALLY orange but I was going for that bright Popsicle color. I got this color by mixing yellow & neon pink food coloring. Both the cupcake & icing are also strongly flavored with orange extract, I did not want the flavor to be subtle.
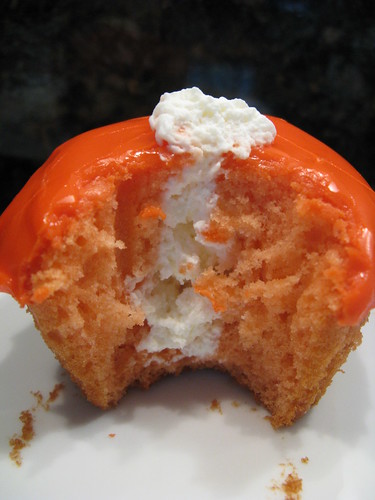
The filling is a whipped cream filling with some gelatin in it which gives it a little body. The original recipe I used didn't call for vanilla & it needed it so when I use it again (which I will, its so good & pipes unlike regular whipped cream)I'll add some. In the recipe below I added that into the ingredients.
Dreamsicle Cupcake

Orange Cupcakes


2/3 c all-purpose flour
1/4 t baking soda
1/4 t baking powder
pinch of salt
3 T unsalted butter, softened
1/3 c sugar
1 large egg, lightly beaten
2 t orange extract
1/4 c plain yogurt
orange food coloring

Preheat oven to 350 F and prepare 6 muffin tins.
Stir flour, baking soda, baking powder and salt together. Set aside.
Beat the butter until light and fluffy. On high speed, gradually beat in the sugar until light & fluffy. Lower speed and add egg, beating until just blended. Then beat in orange extract. On low speed beat in flour mixture & yogurt until just blended. Stir in food coloring until you get the desired color. This will be a very light fluffy batter.
Dreamsicle Cupcake
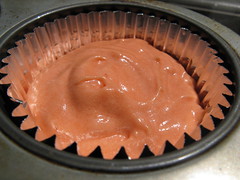
Divide the batter evenly between 6 muffin tins.
Oranges?
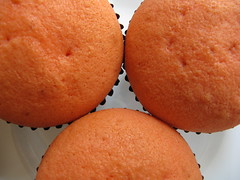
Bake for 18 minutes. The edges should just be turning golden brown. Allow cupcakes to cool on a wire rack.

Makes 6 cupcakes but is easily doubled.

Whipped Cream Filling

(Adapted from Allrecipes)

1/2 c heavy cream
1 t confectioners sugar
1/4 t vanilla
3/4 t cold water
1/4 t unflavored gelatin

Whip the cream, sugar & vanilla together just until soft peaks form. Set aside.
Mix the water & gelatin together in a small bowl and microwave briefly, about 10 seconds, until the gelatin is dissolved. Allow to cool slightly but not get hard. Add to cream & continue whipping until stiff peaks are formed. Keep in the refrigerator until ready to use.

Makes enough to fill 6 cupcakes with a little left over.

To Fill Cupcakes

Put cream filling into an icing bag with a large star tip. Insert the tip into the middle of the top of the cupcake about 3/4 inch. Gently squeeze the cream into the cupcake, pulling the tip slowly out.

Orange Milk Icing

1/2 c powdered sugar, shifted
1 t orange extract
orange food coloring
milk

Mix powdered sugar, orange extract, food coloring and 1/2 t milk. Add more milk as needed by 1/2 t amounts until icing consistency. After icing allow cupcakes to sit until the icing has set, about an hour.

Makes enough to ice 6 cupcakes

The icing doesn't cover the hole where you inserted the cream very well but you'll have enough cream left to pipe a star on the top of each cupcake to cover it. These cupcakes should be refrigerated in an airtight container & are wonderful cold!

Wednesday, June 25, 2008

Fresh Strawberry Cake

I wanted to make a cake for Matt to celebrate the launch of the latest version of the software he works on. (It was a bit of a joke because he telecommutes & everyone else who worked on the product is either in CA or India so I wanted to give him his own launch party.) I also wanted to use the last of our strawberries to flavor the cake. I looked into a lot of strawberry cake recipes online & most called for either strawberry Jello or jam. Then I saw that Whole Foods had a recipe that used fresh pureed strawberries so I went with that idea to make this cake.
Fresh Strawberry Cake
It tasted really wonderfully of fresh strawberries especially with them sliced in between the layers. It was perfect with this whipped cream cheese frosting, almost the flavor of a strawberry cheesecake.

Fresh Strawberry Cake
(adapted from Old-Fashioned Yellow Cake in Small-Batch Baking)

1/2 c all-purpose flour
1 T buttermilk
2 T pureed strawberries (don't worry about getting this super smooth just use a fork to smash them)
1/8 t baking soda
yolk of 1 large egg
1/2 t vanilla
3 T unsalted butter, melted & cooled
1/3 c sugar
Pinch of salt
Pink or red food coloring (optional)

Butter & flour to 4.5-inch cake pans. Preheat oven to 350 F.
Whisk the buttermilk, strawberry purée and baking soda together in a small bowl. Add the egg yolk, vanilla, and melted butter, whisk to combine.
In a larger bowl stir together the flour, sugar & salt. Add the buttermilk/strawberry mixture & whisk until just blended. Stir in food coloring (you can skip this but the color is sort of a gross beige without it).
Divide the batter between the two pans. Bake for 15 min or until a toothpick inserted in the center comes out clean.
Move to a cooling rack & allow to sit for 15 minutes. Run a knife around the edges & invert the pans to release the cake. Allow to cook completely.

Makes 1 two-layer 4.5-inch cake

Whipped Cream Cheese Frosting
(adapted from Tom Parker on Allrecipes)
Many people complained that this frosting was too runny to frost with, I didn't have that problem at all. The trick is to not over beat your cream but stop as soon as you reach stiff peaks. I also cut the amount of cream it originally called for.

2 oz cream cheese, softened
1/4 c confectioners sugar
1/8 t salt
1/4 t vanilla extract
1/4 c heavy cream

In a bowl, beat the cream cheese, sugar, salt & vanilla together. In a cold bowl, using cold beaters & cold cream, beat the cream until it forms stiff peaks. Fold the cream into the cream cheese mixture.

Make enough to frost 1 4.5-inch cake or 4-6 cupcakes

Assembling the cake

2 - 3 strawberries, sliced (depending on size)

If the cakes are not flat, use a large knife to even them out (& yum eat the pieces you cut off!). Put one layer on your serving plate. Lay the sliced strawberries evenly on the cake in a single layer. Top the strawberries with some frosting. Place the second layer of cake on top. Coat the cake with a thin layer (crumb coat) of frosting & let it & the remaining frosting sit in the fridge for a few minutes. Then frost the cake with the remaining frosting. It would be beautiful decorated with more fresh strawberries.
#176 - Launch Cake
(look at those piping skills, ha!)

Best Laid Plans

I had planned to share a recipe with you today for Kohlrabi Coleslaw but the slaw I made yesterday just didn't turn out worthy of sharing. I think a slaw should have a tang & this one was a bit too dull for my taste, despite the celery salt & pepper. I have another head of kohlrabi so this is something I'll be working on.
Chile Rubbed Pork Chop with Kohlrabi Slaw
Two things I can tell you though...
1. Kohlrabi is really good. It has a flavor of cabbage but perhaps a little sweeter. We also really liked its texture, which was a lot like a carrot. I can't imagine it would go limp in a slaw very quickly. I can see making it a staple in our summer slaws.
2. We used the Fragrant Chile Rub leftover from the Bean Butt Chicken on boneless pork chops last night & it was wonderful. I think this could become my go to rub. Its spicy enough to make Matt happy but not so spicy that I can't eat & enjoy it (I'm a wimp when it comes to spicy food).

Tuesday, June 24, 2008

Foldover Garlic Bread

A few weeks ago we had an amazing garlic bread from our local market. It was a flat bread folded over with the garlic & herbs in the middle. We decided to try making our own version of it using our favorite pizza dough. Oh, was it good! The outside gets crispy while the inside stays soft & chewy. I was afraid the garlic wouldn't cook enough & be too strong but the flavor was perfect. This will be the garlic bread I make from now on.
Foldover Garlic Bread

Foldover Garlic Bread

1/2 t rapid-rise yeast
1 t kosher salt
3/4 c water
2 1/2 T olive oil, divided (plus extra if needed)
1 1/2 c all-purpose flour (plus extra as needed)
2 cloves garlic, minced
1 T fresh parsley, chopped

In large mixing bowl, combine the yeast, salt, and spices. Add the water and 1 tablespoons of olive oil and give it a quick stir. Add the flour a cup at a time. When you can't stir in any more flour, switch to kneading it in. Knead until the dough is smooth. If the dough is too sticky add flour in slowly until it smooths out. Pour the 1/2 t olive oil into the bottom of the bowl and roll the dough around until the oil coats the outside of the dough. Cover with a damp cloth and stick the whole bowl out of the way to rise. It should double in about 2 hours.
Preheat the oven to 450 F.
Lightly grease a baking sheet. On the sheet press the dough out to a large circle, about 12-inches. Brush the dough with 1 T olive oil (more is needed to cover the whole round). Sprinkle the garlic & parsley over the oil. Fold the dough over to make a half circle.
Bake for 15 minutes of until golden brown.
Foldover Garlic Bread

Serves 4

Steak Salad with Strawberry Vinaigrette

We can't get enough of these local strawberries right now. There really is nothing like the taste of a food when it is eaten in season. Think about the difference between a tomato you get at the grocery store in December & one you get out of the garden or at a farmers market in July. It's all about the flavor.
This salad is perfect for a hot night because the only cooking is done outside on the grill. You can really use any mixture of vegetables you want, we used what was in our fridge. The blue cheese was a wonderful contrast with the sweetness of the vinaigrette & it became wonderfully creamy from the heat of the steak & onions.
Steak Salad with Strawberry Vinaigrette

Strawberry Vinaigrette

1/2 c olive oil
1/2 c fresh strawberries, halved
1 T balsamic vinegar
1/4 t salt
1/8 t ground black pepper
1 t fresh or 1/4 t dried savory, tarragon, marjoram or basil (your choice)
1/8 t white sugar

Process everything in a food processor or blender until smooth. Refrigerate until ready to use. This dressing will be a little thicker than many vinaigrettes because of the strawberries.

Makes 1 cup

For the salad we grilled 1/2 lb of flank steak just seasoned with salt & pepper then sliced it thin against the grain. We also grilled a small sliced onion until it was soft & starting to brown. We served these warm on a bed of lettuce with halved strawberries, chopped tomato & a really good blue cheese. Yum.

Monday, June 23, 2008

Strawberry Shortcake

Apparently, the cool wet spring we've had is good for one particular crop, strawberries. The season usually ends in late-June but may last until sometime in July this year thanks to a bumper crop. The farm sent us three pints in our CSA box last week. They are smaller than the berries we often see in the store from places like California but the taste is so superior. I seriously can't remember the last time I had strawberries that tasted this good. We've been eating them sliced on vanilla ice cream & in the morning on oatmeal but last night Matt asked for a Strawberry Shortcake.
Strawberry Shortcake
He told me to just get those little yellow round sponge cakes from the store but I knew that wasn't a real shortcake. Shortcake should be a flaky, sweetened biscuit & that's what I was going to make.

These are a snap to make. The only trick is to make sure to keep your butter cold. I'll be making them again & again this summer to top with whatever fruit is in season.

Shortcakes

2 T cold unsalted butter
1/2 c flour
1/8 t salt
3/4 t baking powder
3/4 t sugar
3 1/2 - 4 T half & half

Preheat oven to 450.
Dice the butter into about 1/4-inch pieces. Put it in the freezer while you prepare the dry mixture.
Mix flour, salt, baking powder & sugar together. Using two knives or a food processor cut the butter pieces into the flour mixture. Work until its about a course corn meal texture. Do not allow the butter & flour to form a paste.
Add in 3 1/2 T of the half & half. Stir with a folk just until moistened. If it appears to be too dry add a little more half & half. Use your hand to knead the dough 5 or 6 times in the bowl. Don't over work it or the butter will get too warm.
On a cutting board flatten the dough with your hand to a 5 x 2 1/2 rectangle. Cut in half to form two squares. Place about an inch apart on a baking sheet lined with a silicone pad or parchment paper.
Shortcake Biscuits
Bake for 10 minutes or until golden brown. Remove to a rack to cool. Split in half with a fork to serve. We like it layered with fruit & fresh whipped cream.

Makes 2 cakes (this is easily doubled for 4)

Sunday, June 22, 2008

Weekly Menu - 6/23 -6/27/08

Look at these luscious local strawberries, they have been such a treat.
Simple Pleasures

Here's this week's Menu Planning Monday.

Steak Salad with Strawberry Vinaigrette - We got some lovely strawberries & thought this would be a good use for them.

Chili Rubbed Pork Chops with Kohlrabi Cole Slaw - I'm interested to see how Kohlrabi is as I've never had it before.

BBQ Chicken Sandwiches - Using Wee Willy's bbq sauce.

Stir-fry - We got lots of wonderful stir-fry greens this week & its always so quick & easy to make a stir-fry up.

A dish yet to be planned - My parents are coming on Friday & we haven't figured out yet what we want to serve for dinner. As its supposed to be 88, it will most likely be something on the grill.

This week I'll also feature recipes for shortcakes & roasted garbanzo beans (not together of course).

It says summer on the calendar & the weather has decided to comply so what better flavor for this week's cupcake than a favorite summer treat The Dreamsicle.

What's in the CSA box #4

Here's what can from Harmony Valley Farm this week...
CSA box #4

Strawberries - The first pick of the season. These little beauties pack an amazing flavor. We had them simply over vanilla ice cream last night & it was better than any fancy dessert.

Napa Cabbage - A stir-fry staple

Broccoli - The broccoli from the farm has been sender & tender, perfect for just a quick steam as a side dish.

Potato Onions - They are a genetic cross between potatoes & onions but really are most like a shallot. Apparently they are easier to grow than other onions.

Red Komatsuna - Another Asian green that we've never tried. It is supposed to be good in salads & stir-fries.

Kohlrabi - I think I'm going to try a slaw made with this

Lettuce

Garlic Scapes - The most fun ingredient in the box with its wreath-like shape. The farm suggest frying them in a little butter & I think that sounds like heaven.

All the Midwest rain & hail has effected our farm a little with crops like peppers, okra & tomatoes being completely lost. Luckily they had a second crop of tomatoes & okra in the greenhouse they could replant for a slightly later harvest. Lettuces were also hard hit by the hail so a for a few weeks there won't be a any salad greens available. Buying a share like this really gives you a sense of what how the weather can effect food resources & the livelihood of farmers.

Thursday, June 19, 2008

Chile Chicken Salad

One of the best things about roasting a chicken is using the leftovers for chicken salad. As I was chopping the leftover chicken from the Bean Butt Chicken both Matt & I had the idea to use the Fragrant Chile Rub we used while roasting as the seasoning for the chicken salad. Well, this was just a brilliant idea as it was probably one of the best chicken salads we've ever made.
Chile chicken salad
(doesn't it look lovely on my homemade roll)

The rub did not make it too spicy but gave it a really nice, almost smoky flavor. We added green onions & slivered almonds to the salad to give it a nice crunch.

Chile Chicken Salad

2 c cooked chicken, chopped
1/2 c mayonnaise (more if the salad is a little too dry)
1 t fragrant chile rub
2 green onions, sliced
1/4 c slivered almonds

Mix everything together.  Serve on bread or a bed of salad greens.  I like it with some cherry tomatoes on top for a little sweetness.

How we used CSA box #3

What we did with CSA box #3

I did something special with the rhubarb but I'm not allowed to talk about it until later this month.  

Wednesday, June 18, 2008

Bean Butt Chicken

Since grilling season has been upon us Matt seems to be craving baked beans. I really never knew until this year what a fan of them he was. So, when we saw this recipe for Bean Butt Chicken in Mastering the Grill: The Owner's Manual for Outdoor Cooking we knew we had to try it. Nothing like pairing our love of roast chicken with baked beans!
Bean Butt Chicken
Basically Bean Butt Chicken is made like Beer Can Chicken but you are cooking the chicken on an open can of baked beans allowing all the yummy chicken fat to flavor them. I really loved the Fragrant Chili Rub on the chicken & in the beans. It made the skin of the chicken taste fabulous & gave the beans a little zing! We have a lot of the rub leftover so we'll be trying it on some other grilled meat soon.

Fragrant Chili Rub

2 T kosher salt
2 T paprika
1 t brown sugar
1 T ground ancho chile
1 to 3 t ground chipotle chile (make it as hot as you like)
1/2 t ground cumin
1/2 t ground pepper

Combine all ingredients. Can be stored for 1 month in an airtight container at room temperature.

Bean Butt Chicken

1 4-lb chicken, washed & dried
2 T + 1 t Fragrant Chili Rub
3 t canola oil
1 16-oz can baked beans (look for the thin tall can instead of the squat ones as it will fit in the chicken better. Our favorite beans came in a squat can so we washed out another thin can & put them in that.)

Heat the grill to 325 - 350 F. You want to cook over indirect heat so for a gas grill leave some burners off.
Rub the chicken inside & out with 2 T of the Chili Rub. Stir the other 1 t of the rub into the beans. Rub the outside of the chicken with 2 t of oil. Rub the remaining 1 t of oil on the outside of the bean can. Lower the chicken onto the can so it goes into the internal cavity. Position the bird so the legs help it stand up.
Bean Butt Chicken
Put the chicken & can on the grill away from the direct heat. Cover & cook until a thermometer registers 170 F at the thickest part of the thigh, about 1 1/2 hours.
Remove the chicken & can to a baking sheet or cutting board. Use tongs to help hold the can while you twist & lift the bird off of it. The bird will be hot so use a dish towel or oven mitt to hold it. Let the chicken rest a few minutes then, carve & serve with the beans.
Bean Butt Chicken
Serves 4

Tuesday, June 17, 2008

Lemon Cupcakes with Blueberry Basil Filling & Basil Icing

I didn't really have a plan for a cupcake flavor this week but I kept thinking I wanted to do something with basil (maybe because I'm watching a basil plant slowly die in my garden). I remembered a few years ago Matt took me to Rubicon in San Francisco for an amazing dinner. The dessert I had that night had blueberries & basil in it which surprised me by being such a great combination. I decided these flavors would go well with lemon & this cupcake was born.
Lemon Cupcake with Blueberry Basil Filling & Basil Icing
I was a little afraid the flavor of the basil would be lost but it really shines through especially in the icing. Oh & the smell of basil while you are making these is wonderful. Matt took his first bite & immediately said, "Wow, basil really goes well with the fruit!"

Blueberry Basil Sauce

1/3 cup frozen or fresh blueberries
1 T water
1/2 t lemon juice
1 1/2 T granulated sugar
6 large basil leaves, chopped

Put all ingredients in a small saucepan over med-high heat. Cook, stirring frequently, until the berries break down & the sauce thickens.

Makes about 6 t sauce.

This sauce would also be good over vanilla ice cream.

Lemon Cupcakes
makes 6 cupcakes but can easily be doubled

2/3 c all-purpose flour
1/4 t baking soda
1/4 t baking powder
pinch of salt
3 T unsalted butter, softened
1/3 c sugar
1 large egg, lightly beaten
zest of one lemon
juice of one lemon (with 1 t held aside for the icing)
1/4 c plain yogurt

Preheat oven to 350 and prepare muffin tins.
Stir flour, baking soda, baking powder and salt together. Set aside.
Beat the butter until light and fluffy. On high speed, gradually beat in the sugar until light & fluffy. Lower speed and add egg, beating until just blended. Then beat in lemon zest & lemon juice. On low speed beat in flour mixture & yogurt until just blended. This will be a very light fluffy batter.

Divide half the batter evenly among the 6 muffin tins. Place a scant teaspoon of blueberry basil sauce on top of the batter in each cup, try to keep to the center as much as possible. Top with the remaining batter.

Bake for 18 minutes. The edges should just be turning golden brown. Let cool on wire

Basil Icing

1/2 c powdered sugar, shifted
1 t lemon juice
2 large basil leaves, finely chopped
milk

Mix powdered sugar, lemon juice, basil and 1/2 t milk. Add more milk as needed by 1/2 t amounts until icing consistency. After icing allow cupcakes to sit until set, about an hour.

Makes enough to ice 6 cupcakes.

Lemon Cupcake with Blueberry Basil Filling & Basil Icing

Monday, June 16, 2008

Dad's Memphis Ribs

My Dad is a Minnesotan now living in Memphis, TN. He hasn't picked up the southern accent but he has sure learned how to make some good ribs. He sent us the directions on how to make these ribs after he ended up serving them to a group of neighbors, including some Memphis in May BBQ judges, who declared them winners.
Falling off the bone & ready to eat
This method of making ribs does require a time commitment as the ribs will be on the grill for 4 hours & every hour you will be doing something to the temperature or the ribs themselves. But its that time & the long slow cook that makes these ribs fall off the bone tender. Real BBQ takes time.
We won't be giving recipes for BBQ rub or sauce here as this is really more about the technique of cooking the ribs. We did make our own rub but for the sauce we used Wee Willy's, a Minnesota-made sauce that Bon Appétit just wrote up as one of the best.

Dad's Memphis Ribs

Baby Back Ribs
Dry BBQ Rub
Yellow Mustard
Tin Foil
Apple or Pineapple Juice
BBQ Sauce
Smoker Box & Wood Chips

Heat your grill to low, less that 150, & get the wood chips smoking in the smoker box.
Rub the ribs with the dry rub,
First a dry rub
then coat the meat side with a thin coat of yellow mustard.
A light coat of mustard on the meat side
Place the ribs over indirect heat on the grill.
On low with the smoker box
Close the cover to build up the smoke & allow them to cook for 1 hour. Raise the heat to about medium & let the ribs cook for another hour.
Make a tin foil pouch big enough to wrap your ribs in & put some juice in it.
Wrapped in tinfoil with apple juice
Place the ribs in the juice & wrap it tightly shut. Put back on indirect heat on the grill & let cook another hour. Carefully remove the ribs from the tin foil pouch. Coat the meat side with BBQ sauce.
After 3 hours add some sauce
Place the ribs back on the grill & allow another hour of cooking. The meat will firm up & the sauce will dry.
4 Hours Later, Off the Grill
Serve with extra sauce if you like a wet rib.

My Dad likes to make a couple batches of these at one time & then freeze them. He puts them on a baking sheet & reheats them in the oven to reserve. I think if I was going to freeze some I might take them off the grill 15 minutes early & then they be finished off in the reheating.

Weekly Menu 6/16 - 6/20/08

Ah, last week was sad with the loss of Tastespotting. Let's hope one of the new sites started to fill the void will catch on. Here's three I know of so far...
Recipes 2 Share
Food Porn Daily
Food Gawker
First Tomato
(the first of our Sweet 100's!)

Here's this week's Menu Planning Monday

Dad's Memphis Ribs
- My dad's technique for fall off the bone bbq ribs - RESULT - These take a little time but are oh so good

Curried Peas Fritatta with Fresh Tomato Chuntney
- with fresh peas from the Farmer's Market

Bean Can Chicken - No, that's not a typo. The chicken fat flavors the beans as it cooks.

Merguez Lamb Patties with Golden Raisin Couscous - We'll see how these patties hold up to grilling

Grilled Peanut Chicken - because I've got some Coconut Peanut Sauce to use up

I'm still dreaming up this week's cupcake recipe but I'm thinking of something with blueberry, lemon & basil. - RESULT - I ended up with a Lemon Cupcake with Blueberry Basil Filling & Basil Icing.  A yummy combination.

Come back for recipes throughout the week or click the recipe name to go to those already posted.

Friday, June 13, 2008

Grilled Asian Steak Salad

We love a grilled steak salad in the summer & usually make it with Matt's Mustard Vinaigrette but this week Matt decided to put an Asian spin on it. One sauce serves as both the marinade for the steak & as the dressing for the salad which makes this meal even easier. The flavor of the seasoned rice wine vinegar is the best part of this sauce & allows you to not have to add any additional sugar.
Grilled Asian Steak Salad

Asian Marinade/Dressing

1/4 c low-sodium soy sauce
2 T vegetable oil
1/4 c seasoned rice wine vinegar
1/2 t ground ginger
1 t dry mustard
2 cloves garlic, minced

Whisk everything together. Divide marinade/dressing into two; one half to use as a marinade, the other to use as dressing.

Marinade a 1/2 lb New York Strip Steak (or steak of your choice) the marinade for 2 to 6 hours before grilling.

Discard marinade & grill steak to desired doneness. Slice steak thinly.

Dress a bed of greens & vegetables with the dressing (we used red onion, grilled asparagus & sliced radishes but any favorite salad vegetables would work. Pea Pods would be fantastic in this). Serve steak slices on top.

Serves 2

Thursday, June 12, 2008

Spring Greens Pizza

As well as sending a salad mix of greens the farm sent us a bag of what they called sauté mix last week. They are wonderful just sautéed up as a side dish but I wanted to find other uses for them as well. I thought they would add a fresh flavor to a pizza. I know typically when you get a pizza with greens on it the greens are put on after the pizza is cooked, sort of like a salad on a pizza. I'm not really a fan of cold lettuce on my hot pizza so I thought why not just cook them like any other topping. I hoped they would wilt instead burn & that's exactly what happened. The prosciutto added a nice but of saltiness against the fresh, sweet greens.
Spring Greens Pizza

pizza dough for 1 pizza (our favorite pizza dough recipe)
1 T olive oil plus extra to oil the baking sheet
1 clove garlic, sliced
1 c mozzarella
6 stalks asparagus, cut into 1 inch pieces
1 c spring green mix
2 - 3 sliced prosciutto, torn into pieces
fresh grated Parmesan

Preheat oven to 450 F.
In a small sauté pan heat the olive oil & garlic over medium high heat until garlic softens & is fragrant.
Blanch the asparagus in boiling water until just bright green. Drain.
Lightly oil the baking sheet. Spread out the dough to desired thickness. Brush the dough with the garlic infused oil including the garlic pieces. Sprinkle with mozzarella. Add the asparagus, greens & prosciutto on top of the mozzarella. Grate some fresh Parmesan over the top.
Spring Greens Pizza
Bake for about 15 minutes or until crust is golden on the bottom, cheese is melted & the greens are wilted.

makes 1 pizza

Wednesday, June 11, 2008

Tin Roof Cupcakes

When coming up with this week's cupcake flavor I knew I wanted to try a Very Vanilla Cupcake because I had made some vanilla sugar with leftover vanilla bean last week, but what to go with the vanilla. Then is hit me why not make a cupcake with the flavors of my favorite ice cream sundae, the tin roof. A tin roof sundae is really very basic; vanilla ice cream, chocolate sauce & red skinned Spanish peanuts. That's it. Hold the whip cream. Don't add a cherry. It is perfect in its simpleness. I used chocolate ganache for the chocolate "sauce" & regular salted peanuts (because I prefer not to have the skins)
Tin Roof Cupcakes

Very Vanilla Cupcake
(adapted from Martha's Stewart Coconut Cupcake)
This is the best fluffy white cupcake. It smelled so good Matt & I ate one right from the oven without anything on it.

3/4 c all-purpose flour
1/2 t baking powder
1/4 t salt
6 T unsalted butter, room temperature
1/2 c + 1 T vanilla sugar
1/2 vanilla bean
1/2 t vanilla
1/4 c milk
2 large egg whites

Preheat oven to 350 F. Prepare 6 - 8 muffin tins.
In a small bowl mix together the flour, baking powder & salt. In a large bowl cream together butter & vanilla sugar until light & fluffy. Scrape the seeds from the vanilla bean & add to butter mixture. Add vanilla & beat. On low speed add half the flour mixture until just blended. Add milk until blended. Add remaining flour & mix until just blended.
In another bowl beat the egg whites until stiff, glossy peak appear, about 2 minutes. Gently fold 1/3 of the egg into the batter until combined. Add remaining egg & fold until combined.
Divided equally among the muffin tins. Bake for 20 minutes or until a toothpick inserted into the center comes out clean.
Allow to cool before frosting.

Makes 6 - 8 cupcakes

Chocolate Ganache
(from Joy of Cooking)

1/4 c cream
2 1/3 oz semisweet chocolate chips
1 t flavoring of choice (I flavored mine with coffee)

Bring cream to boil. Remove from heat & add chocolate. Whisk until the chocolate has melted. Add flavoring & whisk until smooth. Allow to cool to spreadable consistency.
Can be stored in the fridge for 1 week. Reheat to reuse.

Frost cupcakes & sprinkle with salted peanuts.
Cupcake photoshoot gone awry

Tuesday, June 10, 2008

Grilled Shrimp with Honey, Lime & Mint Glaze

This tasty meal not only comes together quickly but we used the same recipe as a glaze on the shrimp & as a dressing for a fruit salad. I also liked it mixed into jasmine rice on the side. It has a sweet & tangy summery flavor, that one could almost call tropical. For two people this glaze recipe made enough to cook the shrimp, dress the fruit salad & have a little more left to serve on top.
Grilled Shrimp in a Honey, Lime & Mint Glaze

Honey, Lime & Mint Glaze
(from Mastering the Grill)

6 T honey
juice & zest of 1 lime
1 T chopped mint
1/4 t kosher salt

Mix all ingredients together.

Grilled Shrimp

8 to 10 large shrimp, peeled & deveined
Glaze from above
skewers or a grilling basket or screen
Shrimp on the grill
Coat the shrimp with the Honey Glaze. Grill on skewers or an oil grilling basket or screen on direct medium-high heat. Shrimp should take about 2 - 3 minutes per side depending on size. Do not overcook. Serve with a little extra glaze drizzled over the top.
Serves 2

Use any extra glaze as a dressing on the fruit of your choice.
Fruit Salad
We used strawberries, peaches & horned melon.
Related Posts with Thumbnails

Get Email Updates!

Enter your email address:

Delivered by FeedBurner

Measurement Abbreviations

T = Tablespoon
t = teaspoon
c = cup
lb = pound
oz - ounce

Labels

Blog Archive

Contributors

Blog Directory for Minneapolis, Minnesota